Showing posts with label Table Top Battles 2nd Edition. Show all posts

Saturday, 2 August 2025

The Battle of Cerignola. South-Eastern Italy : 26th April 1503.

 This article is my personal interpretation of information concerning events at that time. Any mistakes are my own.

Eight years after the battle of Fornovo the French and Spanish Monarchies were once again at each others throats as to who had control of what in Southern Italy.

Prior to the French King Charles leaving Italy he had installed Garrisons in towns within Apulia and Calabria. The King had also granted land to his Men-at-arms for services rendered. Spanish control of various towns was also agreed upon. 

However, the tentative Peace didn’t last long.There was a new young King on the throne of France  ( Louis the 12th ) itching to test his military muscle.

Milan was the French capital of northern Italy and it was from there that the French army marched south to retake Naples. Louis was intent on making Italy a French Dominion. Eventually the Army arrived at Capua just north of Naples, which refused to surrender. After the French artillery battered the walls, the town was stormed, vandalized and totally looted with the citizens raped and murdered.


The French General de’Aubigney received an envoy from Naples and warned him of worse to come if they did not surrender. King Federigo of Naples ( who was at the town of Ischia) gave himself up to the French. When Naples opened its gates, he was taken to France where he lived out a comfortable confinement until his death.

Italian Politics ( dominated by Cesare Borgia ) and Family Feuds had also bought the Spanish Kingdom of Aragon into the Italian arena. Somewhat irritated by French presumption, Frederick the 2nd, the Spanish Aragonese Monarch  decided to intervene militarily.

In 1501, a Spanish Army was shipped from Sicily to Reggio in the toe of Italy under the Spanish General Fernandez de Cordoba. His force consisted of 190 Men-at-Arms, 300 Light Horse ( Jinetes) and 4000 Infantry. This was followed by more reinforcements. The intention was to force the French from Southern Italy once and for all and cement their grip on the region.


The first objective was Tarentum. It was here that the eldest son of the King of Naples resided. When Tarentum wouldn’t surrender, the city was stormed and looted. The Neapolitan Prince Frederick was taken back to Aragon in Spain where, like his father in France he lived in comfortable confinement until his death.

Having made Tarantum a Spanish holding, Cordoba then made his base at the coastal town of Barletta. This made it easier for his army to be supplied by the Venician Navy ( Venice was supposed to be a neutral observer in all this but they didn’t like the idea of French Power on their doorstep! Or of French Pirates using the City as a base after raiding Spanish supply fleets! )


This situation in turn annoyed The French Monarch so Louis gave instructions to his new Viceroy in Naples, the young Duke of Nemours to destroy the Spanish force. 

In the first clash of arms outside Barletta , the Spanish light Cavalry lured the headstrong French Men-at-Arms into an ambush of Spanish Arquebusiers by feigning retreat. Giving the French force a beating, the Spanish then retired back into Barletta.

Having seen how the French reacted, and not having enough Heavy Cavalry to face the French Men-at-Arms, Cordoba trained his army in new tactics. Infantry firepower was centre stage combined with fieldworks, and the new artillery pieces being produced. These new formations were called a “ Coronelia”.  Blocks of Pikemen working in conjunction with groups of Arquebusiers armed with the new matchlock muskets.


The Arquebus was heavy, needing a rest to hold the barrel while it was fired. Although inaccurate and of limited range the lead ball could inflict terrible damage on an opponent, especially when fired in controlled volleys.

Note: The Arquebus was used by other armies but this was the first time it was used in large organised volleys with rotating lines of Infantry.

Having been trained in the new formations Cordoba marched his army from Barletta, westward to the small town of Cerignola which was situated on a hill. The town was surrounded by a ditch, which Cordoba had his men deepen in the area of the expected attack. 

The earth was used to make a parapet. Vine stakes were placed all along the front and the army was positioned behind it. The Light Cavalry  Jinetes. ( Pro: xi- neats) were sent out on raids in order to goad the French into attacking. On the afternoon of the 26th of April, their forays yielded results……….

THE SPANISH ARMY: 6,500 = 6.5pts x 10 = 65 points.

Mounted Men-At-Arms: 700 = 0.700 x 10 = 7pts = 2 stands @ 3pts + Prospero Colonna- 1 General @ 1point.

“Jinetes” Light Cavalry: 800 = 0.800pts x 10 = 8pts = 4 stands @ 2 points.

Arquebusier ( musket armed) Infantry: 2,000 = 2pts x 10 =  20pts = 10 stands of Muskets @ 2pts.

Landsknecht Infantry Pikemen: 1,000 = 1pt x 10 = 10pts = 3 stands @ 3pts = 9pts + Fabricio Zamudio @ 1pt.

600 Spanish Pikemen = 0.600 pts x 10 = 6pts = 2 stands @ 3pts = 6pts

400 Infantry Swordsmen ( Spanish: Roderleros): 0.400 x 10 = 4pts = 2 stands @  2 points.

18 cannon x 50 crew = 900 gunners = 0.900pts x 10 = 9pts = 8 guns @ 1pt + 1 General @ 1pt Pedro Navarro.


THE FRENCH ARMY: 8,750: 8.750pts x 10 = 88points r/u.

650 Men-At-Arms = 0.650pts x 10 = 7pts r/u = 2 stands of Heavy Cavalry @ 3pts + Louis d’Armagnac, Duke of Nemours  @ 1pt.

1,100 Light Stradiot Cavalry = 1.1pts x 10 = 11pts = 5 stands of Cavalry @ 2pts + Yves d,Alegro @ 1pt.

3.500 Swiss Pikemen = 3.5pts x 10 = 35 pts =

9 stands of Pikemen @ 3pts = 27pts.

2 stands of Arquebusier Infantry @ 2pts = 4pts.

2 stands of Crossbow Infantry @ 2pts = 4pts.

+ 1 General Tabien de Chandieu @ 1pt.

3,200 French Infantry = 3.2 x 10 = 32pts =

8 stands of Pikemen @ 3pts = 24pts

4 stands of Infantry Crossbows @ 2pts = 8pts.

1 General, Gaspard de Coligny @ 1pt.

2 Guns x 50 crew = 100 gunners = 0.100pts x 10 = 1 stand of Light Artillery @ 1pt.

Note: No one is sure as to whether the French had any artillery present on the battlefield or not. I have allowed one cannon which is at the back of the French Infantry.

THE HISTORY:

This battle is recognised as a turning point in the development and use of firearms, and a major stepping stone in the erosion of Cavalry supremacy. Despite that, not much actual detail is known about the events of that day. Even the exact location of the site is unknown.

Apparently Cerignola is situated on an eminence west of the city of Barletta in the “heel” of Italy. The town was surrounded by a dry ditch. The whole town is surrounded by rolling countryside which to the north, opens out onto a plain which contains a Saltmarsh. ( These days sea salt is mined on an organised industrial scale). 

To the South and West it seems to be enclosed countryside which was prone to flooding in the wet season. I’ve included a ridge facing west. I’m assuming ( wrongly maybe ) that the rolling ground and bushes etc restricted the field of vision.

The French were moving in the standard formation of Advance Guard, Main Battle and Rearguard. When arraigned for battle the Heavy Cavalry Gendarmes ( Men-at Arms, the Nobility) of the Advance Guard would be in the position of Honour on the right.

When the French Army arrived there was some debate amongst the Senior Generals as to how best to attack. It was late afternoon and the weather was hot and dry. Some, including Nemours wanted to wait until the following day. 

However Seigneur de Chandieu, the Commander of the Swiss Infantry threatened to withdraw his men. Gradually, the discussion between the French Commanders became more and more heated ultimately exploding in accusations of Cowardice leveled at Nemours himself!!.

That settled the issue. Nemours in a state of anger and hubris mounted his Warhorse and made ready. When all was set the Duke signaled the advance. The Heavy Cavalry cantered forward, self assured that this time, they would sweep any Spanish away. 

 I have participated in a cavalry charge of sorts. A dozen horses in a line at full gallop. Even the horses get caught up in the excitement.

So, it seems the French Cavalry, both men and horses heavily armoured, kept rolling forward until they were bought to a juddering halt. In the first instance, by the trench in front of the Spanish position. Secondly, and for the first time, a massive cloud of lead shot punching holes in armour and bringing the glorious charge to bloody ruin. Instead of retreating, the French cavalry milled around trying to work their way to the right but the arquebus volleys kept bringing them down.

Nemours himself was killed when a musket ball hit him in the head. With the Commander dead and the failure of the Heavy Cavalry, the attack continued with the advance of first,  the Swiss of the Main Battle, then the French Infantry of the Rearguard.


Therefore there must have been topographical restrictions not only in front of the Spanish position but also at both ends forcing this frontal attack. Also, if the Cavalry had seen the trench they may have been able to halt the charge. 

The fact that they didn’t suggests to me that they were at “full throttle” before the trench was spotted. You need a lot of “ stopping distance” to slow a horse with an Adrenalin rush!!. Added to that is the “ letterbox effect” of the closed helmet visor reducing the field of vision ( and anger clouding judgement)

In my version I’ve included part of the saltmarsh at the northern end and difficult hill country to the south. Accounts that I have read seem to vary on how the battle progressed so I’ve used my own judgment on certain parts.

THE BATTLE.

Some special rules for refighting the battle;

* The French move first on the first Game-Turn.

* The Spanish retain the Initiative Point for the entire battle.

* French stands cannot be fired upon until they are in the forward squares of the ridge.

* The Duke of Nemours must be in an adjacent square to a French Heavy Cavalry stand at all times. If a French Heavy Cavalry is removed, the Duke of Nemours is also removed.

* Any stand positioned in the Trench while engaged in Close Combat will have 2 points deducted from its Close Combat die.

* Spanish stands win any ties.

* Spanish musketeers get one extra point on their Firing die roll.

* the battle is played for 8 Game-Turns.

VICTORY CONDITIONS;

By any stretch this is a tough call for the French Army and they can expect heavy casualties. Therefore, if the French can cause the loss of 10 stands from the Spanish army by the end of eight Game-Turns, the battle is classed as a draw.

CREDITS.

The figure illustrations were downloaded from Pete's Paperboys website [ The Renaissance range ]. i then had them printed out in A5.

I've enhanced the Heavy Cavalry blocks by putting the cocktail sticks into the block.

The 3ft [ 90cm ] x 2ft [60cm ] cloth is felt. The hills are made from the foamboard. The village is foamboard covered with illustrations printed from Pete's English Civil War book.


Friday, 8 March 2024

Battle of New Bern: North Carolina 14th March 1862

 This article is my personal interpretation of the battle. Any mistakes are my own.

By now the War was being waged in deadly earnest.. The Confederacy needed much of its supplies and weapons bought from countries abroad. The main currency used for purchase was cotton which had to be shipped out. In addition, the Confederate Government were sending out Commerce Raiders to attack any Union Merchant ships. 

 Lacking the large industrial capacity of the Union, this was the only way that the Confederate States could supplement the material needed to maintain their forces.

Previously, as the Civil War commenced, a Union General by the name of Winfield Scott came up with the  “ Anaconda Plan”. This was a strategic plan which involved expanding the Navy to blockade Confederate ports and, with the help of the army to attack enemy ports and river defences.

Along with the coastal attacks the plan also involved wresting control of the Mississippi River in order to cut the Confederacy in half. Five days before this battle, the Naval history of the world had been transformed when the first two opposing Ironclads had slugged it out in Hampton Roads making the wooden warship obsolete.

As part of the Anaconda plan and influenced by the historic naval battle that had taken place, the Union Government embarked on a major expansion of the Navy. This involved building armoured ships and “90 day gunboats”, so called because they were built that quickly.

In the meantime, the Union Navy was using any paddle steamers and screw powered vessels that could float in order to enforce the blockade and attack Confederate bases. New Bern on the Neuse river had lost its prestige as a major port. However it was still important in the protection of the railroad.


The line that ran through New Bern, went onto Goldsboro where it connected to the Wilmington Railroad, a major supply line to the  Confederate Army of Northern Virginia. 

 The Union General Ambrose Burnside commanded a Division of troops. With the help of The Atlantic Blockading Squadron, his troops had already taken Confederate forts on Hatteras and Roanoke Islands. These advances gave the Union Flotilla access to Pamlico Sound and Burnside was determined to take New Bern. The first step was to land troops just north of Slocums Creek.

Lawrence Branch, the Confederate General commanding at New Bern knew he had a tough job on his hands. His best troops had been pulled from the line to reinforce the Army of Northern Virginia. 

The remaining troops were not as well trained. Having pulled the remaining troops from a defence line closer to Slocums Creek, the line anchored on Fort Thompson was reinforced. It was here that the Confederates awaited the Union attack,.which soon materialised…


DEPARTMENT OF NORTH CAROLINA COASTAL DIVISION OF THE U.S. ARMY.

11,000 = 11points x 4 = 44 points.

C-in-C Ambrose Burnside  @ 1 point.

1st BRIGADE. 

General Foster @ 1 point.

10th Connecticut: 1 stand @ 3 points.

23rd Massachusetts:  1 stand  @ 3 points.

24th Massachusetts:  1 stand  @ 3 points.

25th Massachusetts: 1 stand  @ 3 points.

27th Massachusetts: 1 stand  @ 3 points.

2nd BRIGADE.

General Reno  @  1 point.

51st New York:  1 stand  @  3 points.

9th New Jersey: 1 stand  @  2 points.

51st Pennsylvania:  1 stand  @ 3 points.

21st Massachusetts:  1 stand @ 3 points.

3rd BRIGADE.

General Parke  @ 1 point.

8th Connecticut: 1 stand @ 3 points

11th Connecticut: 1 stand @ 3 points.

4th Rhode Island: 1 stand  @ 3 points.

5th Rhode Island:  1 stand  @ 3 points.

1st New York Marine Artillery Detachment:

2 stands of Light Foot Artillery @ 1pt = 2 points.


THE NAVAL FLOTILLA:

14 Gunboats each with 50 crewmen = 700 men = 0.700 pts x 4 = 2.8 or 3 points r/u.

3 Gunboat models, each @ 1 point = 3 points.

THE CONFEDERATE ARMY: 6,000 = 6pts x 4 = 24 points.

C-in-C: Lawrence Branch  @ 1 point.

26th North Carolina Infantry = 2 stands @ 1 point = 2 points.

33rd North Carolina Infantry = 2 stands @ 1 point = 2 points.

35th North Carolina Infantry = 1 stand @ 2 points.

7th North Carolina Infantry = 1 stand @ 2 points.

The Special Battalion ( a group of infantry scrapped together from other formations armed with shotguns and fowling pieces.) 1 stand @ 1 point.

27th North Carolina = 1 stand @ 2 points.

2nd North Carolina Cavalry = 2 stands @ 1 point = 2 points.

ARTILLERY;

6 Field Batteries = 24 Guns x 50 gunners = 1,200 gunners:

1.200 x 4 = 4.8 or 5pts r/u = 5 stands of Light Artillery @ 1pt = 5 points.

24 Static Artillery Pieces ( mostly at Fort Thompson.) and Fort Ellis.

24 x 50 gunners = 1,200 gunners.x 4 = 4.8 or 5pts r/u = 2 stands of Heavy Artillery @ 2pts ( Fort Thompson) and 1 stand @1 point at Fort Ellis.

Note: Due to a shortage of labour some of the battery positions never got completed, therefore I’ve only included Fort Ellis. Fort Thompson was fully established.


FIGHTING THE BATTLE.

This is a tough fight for the Confederates. Unless the Union player is very unlucky, it would be hard to loose. Therefore, the Confederate player can draw the battle.

* Game-Turns and dicing for the the Initiative Point are carried out as stated in the normal rules.

* The Confederate Player can move the guns normally in the defense works to the right of the line, but the guns within the forts cannot be moved.

* All the field cannon move at 2 squares movement in any direction.

*  All Infantry apart from the Dismounted Cavalry and the Special Battalion are Line Infantry. Therefore they can only be moved through the face of a square not a diagonal. The Light Field Guns, dismounted Cavalrymen and Special Battalion can move in any direction 

* The Cavalry are classed as Light Cavalry. They can move in any direction. Dismounted Cavalry are always 1 point less than their mounted selves. Therefore if the mounted Cavalry are 1 point, the dismounted Cavalry are zero points so just a basic die is rolled for the stand.

* The abatis in front of the Confederate lines is counted as” Trench” during Firing and Close Combat.

* The Union Infantry stands can be moved in The Creek, but only one square per move. They can still fire after moving whilst in The Creek. In the actual battle the Union troops pierced the Confederate lines via this creek.

* I don’t know if the Senior Officers on the Union side had horses but I have portrayed the Generals as such. However, the Generals can only move at two squares. The roads do not give any extra movement. The weather had been bad so the roads had turned to mud.


THE RIVER BATTLE.

The river flotilla was commanded by Stephen C. Rowan ( not represented ). The river had been rigged with obstacles including a line of hulks to force any ships into range of the guns.

* The hulks cannot be moved. The paddle steamers move at 2 squares speed ( measured from the front of the ship.) The ships guns have a range of 4 squares.

* To make things basic, both the forts guns and the paddle steamers can take two hits The ship or a fortress gun will take a hit on any low score. On the second hit the gun or the paddle steamer causes complete destruction.


VICTORY CONDITIONS:

The Confederates must stay in place for four Game-Turns. From the 5th Game-Turn onward the Confederates can retreat. They can only leave the table via the road junction marked ( TO NEW BERN) .

This is the spot where the bridge crosses the Neuse river. If 8 Confederate infantry stands manage to leave the board by Game-Turn 8  AND/ OR BEFORE ONE Gunboat makes it ( completely intact ) to the Confederate baseline the  battle is a draw.

Historical note: The Confederates were putting up a good fight. However when the Union Infantry penetrated the middle part of the line via the creek, some of the Confederate infantry panicked which triggered a general retreat. The cannon in Fort Thompson and Fort Ellis were spiked by the garrison troops before they left but the Union troops still captured a number of field pieces.


CREDITS.

All the figures are a mixture of Miniature Figurines and Peter Pig. The wagon and tent line models are from Peter Pig. The Fortress guns are also Peter Pig.

Fort Thompson was scratchbuilt from foam board and cardboard ( originally for an 18th century scenario). Fort Ellis is represented by a shop-bought enclosure purchased many years ago. The walls and hedgerow are from the Pendraken 10mm range of scenery..

The farm buildings were scratchbuilt from cardboard. The green scenery bases are from S and A Scenics. The hill sections: some were produced by Brian at Essex Miniatures and some were homemade from cork tiles. The railway track and bridge are scratchbuilt from cardboard and cocktail sticks. The trees are from various manufacturers.

The abatis was scratchbuilt from pan scrubbers cardboard and plasticine.

The plastic explosion markers are from Litco. The smoke markers are cotton wool.

The paddle steamers and hulks were made from card and foamboard. The paddle sections were two halves of a fruit juice carton lid. The stern of the boats are a piece of milk bottle top. The guns were made from plastic paint brush tubing and a berry pin. The supports  are made from cardboard stuck to a coin.


The Gunboat crew figures are from the Peter Pig Colonial range which also includes a ships wheel. The Naval Gun Crew figures are from the Peter Pig ACW range. All the flags are from the Peter Pig range.

The roads and rivers are cut from thin cardboard. The round MDF bases are from Minibits. The square stands are cut from picture-framing cardboard. The battle was fought on a 3 foot (90cm) x 2 foot (60cm) board marked out in 2 inch squares.


Saturday, 6 January 2024

Battle of Fornovo: Italy 6th July 1495.

 This article is my personal interpretation of this battle. Any mistakes are my own.

In 1494 a French King led his army into Italy. In every way the force he led was his Army. The days of individual Nobles leading their own Retinues of men tied to them by obligatory service were over. This Army consisted of men paid for by the State.

Amongst the troops of this army were also paid mercenaries. The feared Swiss Pikemen owed no loyalty to any state. “ no pay, no Swiss” was their motto. Prior to this invasion, Italy was a cloistered military environment. Each City-State fought their wars against each other using payed troops from their own neighbourhood, along with any mercenaries looking for work.


Each City Council would raise a “Condotta” or contract with an experienced General to raise troops with structured wages. A period or length of employment was set, usually until a campaign was concluded. Battles between States were not fought until the annihilation of one side. Not only would this lead to unemployment for the soldiers ( the Condottierii ), the generals themselves would be out of a job!!.

Therefore each Italian City-State practised limited warfare. Louis the 8th,s invasion changed all that. This invasion ushered in the era of total war, the destroying of an enemy. Louis also bought with him a new weapon. Mobile artillery firing metal projectiles.

As the French army moved down the west coast of the Italian peninsula, walled towns previously thought impregnable, were stormed and taken with the aid of this new weapon. The inhabitants and garrison were killed. Louis,s target was Naples. The previous incumbent on the throne had died and Louis decided to invoke a vague family connection to justify his actions. After six months of enjoying the environs of the City, common sense started to kick in.


Sage heads amongst Louis’advisors had been trying to warn the King for months about the tenuous position he was in. A long supply line through enemy territory, no capable support from the sea along with rumours of previously unheard cooperation between the Italian City States.( this Association became known as The League of Venice).

The Spanish Monarchy were also angered by Louis’ presumption. The Aragonese Royal Family had held sway over Southern Italy and regarded the Province as one of their own!

Finally, in early June Louis and his army started moving north.As the army passed over mountainous terrain dragging the guns and wagons of loot, Louis was expecting an attack which didn’t  materialise. After twenty-five days, the French army encamps in and around the village of Fornovo.


While there, Louis hears about an approaching Italian army. The  City-States of Milan and Venice have finally sunk their differences. After days of negotiation, enough agreement has been reached to put together a force large enough to face the invaders. As the French army leaves Fornovo and crosses the Taro heading north, the troops of the Italian army leave their camp and form up on the eastern bank of the river facing west. There are also squadrons of enemy cavalry ahead on the road across the line of march.


Having prepared for any enemy intervention, Louis gives the order and the French army halts and faces east…….

THE FRENCH ARMY: 10,000 = 10pts  x 4 = 40 pts.

ADVANCE GUARD : 4,200 = 4.2 pts x 4 = 16.8 pts or 17pts r/u.

1 General ( Giangiacomo Trivulzio )    @ 1 point.

500 Men-At-Arms = 1 stand   @ 2pts.

200 Mounted Royal Guard Crossbows = 1 stand  @ 1pt.

300 Infantry Crossbows = 1 stand   @ 1pt.

3,000 Swiss Pikemen = 4 stands @ 3 pts = 12 pts.

( 200 men represented by Trivulzio ).

MAIN BATTLE: 3,250 = 3.250 pts x 4 = 13 pts.

1 General; King Charles 8th of France  @ 1pt.

1 General; Englebert of Cleves  @ 1 pt.

300 Royal Foot Archers = 1 stand  @ 1 pt.

2,000 Infantry Crossbows = 8 stands @ 1pt = 8pts.

500 Men-At-Arms = 1 stand  @ 2pts.

( 450 men represented by Charles and Englebert ).

REARGUARD: 2,500 = 2,500pts x 4 = 10pms.

1 General: Jean De Foix  @ 1pt.

1,800 Crossbow Infantry = 7 stands @ 1pt = 7pts.

500 Men-At-Arms = 1 stand  @ 2pts.

( 200 men represented by Jean De Foix ).

THE CANNON:

30 Guns each with 50 men = 1,500 gunners = 1.500 pts x 4 = 6pts.

2 stands of Heavy Artillery @ 2pts = 4pts.

2 stands of Light Artillery @ 1pt = 2pts.


THE ITALIAN ARMY ( The Holy League ).14,000 = 14pts x 4 = 56 points.

THE EXTREME RIGHT FLANK ( in front of the French Column ).

1,000 = 1pt x 4 = 4pts.

1 General: Piero Duodo  @ 1pt.

600 Light Stradiot Cavalry = 2 stands @ 1pt = 2pts.

500 Mounted Crossbows = 1 stand @ 1pt

( one point is for the General).

THE CAMP: 3,500 = 3.5pts x 4 = 14pts.

1 General; Carlo of Pian Melleto  @ 1pt.

2,500 Spearmen = 5 stands @ 2pts = 10pts.

300 Light Cavalry Crossbowmen = 1 stand @ 1pt.

500 Infantry Crossbowmen = 2 stands @ 1pt = 2pts.

RIGHT WING : 4,000 = 4pts x 4 = 16pts.

1 General: Gianfrancesco Sanseverino Count of Caiazzo  @ 1pt.

500 Mounted Men-At-Arms = 1 stand @ 2pts.

300 Stradiot Light Cavalry = 1 stand @ 1pt.

500 Crossbow Infantry = 2 stands @ 1pt = 2pts.

2,500 Milanese Infantry Spearmen = 5 stands @ 2pts = 10 points.

CENTRE: 4000 = 4pts x 4 = 16pts.

General Roldolfo Gonzaga @ 1pt.

2,500 Infantry Spearmen = 5 stands @ 2pts = 10pts.

500 Crossbow Infantry = 2 stands @ 1point = 2pts.

300 Light Stradiot Cavalry = 1 stand @ 1pt.

500 mounted Man-At-Arms = 1stand @ 2pts.

LEFT WING: 1,500 = 1.5pts x 4 = 6pts.

1 General: Bernardino Fortebraccio  @ 1pt.

500 Men-At-Arms = 1 stand  @ 2pts.

800 Mounted Crossbows = 3 stands @ 1pt = 3pts.

THE CANNON:

10 guns each with 50 gunners = 500 gunners = 0.500 x 4 = 2pts.= 2 stands of Light Artillery @ 1pt = 2pts.


HISTORICAL NOTES:

I have read two or three articles covering this battle. In each case there is a variance in numbers and composition of each army. Therefore, the above numbers are my personal interpretation, as is the formation of each group. The history is also a bit blurred as is the composition of each force.

I’m assuming that the Italian artillery pieces were older guns that fired stone shot. The actual battle lasted about half an hour. It also began raining about halfway through the action which put the guns of both sides out of action.

The Italian Men-At-Arms were  at a disadvantage. The Taro was, normally a shallow creek but recently the rains made the river deeper and faster moving. When the Italian knights charged across the river the horses slipped on the shale.

The French bank of the river was also higher with vegetation which caused further problems. As if that wasn’t enough, the Italian lances were made lighter and shattered on impact. Despite all this the Italians kept attacking..

The Stradiots were light cavalry employed by Venice. The men came from the Balkans and were expert horsemen trained in close-quarter hit and run tactics.

Finally, the mounted crossbows. I must admit that I couldn’t find any information on tactics. My personal thoughts are that;

* They were mounted Infantry.

* The crossbows could only be fired while the horse is stationary or while the rider is dismounted..

* These men were not true cavalry. Therefore they could only attack infantry that were not organized in any formation.

* Usually the Infantry crossbowmen carried a large squarish shield called a Pavise. These could be carried on the back with two shoulder straps. This was to allow the crossbow man to be covered when he turned his back on the enemy to reload the bow.

The loading procedure was to place a foot in the stirrup at the front of the bow. A hook fixed to a waist belt was placed on the bowstring to pull the string back as the man stood upright. More powerful bows needed a cranking mechanism which was also suspended by a waist belt.

I have found no mention of the pavise or wether they were carried. With both sides expecting battle I’m assuming they were. Therefore, all crossbow infantry deduct 1pt from their Firing die when firing at enemy Infantry crossbowmen.

Roldolfo Gonzaga was the norminal Commander of the Italian army. The idea was that he would bring forward reinforcements during the battle. However he was fatally wounded which caused some confusion within the Italian ranks and the Reserve never left the camp.

FIGHTING THE BATTLE:

* This is one mechanism that I use for setting historical precedence. The points total for each army is halved. That number is the morale total of each army. However the numbers are SWOPPED OVER.

Therefore:

The French army has 28 points,  The Italian army 20 points.

As stands are removed from play, the points of the individual stands are removed from the Morale total. The first side to reach zero looses the battle.

* The French army retains the Initiative Point for the entire battle. The French army also wins any ties.

* Any stands entering the River Taro must stop on that Game-Turn.

* Troops fighting while in a river deduct 2pts from their combat die. A further 1pt is deducted from any stand fighting Up the bank toward the French side.

* Cavalry do not get the 3pts extra when attacking infantry in a river.

* The Mounted Crossbows are not true Cavalry. These stands do not get the three points for attacking Infantry in the open.

* The Spearmen and Pike must move through the face of a square. Not a diagonal. The same rule applies to the Mounted Knights

* The Spearmen are treated as normal infantry. They are not Pikemen.

* The Infantry Crossbows, Mounted Crossbows and Light Cavalry can move in any direction.

* The Cannon can only fire for the first four Game-Turns, ( due to the rain). The cannon do not move. Apparently, the French left their Cannon behind after the battle.

* The brown hills are mountainous areas. Stands cannot move into this terrain.

* The Italian army moves first on the first Game-Turn. The battle will be played for either 8 Game-Turns or, until one side reaches zero Morale Points within the 8 Game-Turn timeframe.

* THE ITALIAN CAMP:

In the historical battle Mellita’s men never left the camp. The Italian General,  Gonzaga held them in reserve ready to call them forward. Gonzaga was fatally wounded so the order never came.

If the players wish to include the stands in the camp, the Italian Player rolls a 12 sided die at the beginning of each Game-Turn, from Game-Turn 2 onwards. A score of 12 is required for the stands to be moved.

* The winner of the battle will be the side that still has morale points left and/or lost the least number of stands.

CREDITS:

The battle was played out on a 3 foot ( 90cm x 2 foot ( 60cm) cloth with 2 inch ( 50mm squares) drawn on).

The hills were made from foamboard with a cardboard covering in green and brown cardboard. The roads and river are made from thin cardboard..

The figures are from The Wars of the Roses, a book by Peter Dennis. I had the illustrations printed in A5. I then cut them out and used a Pritt stick to glue the illustrations to foamboard.

The foamboard was glued to picture-framing cardboard using PVA glue. I also went on Peter Dennis’s “Paperboys” website and purchased the Renaissance French along with the Imperial Spanish Army.

The cannon were scratchbuilt using plastic tubing, cardboard, cocktail sticks and shirt buttons. 


The wagons were also scratchbuilt in the same manner. The waggons move at the infantry pace of two squares.


Friday, 10 November 2023

Battle of Stratton. Cornwall, England, 16th May 1643.

 This is my interpretation of this battle. Any mistakes are my own.

After the indecisive battle at Edgehill, there were skirmishes up and down the country as both sides vied for control of villages, towns and cities. Very often, one side or the other would retire after a few shots were fired or after one side made a determined charge.

By April of 1643, many areas had had enough of the random violence  and locally agreed ceasefires were in place. There were even groups of “Clubmen”. People so armed who would gang up on any soldiers from either side who entered the area intent on plunder.

Both sides used these moments to recruit more men into their formations. One such Armistice was in force in the Counties of Devon and Cornwall. In early April a Dutch and French ship landed 1500 muskets and munitions for the Royalist troops in the area.

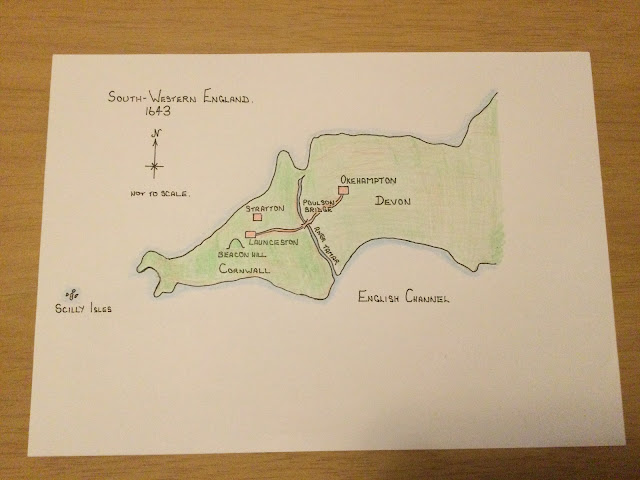
Halfway through April of 1643, this truce came to an end. A Parliamentary force of 1,500 Infantry and 200 Cavalry advanced from Okehampton over the Tamar. This river ran north-south between the two Counties of Devon and Cornwall.


As this force, led by James Chudleigh, advanced over the Poulson bridge heading for Launceston, it was spotted from  Beacon Hill, a local eminence. The action started as a skirmish amongst the hedgerow with the Royalists being pushed back.

However, as more Royalist reinforcements arrived, the attack stalled. The Parliamentary forces were forced to retreat back to Okehampton.

A few days later, the Royalist commander, Sir Ralph Hopton decided to launch a counter offensive. The Royalist army of 3,000 foot, 300 Cavalry and 300 Dragoons moved East over the Poulson Bridge toward Okehampton.

However, Chudleigh was a skillful Commander and, with just a hundred Troopers pulled off an effective ambush. It was the turn of the Royalists to retreat.

Having been forced back to Launceston Hopton was not happy. He was expecting Prince Maurice, ( Rupert’s brother and nephew of King Charles) to join him in another attack.

Before Hopton could get moving, he found out that Parliamentary General Stamford was already on his way to stop the Royalist muster. Stamford’s force of 5,400 Infantry, 200 Cavalry and 13 guns was mustered from all over Devon.

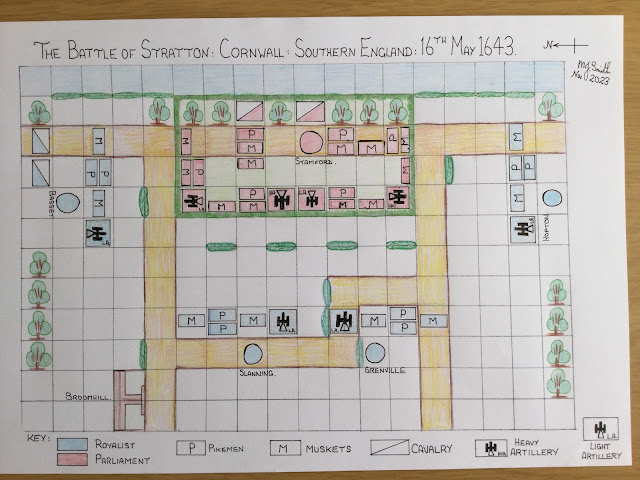
Stamford arrived in the area and deployed his force atop a hill, half a mile from Stratton where another Royalist General, Sir Bevil Grenville had his troops. Hoptons troops were outnumbered two to one, however after speaking with his Generals, Hopton decided to attack. Using their knowledge of the area the Royalists managed to get into position quite early in the day undetected by the Parliamentary troops.


Hopton arranged his troops into four columns and when all was ready, launched the attack……..

PARLIAMENTARY ARMY.

5,400 Foot = 5.4 pts x 8 = 43points;

6 stands of Pike @ 3 points =18 points.

12 stands of Muskets @ 2 pts = 24 pts.

1 General  ( Stamford )  @ 1 point.

200 Horse 0.200 pts x 8 = 1.6 or 2 pts r/u = 2 stands of Cavalry @ 1 point = 2 pts.

13 guns e.w 50 gunners = 650 gunners = 0.650 pts x 8 = 5 pts r/d =

3 stands of Light Artillery @ 1 pt = 3 points.

1 stand of Heavy Artillery     @  2 points.

ROYALIST ARMY;

2,400 Foot = 2.4 pts = 19 pts.

8 stands of Pikemen @ 1 pt = 8 pts.

8 stands of Muskets  @ 1 pt = 8 pts.

1 General ( Basset )  @  1 pt.

1 General ( Slanning )  @ 1 pt.

1 General  ( Grenville )  @ 1 pt.

500 Horse = 0.500 pts x 8 = 4 pts. =

2 stands of Cavalry  @ 1 pt = 2 pts.

1 General ( Hopton )  @ 2 pts.

8 Guns e.w 60 gunners = 480 = 0.480 pts x 8 =

3.840 or 4 pts r/u = 4 stands of Light Artillery @ 1 pt = 4 pts.


SPECIAL SCENARIO RULES;

* The Royalists take the first Game-Turn.

* The Royalists retain the Initiative Point for the entire battle.

* The Royalsts win any ties.

* The hedgerow only impedes Cavalry and Artillery movement. Deduct one point when firing at a target behind hedgerow.

* Any Parliamentary stands not being able to” move- back” or ending up in the stream, are removed from play. The points of these stands are deducted from the morale total of the army.

* Stands cannot enter a square with a tree on it.

MORALE;

* The morale totals are;

Parliament: 50 points.

Royalists;  27 points.

* The respective totals are halved and then SWOPPED OVER.

Parliament. 14 pts r/u.

Royalists.  25 pts.

* As stands are removed, their individual points are removed from their respective morale totals.

* The game finishes at the end of the 8th Game-Turn OR, when one sides morale total reaches zero.

CREDITS:

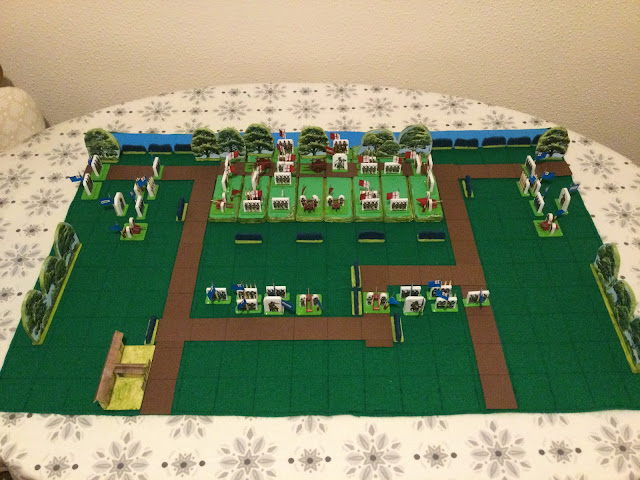
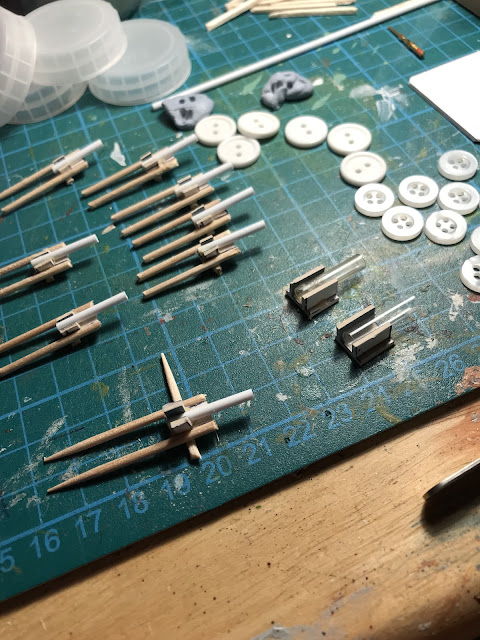
Once again I’ve used the Peter Dennis paper figures ( purchased from Helion ). The guns are scratchbuilt from buttons, cardboard and cocktail sticks. The village was also also made from foamboard and illustrations from the book. These were photocopied in A5 at a local Printers, cut out and stuck on.

The hedgerow was made from pan scrubbers, the roads and river from thin card.

The cloth is 3 feet ( 90 cm ) x 2 feet ( 60cm ) with 2 inch ( 50 mm ) squares drawn on it.


FOOTNOTE:

The details of this battle were obtained from The English Civil War, An Atlas and Concise History of the Wars of The Three Kingdoms 1639-51 by Nick Lipscombe.

Saturday, 2 September 2023

Battle of Soor. North-Eastern Bohemia. September1745.

 This article is my my personal interpretation of the battle. Any mistakes are my own.

After the Battle of Bassignana, the Allied Alliance of Britain ( with Hanover ), Austria, Holland and Piedmont started to fragment.

King Charles Emmanuel, the Piedmontese Monarch, was none to happy with the Austrian General Shulenburg’s indifference to the plight of his Kingdom, particularly now that his Army was stuck in Alessandria and Asti under siege by Spanish and French forces.

Similarly, the Austrian Empress, Maria Theresa was not impressed by Britain’s continued insistence that she should come to terms with Prussia and confirm King Fredericks ownership of Silesia. In turn, Austrian Diplomats had been quietly talking to Ministers from Saxony and Russia.

In September of 1745, Fredericks army was camped in Bohemia. The campaign to take the Province had not been going well. The local population knew that the Austrian Empress would punish anybody helping the enemy. This included loss of personal property, banishment and in extreme cases, execution. Therefore the Prussian forces were continually harassed by groups of Bohemian citizen partizans.

The Prussian Monarch was in no hurry to give up the Province. However his grip was tenuous, made so because he could gather no intelligence from the hostile population.


The Austrian commander, Prince Charles, now reinforced by Saxon troops, was determined to force the Prussians from Bohemia. For his part, Frederick-was well aware of one major trait of the Austrian forces. It’s innate  ability to move very slowly. 

Frederick was more than happy that he could defeat the Austrians whatever they did. This overconfidence very nearly got his army destroyed ( a fact he later admitted to ).

The Prussian army of 23,000 was camped East to West facing South, near the village of Burkersdorf. The Austrian army of 40,000 managed to gain a position on the Graner Koppe, an eminence on the western flank of the Prussian position. During a pre-march Officers conference at about five in the morning, the King was told of the Austrian presence.


Very rapidly, Frederick realised the terrible position his army was in. Not only was there an enemy army on his western flank but Austrian light troops were holding positions on the hills around the northern route, back to Silesia. To cap it all his army was still at ease within the encampment.

Knowing the capabilities of his men and those of the enemy, The King ordered the only action open to him: Rouse the troops an mount an immediate attack!!———————-.


THE PRUSSIAN ARMY: 23,000.

17,000 Infantry, 6000 Cavalry, 40 guns.

2 stands of Grenadier Infantry  @ 3 points = 6 points.

3 stands of Line Infantry  @ 2 points = 6 points.

1 stand of Light Infantry Frei Korp  @ 1point.

2 stands of Light Foot Artillery @ 1 point = 2 points.

2 stands of Cavalry @ 2 points = 4 points.

1 stand of Hussar Cavalry @ 1 point.

King Frederick 2nd  @ 2 points.

General Ryau @ 1 point.

General Duke of Brunswick @ 1 point.

General Buddenbrock @ 1 point.

THE AUSTRIAN ARMY:  40,000. ( 40 points).

28,000 Infantry,  12,000 Cavalry (inc Generals), 90 Guns.

2 stands of Grenadier Infantry @ 2 points = 4points.

8 stands of Austrian Line Infantry @  2 points = 16 points.

2 stands of Saxon Line Infantry @ 2 points = 4 points.

4 stands of Grenzer  Light Infantry @ 1 point = 4 points.

6 stands of Cavalry  @ 1 point = 6 points.

1 stand of Light Cavalry  @ 1 point.

General Lobkowitz  @ 1 point.

General Daun  @ 1 point.

General D’Aremburg  @ 1 point.

General Nadasty @ 1 point.

Prince Charles  @ 1 point.

2 stands of Heavy Artillery @ 2 points = 4 points.

1 stand of Light Artillery @ 1 point.


Fighting the Battle:

By any stretch of reality, this is a difficult battle to recreate. The Prussian army such as it was, pulled off an exceptional feat of arms.

Also, the Austrians seemed to suffer a complete paralysis of command. Having gained an unparalleled advantage over the Prussian army the Austrians then—-froze!.

This description belies the intense and savage fighting that took place when the Prussian infantry were twice repulsed from the Graner Koppe.


SPECIAL RULES:

* The Prussian  Army retains the Initiative Point for the entire battle.

*. The Prussians move first on the first Game-Turn. From Game-Turn 2 onwards, both sides throw a die to see who moves first at the start of the Game-Turn, however the Prussians FIRE FIRST on every Game-Turn.

* The Prussians win all tied results.

* The Prussians do not have two points deducted from their die rolls when involved in close combat while being moved uphill.

* The Austrian Cavalry never moved during the battle until it was time to retreat. However if the Austrian player wishes to use them, there are restrictions:

* The Austrian Cavalry do not get the 3 points for attacking Infantry in the open.

* Because of the lack of unified action, the Austrian Cavalry do not get the “ +1” for Support in close combat.

* The Austrians have 2 points deducted from all their die rolls

GENERAL NADASDY;

Nadasdy’s Brigade were in woods to the east of the Prussian camp. Instead of attacking the rear of the Prussian army, Nadasdy, true to his nature, raided the Prussian camp, where his men set about brutalising and killing the civilians. They then plundered the army pay chests and took the personal belongings of the King including his flute and his pet dog! ( even though this was” the Age of Reason,” warfare was just as brutal as any other era ).


Papers containing important information of military manoeuvres and plans were scattered and left behind. After all that, Nadasdy and his men headed back into the woods,

If the Austrians wish to bring Nadasdy’s group into the game: A 12 sided die must be thrown for the group at the start of every Game-Turn. A score of 12 on the die must be attained before the group can move. If they cannot move, THEY CANNOT FIRE. This includes the two stands of Grenzer  positioned on each side of the Northern exit.

VICTORY:

There are two ways that the game can be concluded. The reason is because of the disparity in troop numbers between both sides and the unusual circumstances of the battle:

1) The Prussians win if they can get three stands on the Graner Koppe in any position at the end of any Game-Turn. Note, each Game-Turn must be played through until it’s conclusion.

2) The points total of each side IS HALVED, is noted,THEN EXCHANGED:

The Austrian army is 12 points. The Prussian army is 20 points. Each time a stand is removed from play, it’s points are deducted from the total. The first side to reach a zero total at the end of a Game-Turn looses the battle. ( a basic Morale rule).

The battle is played nominally for eight Game-Turns or, until either one of  the chosen conclusions above are reached.


Endnote:

This was a difficult battle to plan. Not many gamers would like to field an army, and have half of it just sitting there, Therefore I’ve tried for a possible inclusion which would not completely alter the history of the real battle.

As the Austrian army retreated, Frederick ordered a pursuit however his army were having none of it! As far as the men were concerned they had done their duty and performed a miracle on the day. Basically, by their heroic efforts they had pulled the Kings backside out of the fire and they knew it!

CREDITS:

Most of the figures are from Miniature Figurines with some from Peter Pig. The campsites and wagons are Peter Pig.

The flag poles are from Northstar Miniatures Spears. The flags are hand painted on masking tape ( I’ve just found out that Pendraken Miniatures do a nice range of 10mm flags that do not look out of place with 15mm figures.)

The stands are 40mm x 40mm and cut from picture framing cardboard. The round 40mm stands are MDF and obtained from Minibits ( which is part of Pendraken).

The hills are made from cork tiles and some were made by Brian of Essex Miniatures. The trees were from various manufacturers, one being Guagemaster. The houses were scratch built and the road was cut from thin card.

As before, the board is 3 feet ( 90cm ) x 2 feet ( 60cm) with 2 inch ( 50mm ) squares.


Thursday, 3 August 2023

Battle of the Mountains: Esper 2261.

 Log entry of Lieutenant Smith:

The Board of Enquiry took place during the Winter months. Both of the Guardship Captains, in their mitigation, stated that Solar flares and atmospheric conditions had a negative effect on the scanning equipment.

The Staff on duty could not get a proper fix on the object moving erratically and wether it was a meteor.The Duty Officer did not deem the siting serious enough to send an alert message.

After Abukkin, the Aliens disappeared into the mountains. Some weeks later reports came in of sporadic attacks against the mountain communities.

The different social groups of Esperans do not communicate or socialize readily. News travels very slowly. Therefore we have only recently learnt of a crash site in the mountain region to the North.

The Colonel reckons we are low on aviation fuel until the next ship comes from Earth. The fuel for the APC,s is local and synthed from plants. It also takes the pressure off the use of electric motors. It’s going to be a long trip by truck.

We have also been able to recruit some local civilians who know the mountains.

That took some negotiating. The locals agreed to do the job on condition we would supply them with weapons to replace their bows.

God help us if we fall out with the Esperans. They are getting good with replicating some of our kit. The Guardships have now recalibrated the scanners and have broadened the bandwidth.

The question is: If an alien ship has crashed, was it just an isolated situation or was it a Scoutship?

Now we have to to find the ET’s that are here before they cause more damage——————-.


THE EARTHFORCE:           

4 stands of Armoured Cars:  Defence: 4 pts.    Attack:  5 pts. = 9pts x 4 = 36 points.

4 stands of Squad APC Hovercraft ( “blowers”):  Defence: 4pts.  Attack: 5pts. = 9pts x 4 = 36 points.

4 stands of Regular Infantry = 1 x Command stand: Defence:  3pts. Attack:  4pts.  = 7 points.

  1 x Heavy Weapons stand: Defence: 3pts.  Attack:  4pts. = 7 point

2 x Regular Infantry stands:  Defence: 3pts. Attack: 3pts. = 6pts x 2=12pts

4 stands of Half-Track Lorries: Defence: 3pts.  Attack:  3pts ( Light Guns).= 6pts x 4 = 24pts.

( The Half-Track Lorries carry 1 stand of infantry or civilians).

4 stands of  armed Civilians:  Defence: 1pt.  Attack:  2pts.  ( side arms and Rifles) = 3pts x 4 = 12 points.

Points Total= 134 pts.


THE ALIENS:

15 stands of Warrior Infantry:  Defence: 3pts.  Attack:  3pts. = 6pts x 15 = 90pts.

5 stands of Infantry Heavy Weapons: Defence: 3pts.  Attack: 4pts = 7pts x 5 = 35pts.

2 stands of Heavy Tanks:  Defence: 5pts.  Attack: 5pts = 10pts. x 2 = 20pts.

4 Heavy tracked Armoured Personnel Carriers: Defence: 5pts.  Attack: 4pts = 9pts x 4 = 36pts. ( 2 squads)

2 stands of Light Anti-Air Tanks: Defence 4pts.  Attack: 4pts = 8pts x 2= 16pts ( can fire at ground targets.)

1 Command Tank: Defence: 4 points.

2 Command Stands: Defence: 3pts. Attack: 4pts = 7pts x 2 = 14 points.

TOTAL: 215 points..


Gamer Notes:

This is a tough scenario for both sides because of the restrictive terrain, as mountains would be. The stands cannot be moved into or through a hill square where the square is partly containing a terrain piece. Here is an example


Hills can be moved over if they are stepped. Hills cannot be moved over if two levels are  “ stacked”.

Vehicles cannot move over or through a square containing another vehicle friendly or otherwise.

. (See the Additional Instructions blog for extra rules I’ve added since playing this battle)

* The battle is played for 8 Game-Turns OR until one side suffers a collapse in Morale.


Credits:

The Alien figures are from Ground Zero Games Kra’vak range The Regular troops( not shown but riding in the blowers) are Brigade Miniatures as are the civilian Militia. The Blowers are also Brigade Games and together with the Infantry come as a”Mercenary Company”.

The Terran Half Track vehicles are from the Bradley Range of Alternative Armies. The Alien Heavy tanks ( a conversion) and the Heavy APC’s are Knight Orbital vehicles on Etsey.

The Alien static Artillery were scratchbuilt from buttons. cardboard, plastic tubing and paper clips ( oh! and bra fasteners from Tescos!).

The Light Tanks are from Scourge Minatures ,again on Etsey. I converted them to Light Tanks, using bra fasteners, paper clip and plastic tubing from paint brushes.

The Brown shelters were painted containers from my Grandson’s Pokémon figures that were discarded.

The Crashed Ship were made up of odds and ends from the scrap box!. The mountainous scenery, I’ve made from packing pieces. 


Some if the squares hill pieces were made by Brian of Essex Miniature. The rest were made from sections of cork tiling. One large mountain piece was made from a block of styrene.

The blaze markers are from Litko.


The stands are 40mm square picture framing cardboard. The 40mm mdf round stands are from Minibits.

FIRE MARKERS.

This is something I’ve been experimenting with. Most modern weapons use smokeless ammunition. These are made from 40mm x 10mm strips of acetate with markings applied with a permanent marker.


As before, the battle was played out on a 3 foot x 2 foot ( 90cm x 60cm ) board of 2 inch ( 50mm ) squares.

Tuesday, 9 May 2023

The Battle of Hopton Heath, England 19th March 1643.

 This is my personal interpretation of this battle. Any mistakes are my own.

After the battle of Edgehill, King Charles 1st moved his army toward London, intending to take the City. However, Parliament called out the Trained Bands. These regiments consisted of recruits from the City Guilds like Stonemasons, Shoemakers, Silversmiths etc. In all, 24,000 Parliamentarian troops gathered at Turnham Green ready to contest the advance of the King’s Army, 15,000 strong.

At a Council of War. It was decided that, as London was now under the firm control of Parliament, the Royalists had to find a new base. The decision was made to march to Oxford where the King was welcomed by the population.This City was to become the central base of operations for the rest of the War.

For the rest of 1642 and early 1643 both sides started to raid in an attempt to control the area around their main bases. Lichfield in the Midlands of England was one of those places. The town sat on a supply route which the Royalists used to ship ammunition from the north of England to Oxford. Parliamentary forces held the town.

Therefore Prince Rupert of the Rhine, Nephew of King Charles 1st,  was dispatched to retake the Town. While besieging the place, Prince Rupert learned of a Parliamentry force heading south to break the siege. Sir William Brereton, having been ordered by Parliament, made his way south from his base at Nantwich in Cheshire. Brereton decided to move to Hopton Heath where he was joined by Sir John Gell who had arrived earlier.

Rupert decided to maintain the siege and send troops to stall the advancing enemy. Keeping the majority of the infantry in place, a Royalist force mainly of Cavalry and Dragoons supported by artillery under the command of Spencer Compton the Earl of Northampton was sent north-west toward Hopton Heath. An additional force under General Henry Hastings was ordered to support the Earl.

The Parliamentarian forces reached Hopton Heath first. They set up their camp and battle line anchoring their left flank in the grounds of Heathyard House on the higher part of the Heath. A day later, the Royalists arrived from the south east.The army deployed facing north toward the Paliamentry Army.


THE ROYALIST ARMY: 1,200 ( not inc Gunners). = 1.2pts x 20 = 24 points..

Spencer Compton Earl of Northampton  @  1 point.

General Henry Hastings  @  1 point.

100 Infantry = 0.100pts x 20 = 2 points = 2 stands of muskets @ 1 point.

Note: most of the Royalist Infantry had been left in place to continue the siege of Lichfield.

300 mounted Dragoons = 0.300 pts x 20 = 6 points = 3 stands of mounted Dragoons @ 2 points.

( dismounted Dragoons are worth 1 point and can be moved in any direction).

800 Horse = 0.800pts  x 20 = 16 points.= 7 stands of Cavalry @ 2 points = 14 points

( 2 points are allocated for the Generals )

ARTILLERY.

6 guns, each with 30 gunners = 180 gunners. = 0.180pts x 20 = 3.6 or 4 points rounded up.

1 stand of Heavy Artillery @ 2 pts ( Roaring Meg)

2 stands of Light Artillery @ 1 point = 2 points.


THE PARLIAMENTARY ARMY: 1,450 ( not inc gunners). = 1.450 pts x 20 = 29 pts.

Sir William Brereton  @ 1 point.

Sir John Gell  @1 point.

750 Infantry = 0.750 pts x 20 = 15 points = 

2 stands of Pike @ 3 points = 6 points.

4 stands of Muskets @ 2 points = 8 points.

( Sir William Brereton 1pt)

300 Dragoons = 0.300 pts x 20 = 6 points =

3 stands of mounted Dragoons at 2 points.

( dismounted Dragoons are worth 1 point and can move in any direction).

400 Horse = 0.400 pts x 20 = 8 points = 4 stands of Cavalry @ 2 points.

ARTILLERY;

11 guns each with 30 Gunners = 330 men = 0.330 pts x 20 = 6.6 pts or 7pts rounded up.

4 stands of Light Artillery @ 1pt = 4 points.

1 stand of Heavy Artillery @ 2 points.

( 1 General Sir John Gell @ 1 point).


Gaming Notes.

* The Royalist Army moves first on the 1st Game-Turn.

* From Game-Turn 2 until Game-Turn 8, both sides throw dice for priority of movement and firing.

* The Royalists keep the Initiative Point for the entire battle

* The Royalists win any ties.

* The Cavalry do not get the +3 for attacking infantry in the open as Hopton Heath itself is hilly and uneven terrain.

* Dismounted Dragoons can move in any direction.

* Cavalry and  Mounted Dragoons cannot move over or through the Rabbit Warren.

* The Parliamentry Artillery Pieces were captured by the Royalists after changing hands twice. Therefore, if involved in combat, the Parliamentry guns are taken by the Royalist player on ANY low score.

* Roaring Meg; 

This was a rather large piece of ordnance that the Royalists bought onto the field. Apparently when it did hit something it did some damage. Therefore these special rules apply;

1) The Gun cannot move. If the gun requires a “move-back” , deduct 2 points from the die roll when the Gun fires 2nd within the same Game-Turn

2)  The gun has a range of 5 squares and can only fire every 2nd Game-Turn.


HISTORY:

This wasn’t an overly important battle. But was hailed as a victory by the Royalists keen to trumpet a success after Turnham Green.

The Earl of Northampton lost his life in this battle. He was thrown from his horse leading one of the Royalist Cavalry charges. He was offered quarter by the Parliamentarians but refused and was killed.

At this time neither side had a set uniform and it was left to weathy individuals to raise troops. Therefore some regiments might be provided with a coat of a certain colour but many just had their civilian clothes.

Both sides made use of “ field signs” such as a piece of ribbon tied around the hat or the arm. The Royalist Earl of Newcastle had his WhiteCoats, so named because each man was given a coat of  undyed  wool.


To make identification easier in my games, I use Red  for Paliament( which later became the adopted colour for the Army), and Blue for the Royalists.

In regard to armour, well, as the war progressed, the use of body armour decreased. Pikemen were lucky if they acquired a breastplate. Some pikemen shortened their pikes to make them easy to carry. The musket gradually became lighter, doing away with the rest but still relied on the lighted match for firing. Infantry swords were used for cooking, the men relying on using their muskets as clubs even against Cavalry.

Cavalry were lucky if they had a leather jacket. Helmets were a luxury with most relying on a metal scull cap under their hats. Good horses were kept for the Cavalry where possible and Dragoons used ponies or lesser animals

There were no organised artillery Trains. Each side made use of any field pieces they could get from small galloper guns up to the Saker, which was, generally the largest field gun available. Roaring Meg was an exception.

THE GAME;

The playing area is a piece of felt cloth, 3 feet ( 90cm ) by 2 feet ( 60cm ) marked out in 2” ( 50mm ) squares.

The hill sections are 2” ( 50mm ) x 8” ( 200mm ) long, made of two sections of foamboard glued together and topped with green card. I made them so that they would pack easy in the box.

All the figures were from Peter Dennis’s Paperboys English Civil War book printed onto paper in A5 size.

The buildings and trees were made from the same book.