Friday 10 November 2023

Battle of Stratton. Cornwall, England, 16th May 1643.

 This is my interpretation of this battle. Any mistakes are my own.

After the indecisive battle at Edgehill, there were skirmishes up and down the country as both sides vied for control of villages, towns and cities. Very often, one side or the other would retire after a few shots were fired or after one side made a determined charge.

By April of 1643, many areas had had enough of the random violence  and locally agreed ceasefires were in place. There were even groups of “Clubmen”. People so armed who would gang up on any soldiers from either side who entered the area intent on plunder.

Both sides used these moments to recruit more men into their formations. One such Armistice was in force in the Counties of Devon and Cornwall. In early April a Dutch and French ship landed 1500 muskets and munitions for the Royalist troops in the area.

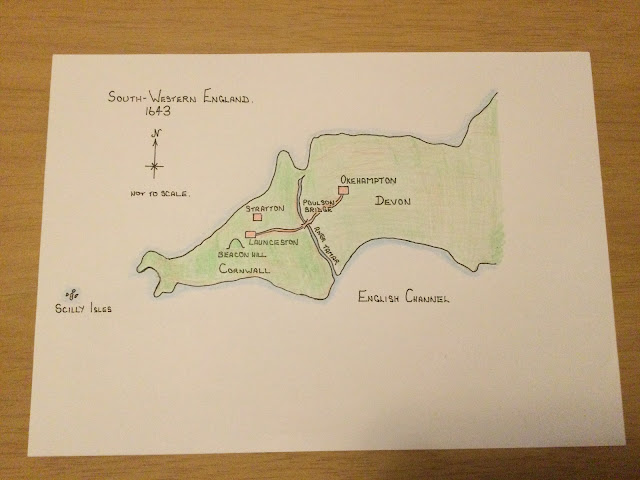
Halfway through April of 1643, this truce came to an end. A Parliamentary force of 1,500 Infantry and 200 Cavalry advanced from Okehampton over the Tamar. This river ran north-south between the two Counties of Devon and Cornwall.


As this force, led by James Chudleigh, advanced over the Poulson bridge heading for Launceston, it was spotted from  Beacon Hill, a local eminence. The action started as a skirmish amongst the hedgerow with the Royalists being pushed back.

However, as more Royalist reinforcements arrived, the attack stalled. The Parliamentary forces were forced to retreat back to Okehampton.

A few days later, the Royalist commander, Sir Ralph Hopton decided to launch a counter offensive. The Royalist army of 3,000 foot, 300 Cavalry and 300 Dragoons moved East over the Poulson Bridge toward Okehampton.

However, Chudleigh was a skillful Commander and, with just a hundred Troopers pulled off an effective ambush. It was the turn of the Royalists to retreat.

Having been forced back to Launceston Hopton was not happy. He was expecting Prince Maurice, ( Rupert’s brother and nephew of King Charles) to join him in another attack.

Before Hopton could get moving, he found out that Parliamentary General Stamford was already on his way to stop the Royalist muster. Stamford’s force of 5,400 Infantry, 200 Cavalry and 13 guns was mustered from all over Devon.

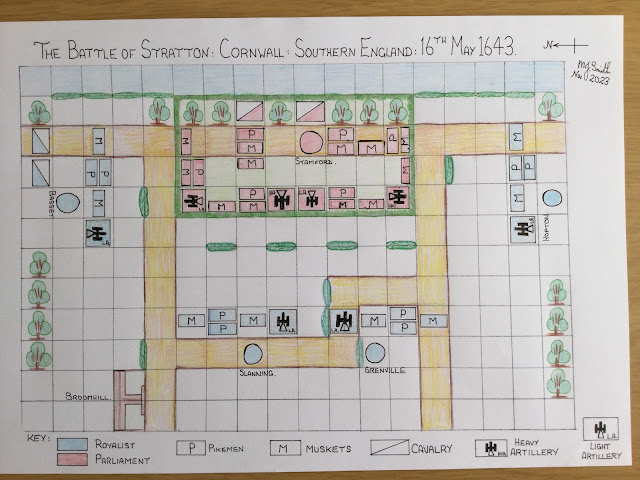
Stamford arrived in the area and deployed his force atop a hill, half a mile from Stratton where another Royalist General, Sir Bevil Grenville had his troops. Hoptons troops were outnumbered two to one, however after speaking with his Generals, Hopton decided to attack. Using their knowledge of the area the Royalists managed to get into position quite early in the day undetected by the Parliamentary troops.


Hopton arranged his troops into four columns and when all was ready, launched the attack……..

PARLIAMENTARY ARMY.

5,400 Foot = 5.4 pts x 8 = 43points;

6 stands of Pike @ 3 points =18 points.

12 stands of Muskets @ 2 pts = 24 pts.

1 General  ( Stamford )  @ 1 point.

200 Horse 0.200 pts x 8 = 1.6 or 2 pts r/u = 2 stands of Cavalry @ 1 point = 2 pts.

13 guns e.w 50 gunners = 650 gunners = 0.650 pts x 8 = 5 pts r/d =

3 stands of Light Artillery @ 1 pt = 3 points.

1 stand of Heavy Artillery     @  2 points.

ROYALIST ARMY;

2,400 Foot = 2.4 pts = 19 pts.

8 stands of Pikemen @ 1 pt = 8 pts.

8 stands of Muskets  @ 1 pt = 8 pts.

1 General ( Basset )  @  1 pt.

1 General ( Slanning )  @ 1 pt.

1 General  ( Grenville )  @ 1 pt.

500 Horse = 0.500 pts x 8 = 4 pts. =

2 stands of Cavalry  @ 1 pt = 2 pts.

1 General ( Hopton )  @ 2 pts.

8 Guns e.w 60 gunners = 480 = 0.480 pts x 8 =

3.840 or 4 pts r/u = 4 stands of Light Artillery @ 1 pt = 4 pts.


SPECIAL SCENARIO RULES;

* The Royalists take the first Game-Turn.

* The Royalists retain the Initiative Point for the entire battle.

* The Royalsts win any ties.

* The hedgerow only impedes Cavalry and Artillery movement. Deduct one point when firing at a target behind hedgerow.

* Any Parliamentary stands not being able to” move- back” or ending up in the stream, are removed from play. The points of these stands are deducted from the morale total of the army.

* Stands cannot enter a square with a tree on it.

MORALE;

* The morale totals are;

Parliament: 50 points.

Royalists;  27 points.

* The respective totals are halved and then SWOPPED OVER.

Parliament. 14 pts r/u.

Royalists.  25 pts.

* As stands are removed, their individual points are removed from their respective morale totals.

* The game finishes at the end of the 8th Game-Turn OR, when one sides morale total reaches zero.

CREDITS:

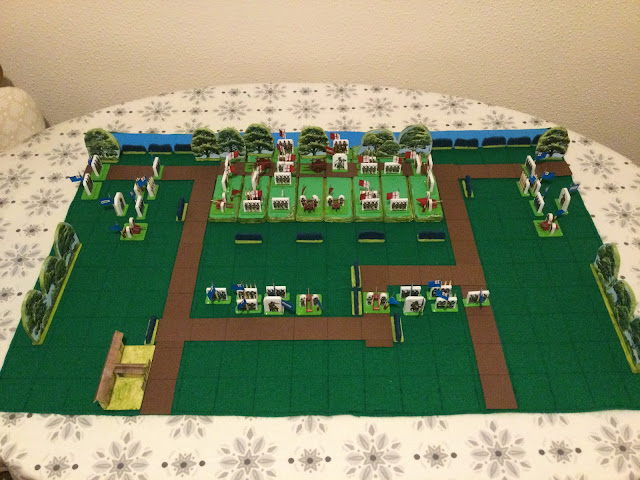
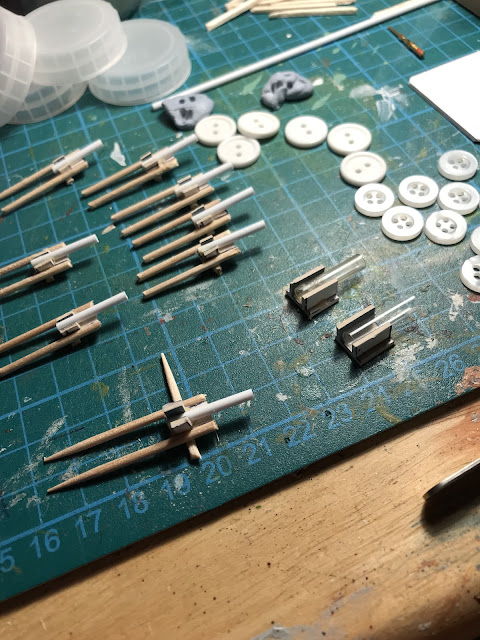
Once again I’ve used the Peter Dennis paper figures ( purchased from Helion ). The guns are scratchbuilt from buttons, cardboard and cocktail sticks. The village was also also made from foamboard and illustrations from the book. These were photocopied in A5 at a local Printers, cut out and stuck on.

The hedgerow was made from pan scrubbers, the roads and river from thin card.

The cloth is 3 feet ( 90 cm ) x 2 feet ( 60cm ) with 2 inch ( 50 mm ) squares drawn on it.


FOOTNOTE:

The details of this battle were obtained from The English Civil War, An Atlas and Concise History of the Wars of The Three Kingdoms 1639-51 by Nick Lipscombe.

Thursday 5 October 2023

The 5th century in Britannia part 10: Arthur’s 8th battle: Guinnion Fort: 489 AD:

 This article is my personal interpretation of events at this time. Any mistakes are my own.

At the Winter Solstice of 488AD, all the Kings are present once again at Caerleon for the Round Table Council:

Tutagaul: The usurped King of Alclud.

Einon: King of Gwynedd ( and Tutagauls host).

Cadell: King of Powys.

Geraint Llyngesic: King of Dumnonia and “ Navarch “ of the British Fleet.

Iddon Ap Ynyr: King of Gwent and close ally of Arthur.

This is a critical meeting. Arthur’s failure to pursue the Scots-Irish and Picts after the battle of the River Croquet is seen as a mistake. As the chorus of disapproval continues, Arthur’s temper starts to rise. At this  point Merlin, sensing the red mist enveloping Arthur, makes his presence felt. Although elderly and frail his mind is sharp and his eyes miss nothing. People fall silent at the sound of his voice;

“ The Saxons, Angles and Jutes ( collectively known to the Britons as Seaxons ) are now established in the East and as far West as Vectis ( the Isle of Wight ). Caw will attack Cambria ( the Roman name for Wales).. None of those present are strong enough to face the Dal and the Picts alone. None are prepared to work in alliance. The Commitatus led by the Pendragon is the only force that can face Caw”. The Dal and the Picts wish to restore their authority here. They will come in force”.


Arthur’s request that his army be expanded to 6000 men is reluctantly agreed to by the Council. King Iddon sends 2250 of his own men to Arthur.

In May of 489AD, Caw is Dunaverty, a Del Riatan settlement. It’s here that he meets Loarn Mac Eric, a High King of the Dal. He has bought 125 ships with 5000 warriors.. In agreement, Caw has also supplied another 5000 warriors with another 125 ships. Caw had nominated Briacat as war leader of his Pict army.

The three leaders are aware that the ships cannot make the trip down the West coast in one journey. Using the knowledge gained from warriors who have sailed the waters, a plan has been formed. 


In early June, the fleet sails from Dunaverty . The first landing is at Insulai Manavia ( the Isle of Man ). The warriors are told not to take slaves, only food and weapons. After the first trip of ninety miles, the next part of 54 miles is from Manavia to the Llyn Penninsular. Once there the fleet lands on the northern shore, just below the abandoned fort of Caer Gybi. Some warriors were once again sent ashore to gather what food they could find. On the next trip the fleet sails the 80 miles  to Aberaeron on the Gwent coastline,

As the warriors come ashore a camp is made. There is no opposition and no guards. On the third day, 8000 warriors start their advance South. The other 2000 are to guard the camp and raid the area.

At this time, Arthur is finally told of the enemy arrival. His suspicions have risen. Why had the Scouts not reported their presence?. On hearing the news Arthur orders the assembly. Light Cavalry were immediately sent out to find the enemy and report back. 1000 troops were assigned to defend Caerleon.

Within a few hours 5000 men of the Commitatus are ready to march. A few more hours and the Scouts come in to the fort. The word is, that the enemy are coming South toward Dolaucothi. Arthur orders the Army to  march to Brecon Gaer, a fort the Romans called Cicucium. This is where he will face the enemy. The fight for Cambria had begun.——————.


THE BRITON COMMITATUS: 5000 = 5pts x 8 = 40 points.

1 stand of Arthur’s Bucellari           @ 3 points.

4 stands of Veteran Infantry   @ 3pts = 12 points.

4 stands of Auxilliary Infantry  @ 2pts =  8 points.

4 stands of Light Archer Infantry  @ 1pt = 4 points.

3 stands of Auxilliary Cavalry  @ 2pts = 6 points.

Arthur  @ 3 points

Cadwy @ 2 points.

Owain  @ 2 points.

IDDON,S  MILITIA:  2250 = 2.250pts x8  = 18pts.

Rogatainus        @ 2pts.

4 stands of Archers  @ 1 pt = 4 pts.

6 stands of warriors @ 2pts = 12 pts.


THE SCOTS-IRISH ( DAL-RIATA ): 4000 = 4 pts x 8 = 32 points.

Learn Mac Eric    @ 2pts

4 stands of Archers/Slingers  @ 1pt = 4 pts.

12 stands of Warrior Infantry  @ 2 pts = 24 pts.

1 stand of Warriors on captured ponies.  @ 2 pts.

THE PICTS: 4000 = 4 pts x 8 = 32 pts ( inc 1000 Saxons ).

Briacat  @ 2 pts.

9 stands of Pict Warriors @ 2pts = 18 pts.

4 stands of Saxon Infantry  @ 2pts = 8pts.

4 stands of Light Archers @ 1 pt = 4 pts.


HISTORICAL NOTES:

Nennius wrote that Arthur’s 8th battle took place at Guinnion Fort. At first, I thought it might refer to Gobannium ( Abergavenny ). However archaeologists say that this was a wooden fort that fell apart after the Romans left the area sometime in the 3rd Century AD.

Brecon Gaer ( Roman Cicucium ) was the main fort in the area. It was a substantial structure and was inhabited well into the 5th century. At the height of the Roman occupation, this fort was one of the strongest Auxiliary forts in Wales, the stone wall dressed in white plaster ( the White Fort ? ). Arthur made a stand here but must have suffered a reversal because the next battle is at Caerleon, Arthur’s headquarters.

I have stated that the Scots-Irish, ( the Dal Riata ), and Picts were Arthur’s adversaries in this battle. Caw was an historical figure. He became war leader of the Picts and he did usurp Tutagaul and take Alclud ( Dumbarton Castle).

The Seaxons had suffered defeats from both Arthur and his late Uncle Ambrosius. Therefore they were in no state to mount another major attack. There was a continuous stream of Jutes, Angles and Saxons heading for Eastern Britain. The Briton “navy” such as it was spent most of its time guarding the Western coastline.  The ships could cope with one or two raiders but not with a whole fleet.

The Seaxons were preoccupied with settlement rather than attacking Cambria..Even then Arthur could not ignore that threat to concentrate on the situation in the North.

Arthur’s lack of striking power would have been noted by his enemies. The Picts and Scots could not advance on land as they would run the risk of being cut off from their homeland and starving to death.


Better to attack by sea, where they had a superior numbers and could strike where they wanted. I haven’t ruled out treachery either, with some of the Kings and Nobility jealous of Arthur’s success. What would be the future for their personal power and prestige ?. All this, and Medreut in the shadows————-.


GAME NOTES.

Those historians that have studied Arthur’s battles are split on wether this battle was on Hadrians Wall or within Wales. As far as I understand the situation, Hadrians Wall had, by this time, ceased to be of any military value. The forts along the wall had either fallen into disrepair or were occupied by small groups of locals.

I have gone with the latter conclusion, with Arthur’s headquarters being at Caerleon. King Iddon,s personal fortress being Carwent. Arthur must have lost this battle because Nennius puts Arthur’s next battle actually at Caerleon, therefore;

* The Scots-Irish and Picts retain the Initiative Point for the entire battle.

* The battle is played for 8 Game-Turns.

* The Scots and the Picts move first on the first Game-Turn.

* From Game Turns 2 to 8, both sides roll their die to determine who moves and fires first, who determines combat and wins any ties.

* I have represented the fort with a normal wall, my thinking being that although strong some decay would have set in. The wall itself counts as “ trench” for firing and close combat. The huts within the fort block movement and line-of-site..There may well have been the remains of a double ditch around the wall impeding movement.

* The winner, after 8 Game-Turns is the side that has lost the least number of stands.


CREDITS:

The Saxons, Scots-Irish and the majority of the Britons are Hat Industries figures. The Picts are from Redbox. Arthur, his Bucellari and his Veteran infantry and archers are from Newline Designs 20mm figures. The Boats are scratch built and the crew are Emhar Viking Ships crew.

The Picts and Scots standards were hand painted. Arthur’s standard and shield decals were from Little Big Man Studios.

The base cloth was from Deep Cut Studios. Some of the scenery tiles were made by Brian of Essex Miniatures supplemented by homemade ones consisting of two layers of cork tile. The trees were from various manufacturers one being Guagemaster.

The roads and rivers were of thin card. The stands were cut from picture framing card 40 x 40 mm square. The command stands are 40mm mdf and supplied by Minibits. The large mountains are made from blocks of roughed up packaging.

The buildings are from Peter Pig. The stone wall is from Alternative Armies.


Saturday 2 September 2023

Battle of Soor. North-Eastern Bohemia. September1745.

 This article is my my personal interpretation of the battle. Any mistakes are my own.

After the Battle of Bassignana, the Allied Alliance of Britain ( with Hanover ), Austria, Holland and Piedmont started to fragment.

King Charles Emmanuel, the Piedmontese Monarch, was none to happy with the Austrian General Shulenburg’s indifference to the plight of his Kingdom, particularly now that his Army was stuck in Alessandria and Asti under siege by Spanish and French forces.

Similarly, the Austrian Empress, Maria Theresa was not impressed by Britain’s continued insistence that she should come to terms with Prussia and confirm King Fredericks ownership of Silesia. In turn, Austrian Diplomats had been quietly talking to Ministers from Saxony and Russia.

In September of 1745, Fredericks army was camped in Bohemia. The campaign to take the Province had not been going well. The local population knew that the Austrian Empress would punish anybody helping the enemy. This included loss of personal property, banishment and in extreme cases, execution. Therefore the Prussian forces were continually harassed by groups of Bohemian citizen partizans.

The Prussian Monarch was in no hurry to give up the Province. However his grip was tenuous, made so because he could gather no intelligence from the hostile population.


The Austrian commander, Prince Charles, now reinforced by Saxon troops, was determined to force the Prussians from Bohemia. For his part, Frederick-was well aware of one major trait of the Austrian forces. It’s innate  ability to move very slowly. 

Frederick was more than happy that he could defeat the Austrians whatever they did. This overconfidence very nearly got his army destroyed ( a fact he later admitted to ).

The Prussian army of 23,000 was camped East to West facing South, near the village of Burkersdorf. The Austrian army of 40,000 managed to gain a position on the Graner Koppe, an eminence on the western flank of the Prussian position. During a pre-march Officers conference at about five in the morning, the King was told of the Austrian presence.


Very rapidly, Frederick realised the terrible position his army was in. Not only was there an enemy army on his western flank but Austrian light troops were holding positions on the hills around the northern route, back to Silesia. To cap it all his army was still at ease within the encampment.

Knowing the capabilities of his men and those of the enemy, The King ordered the only action open to him: Rouse the troops an mount an immediate attack!!———————-.


THE PRUSSIAN ARMY: 23,000.

17,000 Infantry, 6000 Cavalry, 40 guns.

2 stands of Grenadier Infantry  @ 3 points = 6 points.

3 stands of Line Infantry  @ 2 points = 6 points.

1 stand of Light Infantry Frei Korp  @ 1point.

2 stands of Light Foot Artillery @ 1 point = 2 points.

2 stands of Cavalry @ 2 points = 4 points.

1 stand of Hussar Cavalry @ 1 point.

King Frederick 2nd  @ 2 points.

General Ryau @ 1 point.

General Duke of Brunswick @ 1 point.

General Buddenbrock @ 1 point.

THE AUSTRIAN ARMY:  40,000. ( 40 points).

28,000 Infantry,  12,000 Cavalry (inc Generals), 90 Guns.

2 stands of Grenadier Infantry @ 2 points = 4points.

8 stands of Austrian Line Infantry @  2 points = 16 points.

2 stands of Saxon Line Infantry @ 2 points = 4 points.

4 stands of Grenzer  Light Infantry @ 1 point = 4 points.

6 stands of Cavalry  @ 1 point = 6 points.

1 stand of Light Cavalry  @ 1 point.

General Lobkowitz  @ 1 point.

General Daun  @ 1 point.

General D’Aremburg  @ 1 point.

General Nadasty @ 1 point.

Prince Charles  @ 1 point.

2 stands of Heavy Artillery @ 2 points = 4 points.

1 stand of Light Artillery @ 1 point.


Fighting the Battle:

By any stretch of reality, this is a difficult battle to recreate. The Prussian army such as it was, pulled off an exceptional feat of arms.

Also, the Austrians seemed to suffer a complete paralysis of command. Having gained an unparalleled advantage over the Prussian army the Austrians then—-froze!.

This description belies the intense and savage fighting that took place when the Prussian infantry were twice repulsed from the Graner Koppe.


SPECIAL RULES:

* The Prussian  Army retains the Initiative Point for the entire battle.

*. The Prussians move first on the first Game-Turn. From Game-Turn 2 onwards, both sides throw a die to see who moves first at the start of the Game-Turn, however the Prussians FIRE FIRST on every Game-Turn.

* The Prussians win all tied results.

* The Prussians do not have two points deducted from ther die rolls when involved in close combat while being moved uphill.

* The Austrian Cavalry never moved during the battle until it was time to retreat. However if the Austrian player wishes to use them, there are restrictions:

* The Austrian Cavalry do not get the 3 points for attacking Infantry in the open.

* Because of the lack of unified action, the Austrian Cavalry do not get the “ +1” for Support in close combat.

* The Austrians have 2 points deducted from all their die rolls

GENERAL NADASDY;

Nadasdy’s Brigade were in woods to the east of the Prussian camp. Instead of attacking the rear of the Prussian army, Nadasdy, true to his nature, raided the Prussian camp, where his men set about brutalising and killing the civilians. They then plundered the army pay chests and took the personal belongings of the King including his flute and his pet dog! ( even though this was” the Age of Reason,” warfare was just as brutal as any other era ).


Papers containing important information of military manoeuvres and plans were scattered and left behind. After all that, Nadasdy and his men headed back into the woods,

If the Austrians wish to bring Nadasdy’s group into the game: A 12 sided die must be thrown for the group at the start of every Game-Turn. A score of 12 on the die must be attained before the group can move. If they cannot move, THEY CANNOT FIRE. This includes the two stands of Grenzer  positioned on each side of the Northern exit.

VICTORY:

There are two ways that the game can be concluded. The reason is because of the disparity in troop numbers between both sides and the unusual circumstances of the battle:

1) The Prussians win if they can get three stands on the Graner Koppe in any position at the end of any Game-Turn. Note, each Game-Turn must be played through until it’s conclusion.

2) The points total of each side IS HALVED, is noted,THEN EXCHANGED:

The Austrian army is 12 points. The Prussian army is 20 points. Each time a stand is removed from play, it’s points are deducted from the total. The first side to reach a zero total at the end of a Game-Turn looses the battle. ( a basic Morale rule).

The battle is played nominally for eight Game-Turns or, until either one of  the chosen conclusions above are reached.


Endnote:

This was a difficult battle to plan. Not many gamers would like to field an army, and have half of it just sitting there, Therefore I’ve tried for a possible inclusion which would not completely alter the history of the real battle.

As the Austrian army retreated, Frederick ordered a pursuit however his army were having none of it! As far as the men were concerned they had done their duty and performed a miracle on the day. Basically, by their heroic efforts they had pulled the Kings backside out of the fire and they knew it!

CREDITS:

Most of the figures are from Miniature Figurines with some from Peter Pig. The campsites and wagons are Peter Pig.

The flag poles are from Northstar Miniatures Spears. The flags are hand painted on masking tape ( I’ve just found out that Pendraken Miniatures do a nice range of 10mm flags that do not look out of place with 15mm figures.)

The stands are 40mm x 40mm and cut from picture framing cardboard. The round 40mm stands are MDF and obtained from Minibits ( which is part of Pendraken).

The hills are made from cork tiles and some were made by Brian of Essex Miniatures. The trees were from various manufacturers, one being Guagemaster. The houses were scratch built and the road was cut from thin card.

As before, the board is 3 feet ( 90cm ) x 2 feet ( 60cm) with 2 inch ( 50mm ) squares.


Thursday 3 August 2023

Battle of the Mountains: Esper 2261.

 Log entry of Lieutenant Smith:

The Board of Enquiry took place during the Winter months. Both of the Guardship Captains, in their mitigation, stated that Solar flares and atmospheric conditions had a negative effect on the scanning equipment.

The Staff on duty could not get a proper fix on the object moving erratically and wether it was a meteor.The Duty Officer did not not deem the siting serious enough to send an alert message.

After Abukkin, the Aliens disappeared into the mountains. Some weeks later reports came in of sporadic attacks against the mountain communities.

The different social groups of Esperans do not communicate or socialize readily. News travels very slowly. Therefore we have only recently learnt of a crash site in the mountain region to the North.

The Colonel reckons we are low on aviation fuel until the next ship comes from Earth. The fuel for the APC,s is local and synthed from plants. It also takes the pressure off the use of electric motors. It’s going to be a long trip by truck.

We have also been able to recruit some local civilians who know the mountains.

That took some negotiating. The locals agreed to do the job on condition we would supply them with weapons to replace their bows.

God help us if we fall out with the Esperans. They are getting good with replicating some of our kit. The Guardships have now recalibrated the scanners and have broadened the bandwidth.

The question is: If an alien ship has crashed, was it just an isolated situation or was it a Scoutship?

Now we have to to find the ET’s that are here before they cause more damage——————-.


THE EARTHFORCE:           

4 stands of Armoured Cars:  Defence: 4 pts.    Attack:  5 pts. = 9pts x 4 = 36 points.

4 stands of Squad APC Hovercraft ( “blowers”):  Defence: 4pts.  Attack: 5pts. = 9pts x 4 = 36 points.

4 stands of Regular Infantry = 1 x Command stand: Defence:  3pts. Attack:  4pts.  = 7 points.

  1 x Heavy Weapons stand: Defence: 3pts.  Attack:  4pts. = 7 point

2 x Regular Infantry stands:  Defence: 3pts. Attack: 3pts. = 6pts x 2=12pts

4 stands of Half-Track Lorries: Defence: 3pts.  Attack:  3pts ( Light Guns).= 6pts x 4 = 24pts.

( The Half-Track Lorries carry 1 stand of infantry or civilians).

4 stands of  armed Civilians:  Defence: 1pt.  Attack:  2pts.  ( side arms and Rifles) = 3pts x 4 = 12 points.

Points Total= 134 pts.


THE ALIENS:

15 stands of Warrior Infantry:  Defence: 3pts.  Attack:  3pts. = 6pts x 15 = 90pts.

5 stands of Infantry Heavy Weapons: Defence: 3pts.  Attack: 4pts = 7pts x 5 = 35pts.

2 stands of Heavy Tanks:  Defence: 5pts.  Attack: 5pts = 10pts. x 2 = 20pts.

4 Heavy tracked Armoured Personnel Carriers: Defence: 5pts.  Attack: 4pts = 9pts x 4 = 36pts. ( 2 squads)

2 stands of Light Anti-Air Tanks: Defence 4pts.  Attack: 4pts = 8pts x 2= 16pts ( can fire at ground targets.)

1 Command Tank: Defence: 4 points.

2 Command Stands: Defence: 3pts. Attack: 4pts = 7pts x 2 = 14 points.

TOTAL: 215 points..


Gamer Notes:

This is a tough scenario for both sides because of the restrictive terrain, as mountains would be. The stands cannot be moved into or through a hill square where the square is partly containing a terrain piece. Here is an example


Hills can be moved over if they are stepped. Hills cannot be moved over if two levels are  “ stacked”.

Vehicles cannot move over or through a square containing another vehicle friendly or otherwise.

. (See the Additional Instructions blog for extra rules I’ve added since playing this battle)

* The battle is played for 8 Game-Turns OR until one side suffers a collapse in Morale.


Credits:

The Alien figures are from Ground Zero Games Kra’vak range The Regular troops( not shown but riding in the blowers) are Brigade Miniatures as are the civilian Militia. The Blowers are also Brigade Games and together with the Infantry come as a”Mercenary Company”.

The Terran Half Track vehicles are from the Bradley Range of Alternative Armies. The Alien Heavy tanks ( a conversion) and the Heavy APC’s are Knight Orbital vehicles on Etsey.

The Alien static Artillery were scratchbuilt from buttons. cardboard, plastic tubing and paper clips ( oh! and bra fasteners from Tescos!).

The Light Tanks are from Scourge Minatures ,again on Etsey. I converted them to Light Tanks, using bra fasteners, paper clip and plastic tubing from paint brushes.

The Brown shelters were painted containers from my Grandson’s Pokémon figures that were discarded.

The Crashed Ship were made up of odds and ends from the scrap box!. The mountainous scenery, I’ve made from packing pieces. 


Some if the squares hill pieces were made by Brian of Essex Miniature. The rest were made from sections of cork tiling. One large mountain piece was made from a block of styrene.

The blaze markers are from Litko.


The stands are 40mm square picture framing cardboard. The 40mm mdf round stands are from Minibits.

FIRE MARKERS.

This is something I’ve been experimenting with. Most modern weapons use smokeless ammunition. These are made from 40mm x 10mm strips of acetate with markings applied with a permanent marker.


As before, the battle was played out on a 3 foot x 2 foot ( 90cm x 60cm ) board of 2 inch ( 50mm ) squares.

Saturday 10 June 2023

The Battle of Bassignana 27th September 1745.

 This article is my personal interpretation of this battle. Any mistakes are my own.

By the early part of 1745 the war in Italy had not been going well for either the Spanish or French Monarchies. These countries were allies along with familial ties, however each had differing war aims which were hampering operations in the field.

Genoa had become the central headquarters for the “Gallispan Army”, and it was here that a strategy was devised to cut off the Piedmontese from their Austrian Allies. Also, instead of invading the Kingdom from the west ( a move which had already failed once), the attack would start from the south-east. The French General Jean-Baptiste Francois des Marets, Marquis de Maillebois and his Spanish counterpart, Jean Thierry du Mont, Compte de Gages vied for command.

.The French King, Louis 15th yielded to to his Spanish uncle King Philip 5th, giving Gages overall command.


This decision bought a measure of cohesion in military planning with De Gages and Maillebois working as a team. In part they were aided by the movements of the Austrian forces. The Austrian General Schulenburg had moved his forces westward to support the Piedmontese leaving some towns in north central Italy uncovered.

In the early part of 1745, the Franco-Spanish army of 58,000 men started its march north-west toward Piedmontese territory. 8000 men were sent out north and north-east to capture the towns of Parma and Piacenza which capitulated without a fight. These actions also caused the Austrians to move their forces north across the Po to cover Milan and north-east to protect their communications with Austria.


Charles Emmanuel the King of Piedmont became alarmed that the Austrians were moving away from his troops. Even Schulenburg moved his force north, across the Po so that he could move east if required. Despite his pleas to the Austrians to stay, Charles Emmanuel and his Generals realised that they would have face the French and Spanish alone.

The Piedmontese army was a finite force. The King had reached the limits of recruitment and could only rely on the civilian population to support the regulars. Against the French and Spanish, the Piedmontese mustered 30,000 which included battalions of militia. Field entrenchments were relied upon to offset the numerical disparity with the enemy.


The river Tanaro marked the eastern line of the Piedmontese defence. At the northern end where the Tanaro entered the Po, the village of Bassignana was fortified. At the Southern end, Montecastello was also strengthened with defence works. Riverone,at the centre of the Line was a fall back position for troops positioned near the river bank. In the event that these positions were overwhelmed, the  troops were ordered to move west toward either Alessandria or Valenza.

In the days leading up to the battle, Gallispan detachments had been sent across the Tanaro to spy out the land. By persuing them the Piedmontese inadvertently revealed the fords across the river. Plans were now made for the attack, which would be made in  six columns. On the morning of the 27th as the sun rose, trumpets and drums sounded the advance. The Battle for the Kingdom’s survival had begun ————-.


THE FRENCH ARMY; 25,500 = 25.5pts x 2 = 51pts.

21,500 Infantry ( inc Generals) = 21.5pts x 2 = 43pts.

4,000 Cavalry = 4pts x 2 = 8 points.

8 Guns each with 50 gunners = 400 = 0.400pts x 2 = 0.800 pts or 1pt r/u.

1 General ( Maillebois )  @ 2points.

1 General Senneterre @ 1 point.

1 General Grammont  @ 1 point.

1 General Montal  @ 1 point.

2 stands of Grenadier Infantry @ 4pts = 8 points.

9 stands of Line Infantry  @ 3pts = 27 points.

1 stand of Light Infantry  @ 2pts.

4 stands of Line Cavalry  @ 2pts = 8 points.

1 stand of Light Artillery  @ 1 point.


THE SPANISH ARMY 24,500 = 24.5pts x 2 = 49 points.

21,000 Infantry ( inc Generals ) = 21pts x 2 = 44 points.

2,000 Cavalry = 2pts x 2 = 4 points.

7 Guns each with 50 gunners = 350 gunners = 0.350pts x 2 = 0.700 or 1 point r/u.

1 General  and C-in-C ( De Gages )  @ 2 points.

1 General ( Aremburu )  @  1 point.

2 stands of Guard Infantry @ 4pts = 8 points.

7 stands of Line Infantry @ 3pts = 21 points.

2 stands of Genoese Line Infantry @ 2pts = 4 points.

2 stands of Modena Line Infantry @ 2pts = 4 points.

2 stands of Light Infantry @ 2pts = 4 points.

2 stands of Line Cavalry @ 2pts = 4 points.

1 stand of Light Artillery @ 1 point.


PIEDMONTESE ARMY; 30,000 = 30 points x 2 = 60 points.

26,000 Infantry ( inc Generals ) = 26pts x 2 = 52 points.

3,000 Cavalry = 3 points x 2 = 6pts.

20 Guns each with 50 gunners = 1,000 gunners = 1pt x 2 = 2points..

1 General ( C-in-C ) Charles Emmanuel @ 3 points.

1 General  ( Castagnole )  @ 1 point.

2 stands of Grenadier Infantry @ 4pts = 8 points.

10 stands of Line Infantry @ 3pts = 30 points.

2 stands of Vaudois Militia Infantry @ 2pts = 4 points.

3 stands of Civilian Infantry  @ 2pts = 6 points..

3 stands of Line Cavalry @ 2pts = 6 points.

2 stands of Light Artillery @ 1pt = 2 points.


THE AUSTRIANS;

I have not attached any numbers to this little group of stands. Schulenburg’s efforts at support were reduced to erratic and ineffective Artillery fire from the north side of  the Po. The few stands just represent a presence. Each stand can fire but cannot move forward.

The Austrians:

General Schulenburg  @ 1pt.

1 stand of Cavalry  @ 2pts.

1 stand of Line Infantry  @ 3pts.

1 stand of Light Artillery  @ 1pt.


PLAYING RULES:

* The Piedmontese retain the Initiative Point for the entire battle. All the troops of both sides were seasoned. However the Piedmontese were fighting for their homeland.

* The Piedmontese win any tied results.

* The Tanaro was waist deep. Stands being moved into the river must halt. Their move can be continued on the next Game-Turn.

* Stands cannot fire while they are within the river.

* The river Po cannot be crossed except by bridge or boat.

* The French and Spanish Army moves first on the first Game-Turn. From Game-Turns 2 to 8 both sides have dice rolled to determine which side moves and fires first.

* The Game will be played for eight Game-Turns. 

VICTORY.

The Piedmontese must stay on the field for eight Game-Turns in order to get a draw.

The French and Spanish win if they drive the Piedmontese from all three villages after eight Game-Turns.

Note: apart from the overall numbers, I don’t know exactly how they were split between France and Spain so it’s a bit of a guesstimation my part.

In regard to the Piedmontese, I set the army at 30,000  with militia making up the total. Four years of fighting, had certainly worn the army down in numbers but not it’s fighting spirit nor it’s loyalty to the Monarch.

The French and Spanish continually suffered from a paucity of artillery, even going so far as to borrow guns from the Vatican!. The Piedmontese only had a small train of rather elderly guns, but the crews were very professional and well trained.

* In one description of the battle the Franco Spanish army is described as being in three groups of two Columns . Whereas a diagram says five. I think Aramburu’s column was large enough to be mistaken for two columns. so I’ve settled for five columns in all.


CREDITS:

The figures are a mix of Miniature Figurines, Peter Pig and Essex. The work parties are Hallmark figures still available from Magister Militum. The stands are of picture-framing cardboard. The round 40mm mdf bases are from Minibits.

All the buildings are scratch built. The defenseworks are a mix of ; Last Man Last Bullet and Fire And Sword. The roads and rivers are made from thin card. The bridges are also scratch built. Some of the hedge sections are from Pendraken Miniatures.

The board is 3 feet ( 90cm ) x 2 feet ( 60cm ).

 JAMES “JIM” MITCHELL.

I could not finish my article without mentioning Jim Mitchell. I never met this gentlemen, however, he ran the Seven Years War Association from America. This was a loose association of members worldwide and I came late to the party.


Jim was an avid and enthusiasic researcher of the 18th Century, particularly of the War of the Austrian Succession and the Seven Years War. I was very lucky to gain a fair amount of information by being a member. I have a book, ( Campaigns Of The King) that was translated by Jim from which I gained a lot of knowledge about the above battle.

Sadly, Jim passed away in his 40th year not long after his marriage, a loss not only for his Wife but for the hobby at large. May he Rest In Peace.


Tuesday 9 May 2023

The Battle of Hopton Heath, England 19th March 1643.

 This is my personal interpretation of this battle. Any mistakes are my own.

After the battle of Edgehill, King Charles 1st moved his army toward London, intending to take the City. However, Parliament called out the Trained Bands. These regiments consisted of recruits from the City Guilds like Stonemasons, Shoemakers, Silversmiths etc. In all, 24,000 Parliamentarian troops gathered at Turnham Green ready to contest the advance of the King’s Army, 15,000 strong.

At a Council of War. It was decided that, as London was now under the firm control of Parliament, the Royalists had to find a new base. The decision was made to march to Oxford where the King was welcomed by the population.This City was to become the central base of operations for the rest of the War.

For the rest of 1642 and early 1643 both sides started to raid in an attempt to control the area around their main bases. Lichfield in the Midlands of England was one of those places. The town sat on a supply route which the Royalists used to ship ammunition from the north of England to Oxford. Parliamentary forces held the town.

Therefore Prince Rupert of the Rhine, Nephew of King Charles 1st,  was dispatched to retake the Town. While besieging the place, Prince Rupert learned of a Parliamentry force heading south to break the siege. Sir William Brereton, having been ordered by Parliament, made his way south from his base at Nantwich in Cheshire. Brereton decided to move to Hopton Heath where he was joined by Sir John Gell who had arrived earlier.

Rupert decided to maintain the siege and send troops to stall the advancing enemy. Keeping the majority of the infantry in place, a Royalist force mainly of Cavalry and Dragoons supported by artillery under the command of Spencer Compton the Earl of Northampton was sent north-west toward Hopton Heath. An additional force under General Henry Hastings was ordered to support the Earl.

The Parliamentarian forces reached Hopton Heath first. They set up their camp and battle line anchoring their left flank in the grounds of Heathyard House on the higher part of the Heath. A day later, the Royalists arrived from the south east.The army deployed facing north toward the Paliamentry Army.


THE ROYALIST ARMY: 1,200 ( not inc Gunners). = 1.2pts x 20 = 24 points..

Spencer Compton Earl of Northampton  @  1 point.

General Henry Hastings  @  1 point.

100 Infantry = 0.100pts x 20 = 2 points = 2 stands of muskets @ 1 point.

Note: most of the Royalist Infantry had been left in place to continue the siege of Lichfield.

300 mounted Dragoons = 0.300 pts x 20 = 6 points = 3 stands of mounted Dragoons @ 2 points.

( dismounted Dragoons are worth 1 point and can be moved in any direction).

800 Horse = 0.800pts  x 20 = 16 points.= 7 stands of Cavalry @ 2 points = 14 points

( 2 points are allocated for the Generals )

ARTILLERY.

6 guns, each with 30 gunners = 180 gunners. = 0.180pts x 20 = 3.6 or 4 points rounded up.

1 stand of Heavy Artillery @ 2 pts ( Roaring Meg)

2 stands of Light Artillery @ 1 point = 2 points.


THE PARLIAMENTARY ARMY: 1,450 ( not inc gunners). = 1.450 pts x 20 = 29 pts.

Sir William Brereton  @ 1 point.

Sir John Gell  @1 point.

750 Infantry = 0.750 pts x 20 = 15 points = 

2 stands of Pike @ 3 points = 6 points.

4 stands of Muskets @ 2 points = 8 points.

( Sir William Brereton 1pt)

300 Dragoons = 0.300 pts x 20 = 6 points =

3 stands of mounted Dragoons at 2 points.

( dismounted Dragoons are worth 1 point and can move in any direction).

400 Horse = 0.400 pts x 20 = 8 points = 4 stands of Cavalry @ 2 points.

ARTILLERY;

11 guns each with 30 Gunners = 330 men = 0.330 pts x 20 = 6.6 pts or 7pts rounded up.

4 stands of Light Artillery @ 1pt = 4 points.

1 stand of Heavy Artillery @ 2 points.

( 1 General Sir John Gell @ 1 point).


Gaming Notes.

* The Royalist Army moves first on the 1st Game-Turn.

* From Game-Turn 2 until Game-Turn 8, both sides throw dice for priority of movement and firing.

* The Royalists keep the Initiative Point for the entire battle

* The Royalists win any ties.

* The Cavalry do not get the +3 for attacking infantry in the open as Hopton Heath itself is hilly and uneven terrain.

* Dismounted Dragoons can move in any direction.

* Cavalry and  Mounted Dragoons cannot move over or through the Rabbit Warren.

* The Parliamentry Artillery Pieces were captured by the Royalists after changing hands twice. Therefore, if involved in combat, the Parliamentry guns are taken by the Royalist player on ANY low score.

* Roaring Meg; 

This was a rather large piece of ordnance that the Royalists bought onto the field. Apparently when it did hit something it did some damage. Therefore these special rules apply;

1) The Gun cannot move. If the gun requires a “move-back” , deduct 2 points from the die roll when the Gun fires 2nd within the same Game-Turn

2)  The gun has a range of 5 squares and can only fire every 2nd Game-Turn.


HISTORY:

This wasn’t an overly important battle. But was hailed as a victory by the Royalists keen to trumpet a success after Turnham Green.

The Earl of Northampton lost his life in this battle. He was thrown from his horse leading one of the Royalist Cavalry charges. He was offered quarter by the Parliamentarians but refused and was killed.

At this time neither side had a set uniform and it was left to weathy individuals to raise troops. Therefore some regiments might be provided with a coat of a certain colour but many just had their civilian clothes.

Both sides made use of “ field signs” such as a piece of ribbon tied around the hat or the arm. The Royalist Earl of Newcastle had his WhiteCoats, so named because each man was given a coat of  undyed  wool.


To make identification easier in my games, I use Red  for Paliament( which later became the adopted colour for the Army), and Blue for the Royalists.

In regard to armour, well, as the war progressed, the use of body armour decreased. Pikemen were lucky if they acquired a breastplate. Some pikemen shortened their pikes to make them easy to carry. The musket gradually became lighter, doing away with the rest but still relied on the lighted match for firing. Infantry swords were used for cooking, the men relying on using their muskets as clubs even against Cavalry.

Cavalry were lucky if they had a leather jacket. Helmets were a luxury with most relying on a metal scull cap under their hats. Good horses were kept for the Cavalry where possible and Dragoons used ponies or lesser animals

There were no organised artillery Trains. Each side made use of any field pieces they could get from small galloper guns up to the Saker, which was, generally the largest field gun available. Roaring Meg was an exception.

THE GAME;

The playing area is a piece of felt cloth, 3 feet ( 90cm ) by 2 feet ( 60cm ) marked out in 2” ( 50mm ) squares.

The hill sections are 2” ( 50mm ) x 8” ( 200mm ) long, made of two sections of foamboard glued together and topped with green card. I made them so that they would pack easy in the box.

All the figures were from Peter Dennis’s Paperboys English Civil War book printed onto paper in A5 size.

The buildings and trees were made from the same book.


Monday 17 April 2023

The Battle of Pea Ridge; March 6th-7th 1862.

 This article is my personal interpretation of the battle. Any mistakes are my own.

The situation in The Western Theatre for the Confederacy had not been going well. A Union Army under General Curtis had moved south from central  Missouri, pushing the Confederate forces further back in front of him. Sent by the Confederate President Jeff Davis, Major General Earl Van Dorn had high hopes of taking Saint Louis and restoring Missouri along with control of the Mississippi to the Confederacy.

However the situation had not gone according to plan. Van Dorn,s Army of the Trans-Mississippi numbered 16,000 troops. He was more than confident that he could overcome the Union Army of 11,500 opposed to him. However, partly through disorganisation and a fragmented command structure, events proved otherwise.

The Union troops under Curtis had pushed the Confederate force south west out of Missouri and over the border into Arkansas. Eventually, realising that his supply line was becoming tenuous, Curtis called a halt at Sugar Creek. A defence line was established, along the northern bank of  the Creek, facing south in expectation of a Confederate counter attack.

 Van Dorn did indeed want to attack, but not frontally, against the well positioned Union troops. From their position at Camp Stephen, south west of the Union position, Van Dorn wanted to outflank the Union army from the left.


Using a track known as The Bentonville Detour, Van Dorn hoped to circle his Confederate troops around the Union Army attacking it from the rear and cutting off the supply route. The Confederate forces still suffered from some lack of organisation , and disharmony amongst the Senior ranks. The men were already exhausted from their previous manoeuvres. Orders were issued that only light rations and limited ammunition were to be carried.

With Sterling Price’s Missouri State Guard leading the column, the army started its march. It took time for the army to cross Sugar Creek and a gap opened up at the rear of the column, between Pikes Brigade and the rest of the Army. Also, small Union detachments had felled trees along the Detour. 

Such was the delay that Van Dorn ordered McCulloch to take his three Brigades back along the Ford Road, east toward Elkhorn Tavern. Meanwhile Prices Division continued northeast around Big Mountain to meet up at the same place.

General Curtiss became aware of the Confederate movement when McCullochs troops were spotted moving east along the Ford Road toward the Union army. General Curtis was not prepared to sit still while the Confederate army maneuvered on his flank——————-.

UNION ARMY OF THE SOUTH-WEST.

11,500 = 11.5 points x 3 = 35pts r/u.

Brigadier General Samual R. Curtis.  Commanding   @ 2 points.


1st DIVISION,

General Peter Osterhouse  @  1 point.

2 stands of Line Infantry @ 2pts = 4 points.

1 stand of Skirmish Infantry   @  1 point.

1 stand of of Light Artillery  @ 1 point.


2nd DIVISION

General Alexander Asboth  @  1 point.

3 stands of Line Infantry  @ 1point  =  3 points.

2 stands of Regular Cavalry  @ 1 point = 2 points.

2 stands of Light Artillery  @ 1 point = 2 points.

1 stand of Heavy Artillery  @ 2 points.


3rd DIVISION

General Franz Sigel  @ 1pt,

General Jeff Davis  @  1pt.

2 stands of Infantry  @ 2pts = 4 points.

1 stand of Infantry Skirmishers.  @ 1pt.

1 stand of Regular Cavalry  @ 1pt.

1 stand of Light Artillery  @ 1pt.


4th DIVISION,

1 General  Eugene Carr   @ 1pt,

4 stands of Line Infantry  @ 1pt, = 4 points.

1 stand of  Regular Cavalry   @ 1pt.

1 stand of Light Artillery  @ 1pt.


THE CONFEDERATE ARMY of the TRANS-MISSISSIPPI;

16,000  = 16 points x 3 = 48 points.

RIGHT WING;

Divisional General Benjamin McCulloch  @ 1 point.

General Albert Pike  @ 1 point.

3 stands of Line Infantry  @ 2pts = 6 points.

2 stands of Regular Cavalry @  1pt = 2 points.

2 stands of American Native Cherokee Light Cavalry @ 1pt = 2pts.


Major-General Earl Van Dorn ( commanding ) @ 1point.

 General Louis Hébert @ 1pt.

4 stands of Line Infantry @ 2 points = 8pts

1 stand of dismounted Cavalrymen ( no horses) @ 1pt.

1 stand of Skirmish Infantry @ 1pt.


General James McIntosh @ 1pt.

4 stands of Regular Cavalry @ 2pts = 8pts.

3 stands of Light Artillery @ 1pt = 3pts.


LEFT WING;

Missouri State Guard;

Major-General Stirling-Price @ 1pt.

2 stands of Light Artillery @ 1pt = 2pts.

3 stands of Line Infantry @ 2pts = 6pts.

3 stands of Regular Cavalry @ 1pt = 3pts.


Playing Notes for the historical battle.

First Day:

* This Part will be played for 8 Game-Turns.

* No stands of either side may enter Freetown Wood, ( a fictional name I’ve used as a geographical location).

* Big Mountain and Little Mountain cannot be crossed by any stands.

* Sugar Creek can only be crossed by the bridges. Any stand entering the Creek will be lost.

* The fence around the field is only a boundary marker and does not impede movement for any stands.

* Only Hébert’s Brigade will move toward the Ford Road first on the first Game-Turn. The stands of Osterhouse’s Brigade cannot move until they have line of sight to any Confederate stands on Ford Road.

* From Game-Turn 2. On the Confederate side, Hebert’s and McIntosh’s Brigades move into the Ford Road. On the Union side, Osterhouse and Asboth’s Brigades can move.

* From Game-Turn 3, Hebert’s, McIntosh’s and Pikes Brigades can move up the Ford Road. On the Union side, Osterhouse, Asboth and Davis’s Brigades can move.

* From Game-Turn 4, All stands of both sides can move.

* If any Stands from McCullochs division have to “ move-back”, they must do so on the Ford Road. Any stands that cannot move back are removed from play.

* The Union side retains the Initiative Point for the entire battle of  eight Game-Turns.

* The Union side also wins any tied results.

* At the end of  eight Game-Turns, the side with the lowest number of stands lost, is the winner. If the result is tied, the battle goes on for another eight Game-Turns.

Note: The stands start the battle from their finishing position from the previous battle.

* Any stands on Pea Ridge being fired on by Union Artillery will suffer a 2 point reduction to their die roll if they return fire within the same Game Turn. 

* Union Artillery add 1 point to their die roll when firing on any target on Pea Ridge.

This is because Pea Ridge had a layer of rocky shale on the surface. Every time a cannon round hit the Ridge, shale was thrown up like shrapnel, causing Confederate units to retreat.


Playing the Game;

This is a tough battle for the Confederates. They have the numbers but not the space to deploy. I have tried to reflect the lack of mobility and cohesion within the army by reducing the space for movement. 

This battle was a bit tricky to re-enact as it was not a set-piece but a running battle consisting of a series of  moving  skirmishes.


Monday 27 February 2023

Battle of Blenheim ( Blindheim ) Bavaria 13th August 1704.

 This article is my personal interpretation of the battle. Any mistakes are my own.

John Churchill, ( the Duke of Marlborough ) Commander of the English contingent and General of the Allied Army within the Empire had not quite reached the height of fame in his military career. The Imperial part of the army were all the troops from Germanic Kingdoms owning allegiance to the Emperor of the Holy Roman Empire. That being Hapsburg Austria.

It wasn’t quite so long ago that England ( with a pro Catholic King ) had been an Ally of France in its War against Imperial Austria. 

However, a Dutch ( Protestant) Queen now sat on the throne of England. ( Anne was the Wife of  the late William 3rd of England and Stadtholder of Holland ).The Netherlands ( Belgium ) and the United Provinces ( Holland ) were now a target of Louis the 14th ( The Sun King ) of France. Therefore, former enemies were now allies.

.The Bavarian Wittelsbach family, were still in contention with the Austrian Hapsburgs over who had the hereditary rights to the Imperial Throne. This is why the Bavarian Kingdom always stayed an ally of France.


Three years into the current conflict, The French army led by General Tallard along with Maximilian and his Bavarian troops were heading toward Austrian territory to attack Vienna, the seat of Hapsburg power. Churchill’s intention was to divert the enemy. To that end his army marched into Bavaria and stormed a position known as the Shellenburg, a fortified hill linked to the town of Donauworth and a major crossing point of the Danube.

Taking this town gave Churchill a base from which to harry the South Bavarian territory. This had the desired effect. General Tallard  thought that he could cut off Churchills army from his supply lines, even forcing the Allied army to retreat north through Franconia.

However, instead of manoeuvring away from the approaching French forces, Churchill wanted to bring on a battle. August found the French and Bavarian army encamped on slightly rising ground to the West of the river Nebel, a tributary of the Danube. With the rising hills on his left flank, the Danube on the right and with the Nebel to his front, Tallard felt pretty secure.

Therefore it was something of a shock, as the sun rose over the fields of Blenheim on that fateful Wednesday13th to see the enemy Allied army approaching, intent on battle————————.


ALLIED IMPERIAL ARMY;

26,400 Infantry = 26.4pts x 2 = 53points r/u.

10,680 Cavalry = 10.680pts x 2 = 21points r/d.

3 stands of Danish Line Infantry @ 2pts = 6 points.

3 stands of Prussian Line Infantry @ 2pts = 6 points.

* 1 stand of Prussian Light Artillery @ 1pt.

Prince of Anholt Dessau @ 1pt.

5 stands of Imperial Cavalry @ 2pts = 10 points.

Prince Eugene @ 1 point.

1 stand of Imperial Grenadier Infantry @ 4 points.

3 stands of Imperial Line Infantry @ 2pts = 6 points.

* 1 stand of Imperial Light Artillery @ 1 point.

Prince of Holstein @ 1 point.

1 stand of Hanoverian Grenadier Infantry @ 4 points.

2 stands of Hanoverian Line Infantry @ 2pts = 4 points.

1 stand of English Grenadier Infantry @ 4 points.

7 stands of  English Line Infantry @ 2 points = 14 points.

* 2 stands of English Light Artillery @ 1 point = 2 points.

2 stands of English Cavalry @ 2pts = 4 points.

1 stand of Cavalry ( a few troops brigaded ) @ 1 point.

John Churchill, Duke of Marlborough @ 2 points.

George Churchill @ 1 point.

General Cutts @ 1 point.

** 66 Guns each with 30 gunners = 1,980 gunners = 1.980pts x 2 = 3.960 or 4pts r/u.

* 4 stands of Light Artillery @ 1 point each.


THE FRENCH-BAVARIAN ARMY;

14 stands of French Line Infantry @ 2pts = 28 points.

2 stands of French Grenadier Line Infantry @ 4pts = 8points.

( Within Oberglau) 2 stands of Irish Line Infantry @ 3pts = 6pts.

1 stand of Dismounted French Dragoons @ 1 point.

* 3 stands of French Light Artillery @ 1pt = 3 points.

8 stands of French Cavalry @ 1pt = 8 points.

General Tallard @ 1 point.

General Clarembault @ 1 point.

General Zurlauben @ 1 point.

6 stands of Bavarian Line Infantry @ 2 points = 12 points.

* 2 stands of Bavarian Light Artillery @ 1pt = 2 points.

5 stands of Bavarian Cavalry @ 1 point = 5 points.

Elector Maximilian @ 1 point.

General Marsin  @ 1 point.

** 90 guns each with 30 gunners = 2,700 gunners = 2.700 x 2 = 5pts r/d.

* 5 stands of Light Artillery @ 1 point

.

WARGAME NOTES;

* Any stands being moved into the River Nebel  cannot be moved further forward that Game-Turn.

* Any stands being moved into the Danube will be lost.

* Artillery stands cannot be moved into the river Nebel.

* On the first Game-Turn, The Allied Army is moved first and fires first. From Game-Turn two until Game-Turn eight both sides will have dice thrown to decide who moves/fires first on each Game-Turn.

* The Allied Imperial Army keeps the Initiative Point for the entire battle.

* The Allied army wins any tied results.

* The Infantry and Cavalry must move through the face of a square, not a diagonal. The dismounted Dragoons can move in any direction, as can the artillery.

HISTORICAL NOTES.

This battle was a bit of a puzzle because the numbers of combatants cannot be verified. I have chosen the following;

The Allied Army:  66 Battalions, 178 Squadrons.

The French-Bavarian Army: 70 Battalions 143 Squadrons.

The French Army had a problem with “ Glanders” ( French “ Glandres”) a disease which causes problems with the lungs in horses. 12 Squadrons of French Dragoons fought dismounted because their horses had to be destroyed. This disease can also spread to humans, so there is a possibility that the bacteria could have spread to the troops?

When I scaled down the respective armies, I allowed for 60 men in a Cavalry Squadron and 400 men in an Infantry Battalion. Churchill’s March to Bavaria has been labelled as a model of discipline and organisation, because of the excellent logistical support. However I felt that, given the limited medical knowledge and mortality issues, formations would not be at their full compliment.

Neither side had any heavy guns, but both sides had battalion guns which did get moved in this battle to support the combat. Therefore the artillery stands of both sides can move in any direction and fire after moving.

Marlborough had complete trust in his Generals and this was reciprocated especially with Prince Eugene.

The French and Bavarian Generals operated independently. Tallard formed his men further back from the Nebel in order to trap the Allied left against the river. Maximilian formed his men up further forward to use the Nebel as a defence point. The battle was hard fought with bravery and heavy casualties on both sides.


Marlborough’s execution and victory of the battle bought him the ultimate accolade in that Queen Anne had Blenheim Palace built for him. This was the battle that sealed Marlborough’s reputation. I also recommend the book “ Marlborough As Military Commander” by the late Doctor David Chandler, which details all Marlborough’s battles.

STAGING THE BATTLE:

All the figures are a mixture of Miniature Figurines, Peter Pig and Essex Miniatures 15mm Seven Years War figures. All the buildings are scratch built as is one of the bridges.

I used the Seven Years war figures for this blog. At this point in history The British army was still referred to as “ The English Army”. The Act of Union with Scotland,  and the Royal link with Hanover had yet to come. The “ Imperial Cavalry” is mostly Austrian but Prussian, Danish, Hanoverian and Hessians can also be used.

The flatter green areas were made by S and A Scenics. The hills were scratch-built. The trees were made by various manufacturers, Guagemaster being one. The rivers and roads were made from thin card.

The square bases are made from picture-framing cardboard. The round mdf 40mm bases are from Minibits.

The table is 3 feet ( 90cm ) x 2feet ( 60cm) using 2 inch ( 50mm ) squares. As with all my reconstructions you can play them using the information provided or in your own style.