Showing posts with label Jutes. Show all posts

Sunday 22 May 2022

The 5th Century in Britannia part 8 Arthur’s Battle of the River Bassus 487 AD.

 The following is my personal interpretation, as a wargamer, of events in this era. Everything I have written here is conjectural but I have attempted to use history as a guide. Any mistakes are my own.

486AD, June to December. Arthur’s victory against the Seaxons is a cause of great celebration amongst the Britons. The senior Nobles are glad to see a Seaxon host defeated. Inwardly, they are concerned that Arthur would become Dictator, then use the army against them after defeating the Seaxons.


Once again during the Winter Solstice, the Kings gather at Caerleon. They are;

Alclud;  Tutagual. ( his father Cinuit has died).

Gwynedd;  Einon.

Powys;  Cadell.

Dumnonia;  Geraint Llyngesic. ( the Fleet Owner ).

Gwent;  Iddon Ap Ynyr. 

Arthur, with Merlin in attendance joins the Council. Despite their personal misgivings, the Kings declare their support for the Pendragon. They all consign a number of troops for the Commitatus. The conversation amongst the assembled Kings then turns to the invaders. All of them have stories of more Seaxons  arriving on the East and South coast.

In the North, there has been a steady stream of civilians crossing the river Trent. In the South, there are still dwindling communities of Britons fighting off Seaxon raiders east of Dumnonia. At Winchester, the South Gate is blocked off. At Silchester, the North and East Gates are also sealed. At Wanborough along with the other towns is a cadre of Citizen Militia led by the Town Prefect. These are called upon to fight off any raiding parties. These towns are still being supplied from Corinium ( Cirencester).

Meanwhile, in Lundene, Osla meets with Aelle. They are both aware of the Saxon defeat. They decide on a plan to cut off the supply route to the South and East, making it easier to take over the territory.

Seaxon spies have found out that the Tamesis can be navigated by boat. The Tamesis flows past Durnovaria. At this point the river becomes the Isis, which can be navigated as far as Lechlade where the road South can be disrupted.

Because the area south of the Tamesis around Durocorinium and Silchester, still has strong Briton garrisons, Osla and Aelle are aware that if they wish to strike at Arthur’s home territory, they must move through the Tamesis valley or on the river itself.

Lechlade is an old Roman Colonia, which has fallen into disuse and is sparsely populated.


In a combined effort sixty boats can be collected or made. Each boat can carry forty warriors and a Pilot. Because he has a ten day march to Lundene via Stane Street. Aelle can only call on 2,600 warriors. The rest are required to guard Chichester. Aelle’s warriors will go into the boats


Osla can call on on 5,000 warriors. He will lead his men West along Akeman Street toward the river Glyme. The idea is that Osla will distract Arthur so that Aelle can destroy Corinium. Aelle  and Osla come to an agreement. Osla will recognise Jutish Rights to land South of the Tamesis. In return Aelle recognises the Tamesis as the Southern border of Angle territory.

487AD,  January to April. Arthur and his Generals bring the army together at Caerleon training the men in formations. Meanwhile, cavalry patrols are still watching the border country. Reports are surfacing that Seaxon raids have diminished. Merlin has heard whispers that a major attack is imminent and that boats are involved.

Arthur sends a request to Geraint of Dumnonia for ships to patrol the Severn Estuary and the South coast, sailing East as far as Vectis ( Isle of Wight ). Toward the end of April, Arthur moves the army to Glevum. Into May, the number of Seaxon raids diminish even further. Arthur moves the army once more to Corinium, both to watch Akeman Street and the Isis. As the army is set in motion, a patrol arrives reporting that a Seaxon Army is advancing West along the Akeman Street route.

In a brief meeting with his Generals, Arthur tells them to advance to Lechlade. Once there the army is to prepare for battle and to ensure his Standard can be seen. A messenger is sent to Durocorinium asking for the Militia to assemble at Lechlade.

By positioning his army at Lechlade, Arthur is using his army as bait, hoping that the Seaxons will attack him on ground of his own choosing.

ARTHURS ARMY OF THE BRTONS = 4,600 = 4.6 points x 10 = 46 points.

1,200 Briton Veteran Infantry = 1.2 points x 10 = 12 points = 4 stands @ 3 points.

1,200 Auxilliary Infantry ( Hwicce) = 1.2 points x 10 = 12 points = 5 stands @ 2points + Rogatainus @ 2pts.

400 Light Archers = 0.4 pts x 10 = 4 points = 4 stands @ 1 point.

600 Elite Cavalry = 0.6 pts x 10 = 6 points = 1 stand @ 3 points + Arthur @ 3 points.

400 Regular Light Cavalry = 0.4 pts x 10 = 4 points = 2 stands @ 1 point + Owain @ 2 points.

300 Hwicce Light Archers = 0.3 pts x 10 = 3 pts = 3 stands @ 1 point.

500 Gwent Militia = 0.5 pts x 10 = 5 points = 1 stand of Militia @ 2 points + Cadwallon @ 1 point + Cadwy @ 1 point + Medreut @ 1 point.

Arthur has the army drawn up in and around the remains of Lechlade. Palisades are erected to the north of the town. The remains of the town wall facing South to the river Isis are reinforced.


When Osla arrives at the road junction, his Scouts tell him that the Briton army is to the South. Corinium is to the West. Osla wants to take the town but realises that Arthur is positioned on his Southern flank with his back to the river. The opportunity is to good to pass by. Eventually, the Angles are drawn up in their shieldwall facing the Briton position. For a while both sides stare at each other in silence. Arthur realises Osla is playing for time. It is not long before he finds out why. Aelle,s fleet of sixty boats makes an appearance.


Suddenly Osla raises his sword and with a massive “ HOOM” shouted by the warriors the Angle shield wall rolls forward and battle is joined.


OSLA AND THE ANGLES = 5,000 men = 5 points x 10 = 50 points.

Osla  @ 1 point.

23 stands of Warriors @ 2 points = 46 points.

3 stands of Light Archers @ 1 point = 3 points.


AELLE AND THE JUTES = 2,600 men = 2.6 points x 10 = 26 points.

Aelle  @ 2 points.

11 stands of Warriors @ 2 pts = 22 points.

2 stands of Light Archers @ 1pt = 2 points.

As the Veterans meet the attack from the North, the Jutes run their boats up the bank of the river and attack piecemeal. This attack is met by Rogatainus and his Suebian Auxilliaries. As Aelle steps up onto the bank he immediately realises that the plan has changed and directs his warriors at the Britons.


The fighting is hard and everything hangs in the balance. Arthur and his Generals are in the thick of the fighting as are Aelle and Osla.


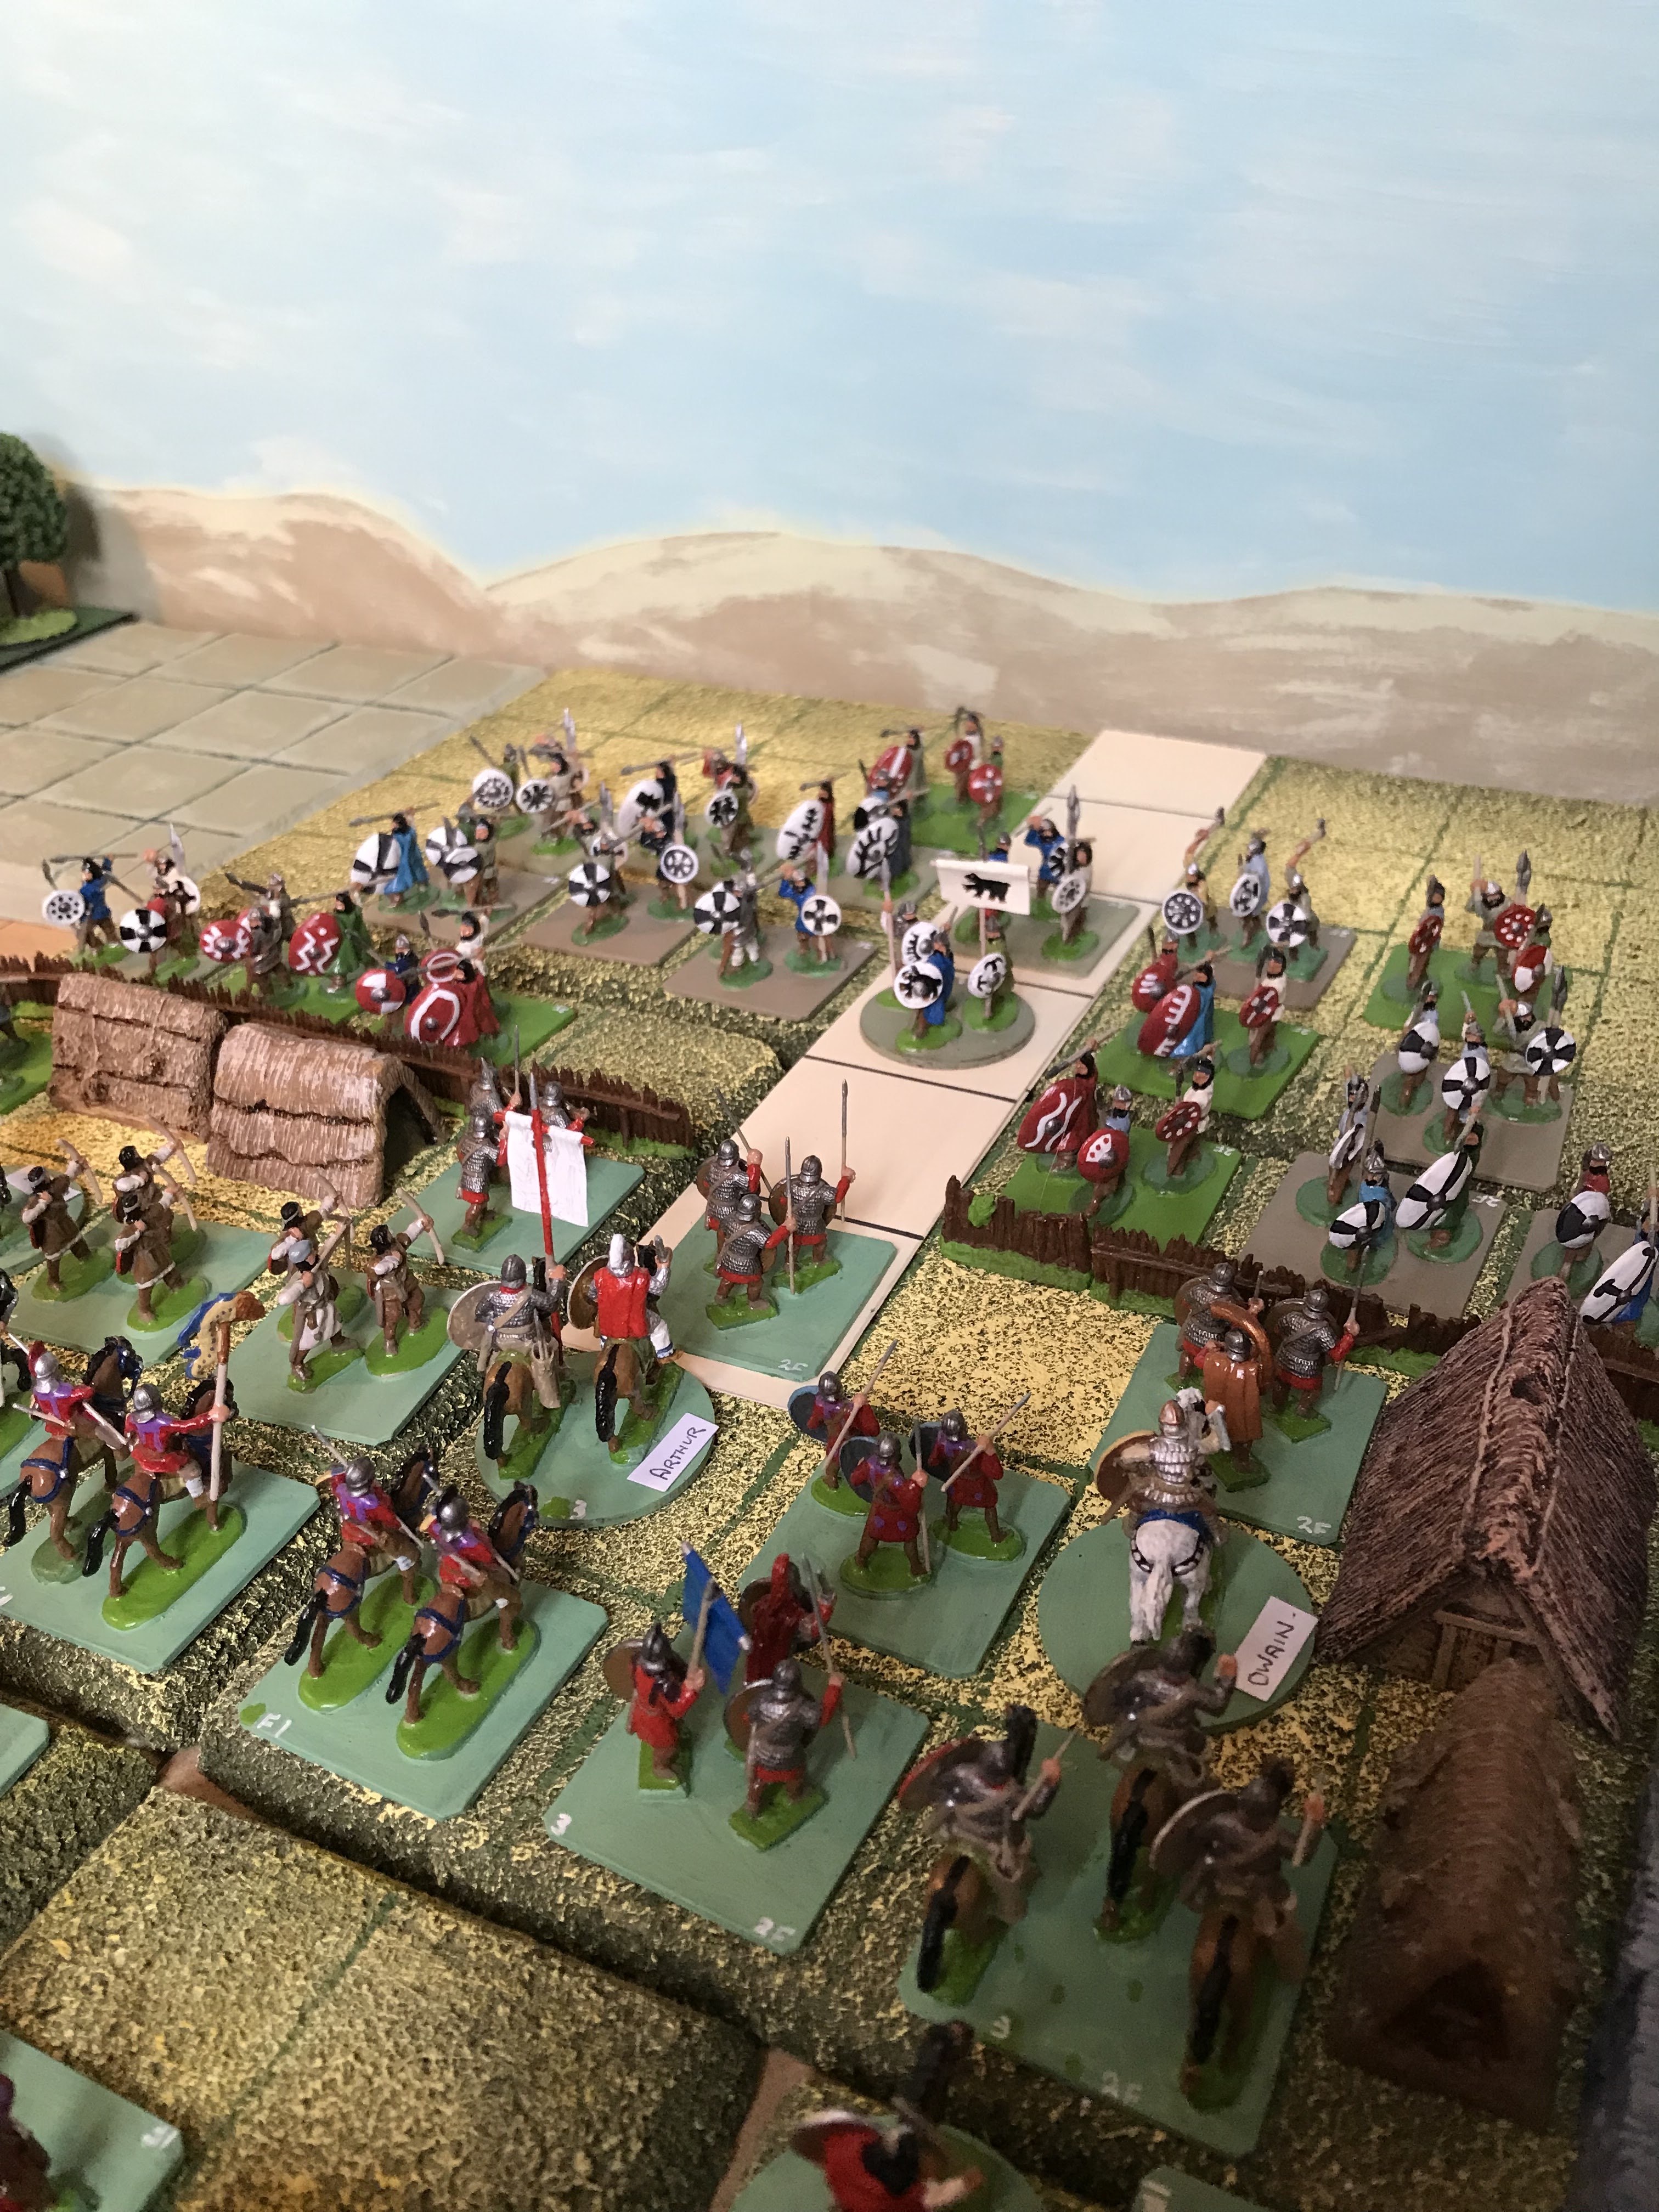
After some four hours of fighting, the situation is becoming desperate. Arthur’s troops are putting up a strong resistance but numbers are beginning to tell. As the fighting continues, Arthur and his Generals become aware that the Seaxon attack is starting to falter. Briton warcries are heard from the Western side of Lechlade.

The arriving Britons are attacking Aelle.s Jutes. A decision is made to concentrate on the Seaxons attacking the North side of Lechlade. As the Britons press forward, the Angles start to give way. Arthur signals his Cavalry and they move forward. The Angles break. Arthur tells Owain to take some of the Infantry to aid Rogatainus. As the Jutes also break formation the slaughter begins.


Many men are killed at the riverbank as the remaining Jutes take to  their boats. Aelle manages to get free. Meanwhile the Angles are being harried by the Briton Cavalry. Arthur has once again prevailed, but the army has taken a battering. Both the Angles and the Jutes have also lost heavily.

The three Prefects and their Militias are praised by Arthur.

Mauric led 700 Militia from Glevum;  0.7 pts x 10 = 7 points = 3 stands @ 2 points + 1 leader @ 1 point.

Manseutas led 600 Militia from Corinium;  0.6 pts x 10 = 6 points = 2 stands @ 2 points, 1 stand of archers @ 1 point, 1 leader @ 1 point.

Andragius led 600 Militia from Durocornium; 0.6pts x 10 = 6 points = 2 stands @ 2 points. 1 stand of Archers @ 1 point. 1 leader @ 1 point

The day after the battle, the dead are buried and the army reorganised.. The Seaxon boats are broken up and burnt. On the second day, Arthur leads his army to Glevum and onto Caerleon. Aelle has taken his remaining warriors back to Lundene. A few days later Osla leads his survivors into the City. In subsequent meetings there are heated exchanges and recriminations. Eventually wiser heads prevail and a loose agreement is made to combine against Arthur in the future.


For the moment Arthur has been victorious, however, in private conversations with Merlin the subject is always;  how long can the Britons prevail.?———-

HISTORICAL NOTE;

Nennius places Arthur’s Sixth battle at the river Bassus. As I understand it “ Bassus “ is the feminine of “Bass”. The only part of a river in Britain with a female name is the Isis. This is ( as shown on the map ) the upper part of the Thames between Dorchester ( Durnovaria ) and Thames Head. The name is used in conjunction with the annual Oxford and Cambridge boat race in modern times.


Lechlade was a busy river port at the height of the Roman Empire, but gradually fell into disuse in the later era. The town was ( and still is) roughly eight miles from the Akeman street junction.

If Arthur wanted to watch both Akeman Street, The Isis and keep the army together then, much like Syagrius at Soissons, he needed the enemy to come to him. This is why I think Lechlade was chosen. As far as I can make out, Lechlade sits on a promontory of land with the rest of the ground east and west being flatter.

There must have been a reason for Nennius to say that Arthur fought a battle “AT” the Bassus.If Arthur placed his army there, the main route to his base at Caerleon would be undefended.As stated above, he needed to provide a powerful incentive to the enemy.

Therefore, to be there, Arthur must have had some notion of an imminent waterborne assault . Aelle would have had to use Stane Street  to move his men to Lundene. This would be to avoid any Frontier Briton settlements around Silchester. This would have been quite an undertaking, as the warriors would need enough food etc for ten days. ( Roman  Military Posts were no more than three days march apart.). The ammount of food available would dictate how many men go on campaign.

The Angles knew that Arthur’s army was a powerful fighting unit therefore they would need help. The Saxons were in no state to fight another campaign so the Angles need the Jutes. These people were still trying to establish themselves on the South coast, in an area close to Briton territory, therefore only a few warriors wold be available to support a direct attack into the Briton heartlands.

Would it be possible for the Germanic tribes to organise a strategic attack?. Well, by this time many of the Germanic warriors and leaders would have had some contact with the Roman Military either as foes or as Foederati. The leaders would have served as Officers. Looking at the lives of Aetius and Ricimer, I certainly think it is reasonable.


The sealing off of the gates at Silchester and Winchester is a fact, but nobody knows when this actually happened. The town of Reading came into being as a Germanic settlement. The names of the three Prefects are real and did exist but I don’t know when. However I thought they could help Arthur.

The boats used by the Jutes were of a Scandinavian design which could hold forty men and a Pilot. The current train of thought is that the Angles, Jutes and Saxons rowed across the North Sea and the Channel.

When looking at a map of Roman Britain, Cirencester is a major hub controlling the roads to the South of Britannia. The countryside was heavily wooded so the Roman Roads were still important to movement. Gaining Cirencester would put the Seaxons closer to the centre of Briton resistance at Caerleon. If the River Severn could also be controlled, that would sever communications with Amorica.

With regard to the Militia intervening in the battle, well, according to Google it takes four hours to walk from either Wansborough or Glevum. Given enough planning these men could get to Lechlade in time to effect the battle.

There are still more battles for Arthur to fight,—————.

THE BATTLE:

Some special rules are required to fight this action.

* The Britons retain the initiative for the length of the battle.

* The battle will last for 8 Game-Turns.

* The Angles and Jutes move first on the first Game-Turn. From Game-Turn 2 until Game-Turn 8, each side will dice to see which side moves and fires first.

* The Britons win any ties.

* The Town Militias enter play on Game -Turn 5. The Militia are moved when the Britons move. Aelle,s Jutes will attack the town first. They will not engage the Militia until they appear from the trees.

* Stands in boats are worth one point.

* Stands cannot fire while in a boat.

* The palisade counts as a trench for the Britons.

* If the walls are attacked, the attacker looses 4 points. = 2 points for attacking uphill and a further 2 points points for attacking the wall.

*  The soft ground to the East of Lechlade cannot be entered.

* Boats move at two squares and cannot move if there is no crew.

* The buildings cannot be moved. The buildings inhibit movement and block line of sight for firing.

CREDITS;

The figures are mostly Hat Miniatures. Some are from Newline Design so a mixture of plastic and metal. The boat crew tokens were made from cutting plastic figures in half.

Most of the standards were scratch made from masking tape but Arthur’s standard is a decal from Little Big Man Studios as is the Elite Cavalry Standard. The standards are made from javelins supplied from North Star Miniatures.

The buildings were from Peter Pig. The walls and palisade are from Alternative Armies. The hills are a mixture of premade by Brian of Essex Miniatures, the others being scratch made from cork tiles. The trees are by various manufacturers, Guagemaster being one. The river and roads are made from thin card.

The tree outlines were made made by S and A scenics. The round mdf bases on some of the trees and command bases are 40mm and are from Minibits. The square stands are made from picture framing cardboard.

* The boats are scratch built from cardboard.


Friday 13 August 2021

The 5th Century in Britannia Part 6; Arthur The Warlord.

 As before, this is my interpretation of events in this era as a wargamer

484AD ; Ambrosius has been buried in the old amphitheatre at Caerleon. At the Winter Solstice, all the Nobles are gathered in the former headquarters building of the Legionary fortress. They are there to decide who will be the next Pendragon. Some of the Kings have been lost by feud or by natural death. The current leaders are;

Dumnonia ; Geraint Llyngesic [ 480 to 514AD ] " The Fleet Owner",his son Cadwy.

Gwynedd ; Einon [ 500AD ] with his sons Cadwallon and Owain.

Powys ; Cadell [ 500AD ] with his son Cyngen.

Alclud ; Cinuit  [480 to 485AD ] who will be succeeded by his son Tutagual.

Gwent ; Iddon Ap Ynyr [480 to 490AD] with his son Caradog.

Note; Although Carleon is in Gwent, King Iddon has his own stronghold at Carwent. Carleon is regarded as an army base, as it was when the Legions were present.

As before, the asssembled Nobility cannot agree as to whom is to lead them. The one person who has any influence, Merlin Aurelianus is bought before the assembly. He is neither Druid or of the Church. However the 59 year old has deep knowledge. He was given his cognomen by Ambrosius. The question is put to Merlin. Who will be Pendragon?. After a moment of thought, he gives his answer;

ARTHUR.

The chamber explodes in a babble of angry voices. Merlin raises his hand and all goes quiet. Merlin reminds them that Arthur Ap Uthyr Ap Constantine was born out of Wedlock. He is not related by bloodline to any Royal House. If Arthur prevails against the Seaxons, the Dal and the Picts, all will share in his glory. If Arthur fails, no Royal House will be condemned.

The next question is of the Army. All Merlin will say is that the Army will be ready. In his mind Merlin knows the outcome of the battle between the Red and the White Dragon.


485AD; As this year progresses to April, a number of incidents happen which although not connected, will have a major influence on the future.

* In Gallaecia, Riothamus has a major problem. Hermeric, the elected High King is Aryan. He issues an Edict that all Catholics must convert or face exile. By April, 9,500 Suebians are crammed aboard 80 ships heading North to Totnes in Dumnonia.

*Hispania is almost a Visigothic Kingdom. Euric has died and has been succeeded by his son Alaric the 2nd.

* At the same time Clovis who has succeeded his father Childric the 1st, as King of the Franks moves to Paris ready to invade Soissons.

* At the end of March 485AD, at Caerleon, in front of the Army veterans the 18 year old Arthur is raised on a shield and proclaimed as Pendragon.

* In Amorica [ Brittany ] Budig the 2nd [ also known as Emyr Llydaw] is not only King of Cornouaille but also High King of Amorica. His son Riwal Mawr becomes one of Arthurs officers.

By the end of April 485, the ships carrying the Suebians reach Dumnonia. Geraint assembles his troops but the men are stood down when sprigs of leaves are seen tied to the prows of the approaching armada.

Soon Riothamus meets with Arthur, Merlin and King Iddon. The Suebians are allowed to settle around Glevum and along the River Severn with their families. The language of the Suebians is close to the Brythonic-Celtic spoken by the Britons. These new settlers become known as the "Hwicce" or "the friendly ones".

By May of 485AD, frontier raiding has been resumed between the Britons and Seaxons. Arthur wants to lead a major expedition into eastern Britannia to disrupt the continuing arrival of Seaxon settlers. However Merlin urges caution. The army is not confident in its new leader and the loyalty of the Kings is suspect.

From May to December 485AD, there are no major battles. The Navy of sixty ships commanded by Geraint patrol the West coast preventing raids by the Dal. There are still Briton communties in the south-east but they must survive on their own.

During this time,  the army is trained up with recruits from the Suebians. Riothamus is now to elderly to lead his people. He elects Rogatainus as a new leader. The Army that Arthur is to lead is of 5,000 men.

1,200 Veteran infantry in 4 cohorts of 300 men.

400 Light Archers in 2 cohorts of 200 men.

500 Elite Cavalry in one cohort.

400 Regular light Cavalry in one Cohort.

2,000 Hwicce infantry in 10 cohorts.

200 Hwicce light archers in one cohort.

300 Hwicce Light cavalry in one cohort.

The five Commanders are; Arthur [  The Pendragon], Medreut, Owain, Cadwy and Rogatainus.

note; 300 Suebians are given to Merlin as his Hearthguard.

March 486AD; The senior leaders of the Seaxons hold their Witan in Londene [London]. In the previous two years another 20,000 Jutes, Angles and Saxons have landed at points along the eastern and southern shoreline of Britannia. Food, shelter and donatives to pay their hearth troops were a priority for these leaders.

For Aelle,Bardulf, Colgrin and Osla there was only one option. Take the fight to the Wallisch. This time the Seaxons decide on different targets. Bardulf and Colgrin are taking their warbands North-west across the river Trent. Aelle and Osla want to attack westward along the Tamesis using the Akeman Street route.


Aelle has 3,800 warriors amongst the Jutes.

Bardulf and Colgrin can call upon 6,000 Saxons.

Osla has 4,800 Angles.

some of these warriors will be left to guard settlements.

April 486AD; A messenger gallops into Caerleon. The South Seaxons are on the move once more toward the Glyme. The horns are sounded. The army is assembled.

This time Aelle and Osla lead their Warbands further South from the site of the previous battle.


2nd Battle of the River Glyme, May 486AD.

The Seaxon Army; 6,500.

Aelle; 2,800 Jutes = 2.8 x 10 = 28 points.

1 General [Aelle] @ 2 points.

12 stands of Warriors @ 2 points = 24 points.

2 stands of Light Archers @ 1 point = 2 points.


Osla; 3,700 Angles = 3.7 x 10 = 37 points.

1 General [Osla ]  @ 1 point.

17 stands of Warriors  @ 2 points = 34 points.

2 stands of Light Archers @ 1 point = 2 points.


The Briton Army; 5,000 = 5.0 pts X 10 = 50 points.

1,200 Regular Infantry = 1.2 pts x 10 = 4 stands @ 3 points each = 12 points.

400 Light Archer Infantry = 0.4 pts x 10 = 4 stands @ 1 point each = 4 points.

500 Elite Clibanarii Cavalry = 0.5pts  x 10 = 1 stand @ 3 points + 2 Generals [ Arthur and Medreut] @ 1 point = 2 points.

400 Regular Light Cavalry = 0.4 pts x 10 = 1 stand @ 2 points + 2  Generals [ Owain and Cadwy ]@ 1 point = 2 points.

2,000 Hwicce Infantry = 2.0 pts x 10 = 10 stands @ 2 points = 20 points.

200 Hwicce Light Archer Infantry = 0.2 pts x 10 = 2 stands @ 1 point = 2 points.

300 Light Tribal Cavalry = 0.3 pts x 10 = 1 stand @ 2 points + 1 General  [ Rogatainus ]@ 1 point.

Notes;

* The Britons retain the Iniative Point for the entire battle.

* The battle will last for eight Game-Turns.

* The Seaxons move first on the first two Game-Turns.

* From Game-Turn Three until Game-Turn eight, the Britons move first

* The Briton Army fires first on each Game-Turn.

* The Glyme is not very deep, so stands can move through with no penalty.

Once again both armies face each other  across the River Glyme. Aelle is contemptuous of the Britons, having been responsible for the death of Ambrosius. Confident that his warriors will easily beat the Britons again, he leads his men across the river.

Osla, seeing Aelle advancing, does not want the Jutes taking all the credit for this victory so he also leads his warriors forward.

This time , as the Jutes and Angles  attack,  they are stunned to hear Germanic voices within the Briton army.  The Wallisch are also putting up a stern resistance. As the battle went on the Seaxons start to tire. 

Arthur seeing the Seaxon line falter gives the signal. As the horns are sounded the Briton line parts and Owain brings the cavalry forward into the enemy. This is enough to break the Seaxons.

The cavalry are reformed as the infantry go forward to pursue the enemy through the trees. Nightfall brings an end to the slaughter. Three days later, Arthur leads his victorious army into Caerleon amid great rejoicing.

They do not have time to rest before another urgent message arrives at Arthur,s headquarters. More Seaxons are west of the Trent!


*Most of the figures are Hat Industries with some of the figures being Newline Designs.

*Arthurs horse is from Ceaser Miniatures.

* The hills were made by Brian at Essex Miniatures.

* Some of the tree bases are from S and A Scenics.

* The trees are from various manufacturers.

* The square 40mm stands are made of picture framing cardboard.

* The round 40mm bases are from Minibits.

Historical Note;

Nennius wrote that Arthurs first battle "was at the mouth of the River GLEIN".  I think he got the spelling wrong. I think it was GLEIM from the Anglo-Saxon GLOEM,which means "sparkle' or "glitter".

The current River Glyme gets its name from Old Brythonic, meaning " bright water", so thats  why I put the battle there.  I inadvertantly stumbled on this when I was trying to work out logically where Ambrosius would face the Seaxons.

The  mouth of the River GLYME joins the river EVENLODE near the village of Bladdon. The village got its name from the old name for the EVENLODE, which was the BLADE.

The River Glyme also marks the frontier of what I think ,was Briton territory at that time.

Finally, the river Glyme runs through the Blenheim estate at WOODSTOCK. It was partially dammed by the famous landscape gardener, Capability Brown to form shallow lakes.


Sunday 9 May 2021

The 5th Century in Britannia: Part 5. Ambrosius, Aelle, and the Seaxons.

As before, this blog is my “ best guess “ as a wargamer, of events in this era, and an attempt to bring some reality to a rather hazy history.

 473AD: By this time Ambrosius [ Emrys Wledig ] is 63 years old. His Wards Arthur and Medreut are 6 and 8 years old respectively. Arthurs sister Anna is also 6. In eastern Britannia there are still communities trying to scrape a living from the soil. However they were in constant fear of the "Seaxon" raiders from the sea.

Note; All warriors of Germanic or Scandanavian origin could have been known to the Britons as Seaxons because of the fighting knife, the "Seax" that they all carried. The Seax had a blade 12"  [ 30cm ] long which broadened at the point and had a single cutting edge.The grip was 4" [ 10cm ] long.

There is the possibility that in time the word “Seaxon” became”Saxon”. Therefore all Germanic invaders were Saxon and could be why the Angles and Jutes fade into the historical background.

These weapons were relatively easy to produce with better quality items reserved for upper class warriors and leaders.

474 to 476 AD; Despite his best efforts, Ambrosius cannot stop Britannia fragmenting into smaller Kingdoms. Merlin is still in the background. As a Briton-born individual, who can also speak Latin he is always with Ambrosius in Council meetings.

The Round-Table Council of Britannia is now held at Caerleon.There are many leaders present. However through marriage and feud five main Kings have become the most powerful and regard themselves as equals. These are;

Erbin of Alclud.

Einon of Gwynedd.

Cadell of Powys.

Cador of Dumnonia.

Nynniaw of Gwent


The Allies of Ambrosius, Hoel and Riothamus have returned to their respective territories taking their troops with them. Amorica is under constant attack from Eurics Visigoths. Riothamus has problems not only with the Visigoths but also Geiserics Vandals.

Ambrosius has a hard time convincing the assembled Nobles that he needs a mobile army [ a Commitatenses], in order to stop any Seaxons settling in Britannia.  These new Kings do not trust each other and they regard Ambrosius as an Outsider, but they are in awe of Merlin. They grudgingly supply Ambrosius small numbers of men for the Field Army. His only Veterans are some of his Officers and his Cavalry.

Meanwhile, in Gaul the Saxons, Jutes and Angles are being forced out of Normandy and the Loire Estuary. there are also Germanic  warriors on Andum [ Jersey] and Lesia [ Guernsey].

476 AD; In Italy, the Western Roman Empire was in its final death throes. A barbarian Patrician by the name of Orestes had seized power. In turn he had promoted his son Romulus Augustulus [aged 16] to the position of Emperor. The centre of power in the waning Western Empire is Arelate ( Arles ) in south- eastern Gaul.

A Foederati General named Odoacer is the next to sieze power. Odoacer has Orestes killed. he then has Romulus exiled to Castelum Lucellum. Romulus is never heard of again.

Odoacer has the Imperial Regalia sent to the Emperor Leo in Constantinople with a message  saying that it was no longer required. With this act the Western Roman Empire ceased to be.

477 AD;  The incursions into Britannia begin in the Spring. Ambrosius at Caerleon gets a report that a large group of Seaxons with women and children have landed at Selsey. The leader of this group is called Aelle. he has three sons; Cymen, Wlencing and Cissa, along with 2000  Jutish people including 800 warriors in 20 ships.

Aelle moves north and attacks Chichester ( Noviomagus Reginorum). The town is in a poor state with dilapidated walls and there is only a small population. These people are killed or driven out with most making their way to Portus Aderni [ Portchester ].

As Ambrosius musters the army, more reports are coming in of Seaxon landings. Fifty ships have landed at Lundene on the Thamesis, carrying 5000 people including 2000 warriors. This is the Saxons under Bardulf and his brother Colgrin.

A third landing has taken place on the estuary of the river Welland. Another 2000 people including 700 warriors. This is Osla with his tribe of Angles.

477AD; Ambrosius decides that Aelle has to be dealt with first. Giving the army a victory would give them confidence. Ambrosius gives Medreut his first independent command.

In July Medreut sets out with his force taking seven days to reach the Chichester area via Glevum and Silchester. The force consists of;

3 cohorts of Auxilliary Infantry @ 200 men = 600.

600 = 0.6 x 40 = 24 points = 12 stands of Auxilliary Infantry @ 2pts.

1 Cohort of Light Archers @ 200 men;

200 = 0.2 x 40 = 8 points = 4 stands of Light Archers @ 1point = 4 points.

Medreut @ 1 point.

Owain @ 1 point.

2 stands of Militia Light Archers @ 1 point = 2 points.

1 Cohort of Light Cavalry ( javelins, spear, sword, shield, helmet ) @ 200 men;

200 = 0.2 x 40 = 8 points = 4 stands @ 2 points.


Aelle has been told of the Britons approach and draws up 700 warriors on Dummer Hill just north of Chichester ;

700 = 0.700 x 40 = 28 points;

Aelle @ 1 point.

Cissa @ 1 point.

Cymen @ 1 point.

Wlencing @ 1 point.

4 stands of Light archers @ 1 point = 4 points.

10 stands of Warrior Infantry @ 2 points = 20 points.

Some of the warriors under Cymen,s command are left within Chichester to protect the people. ( 2 stands of Warriors and 1 stand of Archers ).

Here are the opposing armies laid out for battle;


NOTE; There are two ways to fight this battle

1] Allow the Jutes to move first and fire first on every Game-Turn and to keep the Initiative Point on every Game-Turn.

This would stop the Briton army from being able to manouvre. Also, with no space to allow for "move-backs", the Briton army would start losing stands quite early in the game.

2] Play the game in the normal way.

The Watchtower can only be entered by Infantry.  One movement phase is required to move in. One movement phase out. Stands can Fire or engage in Close Combat after the Movement phase of the same Game-Turn.

Each game is played for 8 Game-Turns.
-------------------------“------------------------------

As Medreut forms his men Aelle leads an all-out charge downhill into the Britons. Before Medreut can react the men break! 


Some try to put up a fight but they are no match for Aelle,s seasoned warriors. Medreut joins Owains cavalry in fighting a rearguard action.


Having retreated, Medreuts force makes a weary journey back to Caerleon. Aelle now establishes his group in the area.

Noviomagus becomes Cissa-ceaster.  Modern Selsey becomes Cymensora at that time and the village of Lancing gets established.

The Winter Solstice of 477 brings a stormy meeting at Caerleon. Ambrosius asks the Kings for more support, pointing up the success of the Jutes and the possibility of the enemy tribes combining with the Scots-Irish. It is only a matter of time before the homelands are invaded.

After a series of angry meetings. Ambrosius gets the troops he needs. Towns on the frontier like Viroconium are repaired and manned. The fleet stays protecting the West coast.

478 to 483 AD; In this six year period, the Briton mounted troops continuously attack Seaxon terrritory. The infantry go out in small bands raiding where they can. Arthur and Medreut are 16 and 18 respectively and leading raids into enemy territory aided by experienced warriors

484 AD;  A pivotal point is reached. The Seaxons hold their first Witan ( a Council) at Lundene, which is now an Angle settlement.

The people are angry with their leaders because of the continued attacks by the “ Walisch “( the Britons ). A decision is made to attack into Gwent and on to Caerleon.

In May, 400 Jutes under Aelle, 500 Saxons under Bardulf, 500 Saxons, under Colgrin  and 800 Angles under Osla gather at Verulamium ( Saint Albans ). Bardulf is elected as leader. Three days later this army of 2,200 men commences the march westward on the old Roman road of Akemen Street toward Glevum.

Ambrosius, on hearing of this advance by the Seaxons, musters the army in the old amphitheatre at Caerleon. The army is expecting him to lead them. At 73 he can feel his body failing him but he knows he has to be there.

 Arthur is to lead the Elite Clibanarii,  Medreut, the  Infantry. Owain is to lead the Light Cavalry and assist Medreut. Morfael one of Nynniaw,s Veterans is to lead the Gwent Militia. The Briton Army of 2,600 men =2.6 x 20 = 52 points.

1,200 Auxilliary Infantry [ Javelins, Plumbata, Swords ] in 6 Cohorts; 1,200 = 1.2 points x 20 = 24 points = 12 stands @ 2 points each. 

200 Light Archers in 1 Cohort = 200 = 0.2 x 20 = 4 points = 3 stands of Archers @ 1 point + Owain @ 1 point.

200 Light Cavalry in 1 Cohort ( spear, javelins, helmet, sword and shield ).= 200 = 0.2 x 20 = 4 points = 1 stand @ 2 points + Arthur @ 1 point + Medreut @ 1 point.

300 Elite Clibanarii Cavalry in 1 Cohort = 300 = 0.3 x 20 = 6 points = 1 stand @ 3 points + Ambrosius @ 3 points.

500 Gwent Militia  [ javelins and spears] = 500 = 0.5 x 20 = 10 points = 5 stands @ 2 points each.

200 Gwent Light Archers = 200 = 0.2 x 20 = 4 points = 3 stands @ 1 point + Morfael @ 1 point.

A feeling runs through the Army that this is THE battle. weapons and armour are bought to their best. The Army takes the road leading East marching past Glevum. After three days, the Briton force reaches the valley of the River Glyme.

Ambrosius knows this is where he will fight his last battle so has donned his best armour. the Seaxon Army is also drawing near having arrived at the abandoned site of Alchester on the Akeman street route.


The next day, the two opposing armies draw up on opposite sides of the gently undulating valley.  The Seaxons facing West, the Britons East.

The Seaxon Army lines up in order;

Left Wing; 800 Angles = 800 = 0.8 x 20 =16 points= 7 stands of warriors @ 14 points + 1 stand of Light Archers @ 1 point +Osla @ 1 point.

Left centre; 500 Saxons = 500 = 0.5 x 20 = 10 points= 4 stands of warriors @ 2 points + 1 stand of Light Archers @ 1 point + Colgrin @ 1 point.

Right centre; 500 Saxons = 0.5 x 20 = 10 points = 4 stands of warriors @ 2 points + 1 stand of Light Archers @ 1 point + Bardulf @ 1 point.

Right wing; 400 Jutes = 400 = 0.4 x 20 =8 points = 3 stands of warriors @ 2 points + 1 stand of Light Archers @ 1 point + Aelle @ 1 point.

NOTE; All the warrior infantry carry throwing weapons. The River Glyme is very shallow so any stands can move and fire as normal while positioned in the river.

 However the Cavalry do not get the 3 points for attacking Infantry, if the Cavalry stand is itself positioned in the river.

The game is played for 8 Game-Turns.

Aelle and Ambrosius; 

 At the end of the 8th Game-Turn, if the stand representing Aelle is in an adjacent square to Ambrosius, one six sided die is thrown by the Seaxon Player. On a roll of 3,4,5 or 6 ; Ambrosius is removed from the board.


Ambrosius exhorts his men. Failure would mean the end for their families and country. Bardulf, being the elected leader of the Seaxon force tells the army that failure would see them and their families being swept into the sea!

After a brief moment of reflection, Ambrosius raises his sword with the battlecry; DUW A PRIDAIN!

Bardulf replies with WOTAN! 

After six hours of fighting both sides are exhausted with neither gaining an advantage. All the leaders are caught up in the fighting with the heaviest combat centred on Anbrosius’s position. Even the cavalry has been negated by the terrain. In a last ditch attempt Ambrosius launches his Clibanarii at the right wing of the Seaxon army where Aelle is positioned. This time Ambrosius with Arthur leads the attack. Aelles men lock shields as the horsemen approach uphill.

The horses can only trot at the enemy infantry and cannot force the line. As the fighting ebbs away, Aelle launches a spiculum which finds its mark. Ambrosius is mortally wounded! As the two sides draw apart the Seaxons withdraw behind locked shields. The Britons are to tired to pursue. The Britons claim a victory but it is phyrric.


The body of Ambrosius is carried back to Caerleon to be buried. The morale of the Army is low. the people are frightened. In the meantime the Seaxons have dispersed back to their settlements in high spirits. The Germanic settlers know they have won a great victory. Aelle,s status rises amongst the tribal leaders.

As the Winter Solstice of 484 arrives, the Kings gather to  bury Ambrosius, and to decide what to do next. Without the personal force  of Ambrosius, each King refuses to appear subservient to the others.  There is only one remaining character who has the Power and Mystery to exert any influence;

MERLIN.

As before, the table I use is 3 feet x 2 feet ( 60cm x 90cm). The figures are nearly all Hat Industries with some Newline Designs and Miliart..

The square bases are from picture framing card. The round bases are from Minibits.

The representation of Chichester is scratchbuilt. The Watchtower is an old model of a Saxon building with a scratcbuilt tower added.

The hills are from Brian at Essex miniatures. One hill is made from a garden kneeling pad from Wilkinson’s.

The wood bases are from S and A Scenics and the trees are from various manufactures

The river and road sections are cut from thin cardboard.

The Seax  or Scramasax 


Sunday 8 November 2020

The 5th Century in Britannia: Part 3. Ambrosius, Uthyr and the Death of Hengist.


 Once again the following article is my personal interpretation of events as a wargamer. Information of the battle site of Maisbeli I found online and in a book written by Ilka Sylvanne.

The original position of the actual town on rising ground to the east of  Mexborough is my own supposition.

In the early months of 462AD, Hengist, leader of the Germanic tribes in Lloegyr , knew of Vortigerns demise. He was also very aware of the capable Warlord leading the Walisch, and the soldiers that he led, well trained and well armed.

With that information in mind Hengist had sent out a message for all his Warriors to march North of the river Don and the Humber Estuary. The warriors were to gather at Petuaria ( modern day Brough ).

In May of 462AD, Ambrosius, leaving Uthyr to command the Reserve in Dumnonia, assembles the field army at Deva ( modern Chester ) and starts the five day march to the Don river. He is accompanied by Eldol, the Dux of Gloucester and Gorlois, the Dux of Dumnonia, each with their personal Retinue.

Camping at Manucium ( Manchester ) and Navio ( Brough-on-Noe), Ambrosius leads his army toward the Don. He knows that a major part of Hengists army will be somewhere in the area.

Meanwhile, Hengist has been told by Scouts that the Roman Army is marching East. He also knows the road Ambrosius will be following through the Pennines so decides to try an ambush. This is a place called Maisbelli ( said to be modern day Mexborough).

After a three day march Hengist reaches the area first and deploys his troops. Ambrosius gets wind of the attempted ambush but still marches on. Both sides camp near the intended battlefield. On the eve of battle both opposing Warlords know what is at stake. 


Neither side can back down, the loss of prestige would be to great. It was victory or death!.

The Roman Field Army; 5,400 (54 points).

Ambrosius @ 2 points.

Eldol, Dux of  Glevum (Gloucester )@ 1 point.

1 stand of Glevum Militia archers @ 1point.

Gorlois, Dux of Dumnonia @ 1 point.

I stand of Dumnonian Light Archers @ 1point.

4 stands of Light Roman Cavalry ( spears and javalins ) @ 2 points = 8 points.

12 stands of Auxilliary Infantry @ 2 points = 24 points.

4 stands of Light Infantry Archers @ 1 point = 4 points.

4 stands of Regular Infantry @ 3 points = 12 points.

Note; I use the word Roman to describe the Amorican army as their tactics and equipment were Romanic in origin.


Hengist,s Army; 4,000 ( 40 points ).

Hengist and his Jutes; 1,500 ( 15 points).

Hengist @ 1 point.

6 stands of Warrior Infantry @ 2 points = 12  points.

2 stands of Light Archer Infantry @ 1 point = 2 points.


Octa,s Saxons; 1,300 ( 13 points).

Octa @ 1 point. 

5 stands of Warrior Infantry @ 2 points = 10 point.

2 stands of Light Archer Infantry @ 1 point = 2 points.


Ebissa,s Angles; 1,200 ( 12 points).

5 stands of Warrior Infantry @ 2 points = 10 points.

1 stand of Light Archer Infantry @ 1 point.

Here are the armies laid out for battle;

I've portrayed Eldol and Gorlois as dismounted and representing them and their respective bodyguards but these leaders may well have been on horses.


Here is a map of the battlefield ( conjectural);


Notes for Solo play;

● The Romans retain the Initiative Point for the entire battle.The Romans win any tied results.

● Throw die for each side to see which side is moved first. The entire army can be moved.

● Throw dice for each side to see who fires first. The entire army can fire if able to do so.

● combat is simultaneous.

● The town of Conisborough ( Cunungeburg ? ) cannot be entered.

● Any stands in the Warband army forced off the table will be counted as casualties.

● The game is played for eight Game-Turns.

For a 2 player game;

● The game can be played is normal. However the Romans still retain the initative point for the game.

● The game is played for eight Game-Turns.

● The winner will be the player who looses the least number of stands.


Conjectural notes.

While looking up the details of the area and playing out the battle, something didn't seem quite right. It has been said that the battle was hard fought. As the Roman troops gained the upper hand Hengist retreated to Conisborough near where the castle stands to make his final rally.

The field of battle ( Maisbeli) has recently been identified as Mexborough. Looking on Googlemaps the information says that its a 50 minute walk from Mexborough across the river Don to Conisborough.

After fighting for some time would the men have enough stamina for say, a 25 minute run across a river of unknown depth and turn to face the enemy?, especially if they were chased by Cavalry. Also any troops fleeing a battle would take the route they had previously marched over, in this case the North-east.

I fought the first battle on flat ground. It was a walkover for the Romans. However having looked at the area there is a hill to the East of Mexborough where the River Dearne runs into the Don.

 I do not know if this hill is natural or a waste heap from a former mine in the area. It's shape certainly looks like it could have had a stockaded town on the top. I restated the battle with the hill, giving the Warband army the higher ground.


I reset the battle with the hill to the East and positioned Hengists army in front on the slope. This time, even with the Romans having the Iniative Point throughout the battle it was a much harder contest. Hengist did not enter the town. The gates may well have been locked so he made his last stand there allowing the rest of the remaining warriors including Octa and Ebissa to get away. 

This is just my theory, but you never know ? - - -.

The battle was played out on a 3 foot by 2 foot board. ( 90cm x 60cm )

The figures are from Hat Industries with a few from Miliart and Newline designs. The flat hills are by Brian at Essex Miniatures. The tall hill and stockade sections are scratchbuilt. The trees are by various manufacturers.

The river and track sections are made from thin cardboard. The figure bases are from picture framing cardboard. The round 40mm mdf  bases are from Minibits. The tree bases marking out the wooded area are from S and A Scenics. The two houses are either Peter Pig or Hovels.

Postscript:

At the end of the battle Gorlois entered into close combat with Hengist and captured him. After the battle it was decided in council that Hengist was sentenced to death. He was beheaded and Ambrosius gave Hengist full pagan rights in his burial.

Sunday 11 October 2020

The 5th Century in Brittannia : Part 2. Hengist, Horsa and Ambrosius

Once again this is my personal interpretation as a wargamer of events as presented by the historians.

454AD started like most recent years within the Western Roman Empire. Various tribal Elders steeled themselves and their followers for more trouble to come. Everything was in turmoil. The only constant was Aetius, the powerful Roman Warlord, keeping the balance of power in the West after his victory over Atilla at the Catellaunian Fields.

That all came to an end in September of this year when  Aetius was assassinated by a rival jealous of his success. This paved the way for more bloodshed as various Germanic leaders fought for territorial control in Gaul, Hispania and Himlingoje.

The situation in Britannia having been relatively quiet was also about to change. Hengist, leader of the Gewissi ( Jutes) was deep in thought during the Winter of 454. He realised that, with Aetius now dead, he could make a bid for power and wealth in the country.

There was no one who could stop him. The Britons (or "Wallisch) were to divided and to weak. The Wallisch Council in Londene had never ever paid them enough to make up for the Jutish blood shed in their defence.

In early 455AD Hengist and his Brother Horsa made their move. Taking to their ships with their followers, they sailed  North up the East coast in groups. The main group sailed along the Humber and down the river Don. 

Note 28-10-20:
I don’t know if the River Don was navigable by boat it’s entire length at that time. It is possible that Hengist and his warriors had to walk part of the way.


 The one commodity that will bring money lies at Derwent. Not Gold but something  the the Romans prized for the manufacture of their weapons and armour: Lead!. Other groups land at Holderness above the Humber Estuary. From these points, they fan out to raid villages, and smaller settlements.

 The Gewissi have been sailing the rivers and coastline for ten years fighting the Frankish Pirates, The Picts and Scots. They know where they are going.

When the Nobles realise what is happening they are at a loss as to the solution. The only one with the power and influence is Vortigern. He is detested by the Romanised members of the Council for his Scots-Irish background and for employing the Gewissi.

He uses the situation to his advantage. In return for the Council declaring Vortigern as Pendragon ( High King ). Vortigerns son Vortimer is declared as Warleader and he along with his brother Catigern gather 1,500 Picts and Scots-Irish Federated troops  ( using their Fathers connection) with which to oppose the Gewissi.


The first battle takes place at Derwent between Vortimers 1,500 men and the 700 men of Hengists Warband.  (This village is now below water at Ladybower Reservoir)

The Battle of Derwent: Spring 455 AD.

Scots-Irish and Pict Army; 1,500 = 15 points x 2 =30 points.

Vortimer @1 point.
Catigern @ 1 point.
12 stands of Warriors @ 2points = 24 points.
2 stands of Light Cavalry @ 2 points = 4 points.

The Jutes ( Gewissi); 700 = 7 points x 2 = 14 points.

Hengist @ 1 point.
Horsa @ 1 point.
5 stands of Warriors @ 2 points = 10 points.
2 stands of Light Archers @ 1 point = 2 points.


Here is a map of the battlefield ( conjecteral) ;


● The Jutes get the Initiative Point every Game-Turn.
● The Jutes move first on every Game-Turn.
● The winner after 8 Game-Turns is the Player with the lowest number of stands lost.
● The Jutes win if they still have 4 stands remaining at the end of the game.
● The river Derwent can only be crossed via the bridge. Any stands entering the river will be lost.
● The hills to the North cannot be entered. The battlefield can only be exited via the East, West or South. The River Don is to the East of the battlefield.

In the historical and hard fought battle, Hengist is beaten and he and his men are pursued back to his ships on the Don

From there he, and his men sail back to Thanet. Having beaten Hengist, part of  Vortimers Army go against other groups of Gewissi in Holderness and drive them back to their ships.


It takes three days sailing for Hengist and all his men to reach Thanet. He knows that Vortimer will come after him. He has fifteen days to prepare his remaining force and he knows he will be outnumbered.

Realising where they would go, Vortimer and Catigern gather up their Army and march the 250 miles South-East toward Thanet, receiving supplies in London on the way. Vortimer looses men on the march due to straggling, wounds and desertion. Some of the warriors are not prepared to be away from their villages in Rheged, Gwynedd and Powys.


Fifteen days later, two opposing battle lines faced each other at a fording point on the River Medway at Episford ( modern Aylesford).

 Hengist had been told by his Scouts that the Walisch Army is not as large as he thought it would be. Hengist takes a gamble and leads his men out for battle.


Hengist and his Jutes ( Gewissi) 700 = 7 points x 2 = 14 points.

Hengist @1 point.
Horsa @ 1 point.
5 stands of Warrior infantry @ 2 points = 10 points.
2 stands of Light Archer skirmishes @ 1 point = 2 points.

Vortimer and his Scots-Irish 800 = 8 points x 2 = 16 points.

Vortimer @ 1 point.
Catigern @ 1 point.
4 stands of Warrior Infantry @ 2 points = 8 points.
2 stands of Light Archer Skirmishers @ 1 point = 2 points.
2 stands of Light Cavalry. @ 2 points = 4 points. 

The Scots-Irish get the Initiative Point every Game-Turn.
The Scots-Irish move first on every Game-Turn.
The Scots-Irish fire first on every Game-Turn.
After 8 Game-Turns the side loosing the least number of stands is the winner.


Once again Vortimer and Catigern go on the attack and, after a stiff fight drove the Gewissi back. This time the Gewissi (Jutes) were harried back to Thanet.

Hengist and his remaining men were given no time to make a stand. They had to take to their ships to save their lives. During the course of this protracted skirmish, Vortimer and Horsa lost their lives.

With the Jutes now banished from Britannia, the remainder of the Picts and Scots-Irish army under Catigern is encamped near London. Vortigern is now undisputed master of the round table Council of Britannia. 

But Hengist wants revenge. Not only for being beaten by Vortigerns army, but also for the death of his brother.

In the following year 456AD, Hengist returns to Thanet. This time he is accompanied by his two sons Octa and Ebissa alongside 4,000 battle hardened Jutes, Angles and Saxons in 40 ships. In Gaul the Saxons are gradually being forced out of their new territory by the Franks. 
This time Hengist is determined to stay, so spends the rest of the year consolidating his position.

Vortigern needs time to assemble his Army that has scattered back to their various settlements, he has no forces large enough to face Hengist immediately.
To add to his problems Vortigern hears rumours of an army being assembled in Amorica in order to come to Britannia.

457AD finds both opposing armies once again  assembled for battle on the ford at Aylesford.


Hengists Army: 4,000 (40 points).

Hengists Jutes; 1,500.

Hengist @ 1 point.
6 stands of Warrior Infantry @ 2 points = 12 points.
2 stands of Light Archer Infantry @ 1 point = 2 points.

Octa,s Saxons; 1,300.

Octa @ 1 point.
5 stands of Warrior Infantry @ 2 points = 10 points.
2 stands of Light Archer Skirmishers @ 1 point = 2 points.

Ebbisa and the Angles; 1,200.

Ebissa @ 1 point.
5 stands of Warrior infantry @ 2 points = 10 points.
1 stand of Light Archer infantry @ 1 point.

Catigern,s Army;

The Scot-Irish;
Catigern @ 1 point.
8 stands of Warrior Infantry = 2 points = 16 points.
1 stand of Light Infantry Archers = 1 point.

The Picts;
Pascent @ 1 point.
2 stands of Light Cavalry @ 2 points = 4 points.
7 stands of Light  Infantry skirmishers @ 1 point = 7 points.


Note; The Medway river can only be crossed via the Fording point.
●Both sides will throw a D12 at the start of each Game-Turn to decide which side has the Iniative and moves first.
●The battle will last for 8 Game-Turns.
● The winner of the game is the side will the lower number of stands lost.


In the historical battle, Catigern,s army is defeated,

Note; 11-11-20. It is said that Catigern died at this 2nd battle of Aylesford and is buried there.

Vortigern now knew for sure that an Amorican army would arrive eventually. Therefore he decides to attempt peace talks with Hengist hoping he can use the Germanic troops as Federates.

Hengist arranges a Banquet for Vortigern and 300 Wallisch nobles. The Gemanic warriors called everyone in Britannia " Wallisch" meaning "foreigners".However this time Hengist wants nothing less than absolute power. As Bretwalda,or Warlord, Hengist has to award his followers with gifts and lands that he has promised them.

To that end he ensures that each British Noble has a warrior sitting next to him. Each warrior is armed with a concealed knife. At a given signal, Hengist's men kill virtually all the Britons. Vortigern is taken hostage. In exchange for his life and eventual release he gives Hengist Eastsex, Southsex and Middlesex, along with Londene, Wincestre, Lindum and Eboricum. Arbeia on the Eastern end of Hadrians wall is also given to Hengist. 

Saxons, Jutes and Angles now spread out across Lloegyr taking slaves and land. The remaining Romano-Britons are in full retreat. Most head toward Dumnonia and the Southern coast of Powys around the Severn Estuary. Some of the Picts retreat Northward toward Bana on the Wall along with the Scots Irish. 

Vortigern, now totally discredited  by his actions retreats to his fortress of Dinas Emrys in Northern Gwynedd along with 1,000  Pictish and Scots-Irish warriors of his personal guard.
 
Note; Vortigern,s remaining  son, Pascent is not heard of at this point. I am surmising that he went either to Ireland or North into Western Caledonia.

By 458AD British Nobles with their followers are arriving in Amorica ( Brittany) with stories of the disaster unfolding in Lloegyr. Aldwyr, the High King of Amorica decided it was time to act. He chooses Ambrosius and his brother Uthyr the two remaining sons of Constantine the 3rd as Commanders of the Army. Both had been trained in Roman military matters and both had gained experience in fighting the Franks and Alans.

In the Spring of 459AD Ambrosius and his brother Uthyr land at Totnes in Dumnonia along with 8,300 regular troops. The Romano-Britons in the area gather to the standards. 


The first mission for Ambrosius is to capture the Usurper Vortigern. He takes half the army North into Gwynedd to attack Vortigerns fortress ( Dinas Emrys). Using siege techniques and fire missiles the fortress is destroyed. Vortigern dies during the attack everyone assuming he has died in the flames.

From then on and during 460AD, Ambrosius takes his army through Gwynedd and Powys driving out the Scots-Irish settlers. By the end of that year after a successful campaign Ambrosius is declared Pendragon (Warlord) of Britannia, at Woodchestre (near modern Stroud in Gloucestershire.)

In 461AD Ambrosius and his brother Uthyr start planning operations against the Gemanic invaders.

Army of Ambrosius; 8,500.

The Field Army; 5,200

Ambrosius @ 2 points.
Eldol ( Dux of Gloucester)  @ 1 point.
Gorlois  ( Dux of Dumnonia )@ 1 point.


4 stands of Light cavalry @ 2 points = 8 points.
4 stands of Regular Infantry @ 3 points = 12 points.
12 stands of Auxilliary Infantry @ 2 points = 24 points.
4 stands of Light Archers @ 1 point = 4 points.

Reserve in Dumnonia; 3,300.
Uthyr @ 1 point.

4 stands of Light Cavalry @ 2 points = 8 points.
8 stands of Auxilliary Infantry @ 2 points = 16 points.
4 stands of Light Archers @ 1 point = 4 points.
4 stands of Light Ballista Field Artillery @ 1 point = 4 points.

Notes;
The Roman Cavalry I use at this point in the history do not have body armour and ride unarmoured horses.

Although all Regular infantry in this era were known as Peditum, I use the words " Regular" and " Auxilliary" to separate those troops wearing mail body armour and those without, this being the latter.

Credits;
Nearly all the soldiers are Hat Industries. The wagons,mules and civilians are from the Ceaser Miniatures Roman Train boxes. The Eagles are scratch built. 

The regular infantry standing behind the Generals are Newline Designs Roman Infantry. The boat crew are Emhar Viking crew.
The ship's are scratchbuilt. The buildings are from Hovels and Peter Pig.
The square bases are picture frame cardboard. The round 40mm mdf bases are from Minibits.


Thursday 11 June 2020

Roman Britain Part 4 : A Campaign.

The following is some rough campaign ideas for fighting battles in Roman Britain during the 4th century ( 301AD to 400AD).

A single stand of figures is roughly equal to 100 men.

The  Infantry Unit;

The Unit represents a Cohort of Roman troops or a Numerus of Federated tribesmen.
The unit is represented by 4 stands of figures.
They do not have to be armed all the same, so you can mix n' match the stands.

The Infantry Warband;

These are of 4 stands. Again they don't have to be armed all the same.

The Ala Petriana;

This Roman cavalry unit is of 8 stands. They do not have to be armed all the same. This unit does not have to operate together and so, could be split into smaller groups of stands

Warband cavalry;

Not available in great numbers and limited to the Picts and the Scots Irish;
Each of these Nations would each have one group of 4 stands.

War chariots;
A bit controversial this one. The Scots-Irish were also known as the Del Riatta or
" people of the chariot". Wether that refers to another time, I don't know, but because the Scots-Irish had settlements on the West Coast of Caledonia (what
is now Scotland )they might have been used so, I have one group of 4 stands.

Command Stands;

Within my own rules I just have a command stand for the whole group of stands comprising one army, however if you have command stands for each group then go with that.

Note: The stands within each unit do not have to move together. They can be moved independently of each other. However the choice is your own.

The scenarios;

Below are listed four groups of towns that can be attacked by specific tribal groups depending on their location. Besides some of the names is the letter (N) denoting a Numerus being present. A Numerus is a Cohort of Federated troops with some training but carrying their own weapons.

In the first three scenarios listed, a 12 sided ( or two D6) die is required. This number decides which town the Warband has appeared at.

Dicing for size of forces;

The Roman player may already have a Numerus present in the town. If any others are within one move distance on the map ( between one town and the next is one move distance ) these other units may take part.


The Warband player throws a D6 for the number of stands they have;
For Land Battles;
1 or 2:  8 stands.
3 or 4: 16 stands.
5 or 6: 24 stands.

If the Warbands are landing by boat;
1 or 2: 8 stands.
3 or 4:12 stands.
5 or 6: 16 stands.

Each marked town on the map represents the town and the area around it so this may decide the type of battle to be fought. If outnumbered two to one or more, the weaker army or group can have defenseworks like a town stockade or marching camp.


If numbers are three-to-two, the weaker side will pick which edge to fight from after the stronger side has rolled for scenery ( say three pieces).

The Legion;

If a full Legion takes the field  ( which was rare ), 16 stands will be required.  Again these stands don't have to be armed all the same. One command stand will represent the Prefect or whoever you nominate as senior commander. In my previous blog I said that Legions would be 2000 men. However the 16 stands would give you 1,600 men which is probably closer to the norm!

The Petriana Horse,

If the full Ala takes the field this will be represented by 8 stands. Again, they don't have to be armed all the same. Once again this will give you 800 men rather than 1000 which ,again would probably be closer to actual numbers.

I'm being a bit loose on organisation of figure types for a reason. At this time various units were being moved all over the place and to the continent. There was also continual warfare. The supplies of weapons, armour and food must have been disrupted a fair bit. I'm sure some units had a less than organised appearance.

The Scenarios:

Throw a D6 to decide which scenario you wish to follow:

Score 1: Picts and Scots-Irish; Northern Incursions.

Roll a D12 ( or 2 D6 ) to see which town the Warband starts from;

1 to 3 : Luguvalium ( N).
4 to 6 : Brocarum ( N ).
7 to 9 : Brementenacium ( N).
10 to 12 : Verbeia.

Score 2; Scots-Irish West Coast raid.

Roll a D12 ( or two D6 ).

Deva : 20th Legion ( 2,000 men ).
1 or 2: Segontium.
3 or 4 : Isca.
5 or 6 : Glevum ( N ).
7 or 8 : Lindinus ( N ).
9 or 10 : Corinium Doburiorum ( N ).
11 or 12 : Isca Dumnoniorum ( N).

Score 3 or 4 ;  Fankish or Frisian Pirates. The Picts ; East Coast.

Throw a D12 ( or 2 D6 );

1 or 2 : Bannovallum.
3 or 4 : Ventacenorum.
5 or 6 : Combatovium ( N) ☆
7 or 8 : Lindum ( N).
9 or 10 : Durobrivae, 3rd Cohort, 2nd Augusta. ☆
11 or 12 : Durovigutum ( N ). ☆
Rutupiae : 1st and 2nd  Cohort, 2nd Augusta. ☆

Note: Those town marked thus; ☆ , must be taken first then Londinium can be claimed. Londinium becomes a permanent Saxon base.

Score 5 or 6 : Rebellion!.

Throw a D6. If a "4 " is thrown for example, the first four towns on the list revolt and have to be defeated by regular troops. Any Warbands in the area will join the troops in revolt.

Score 1: Virconium (N ).
Score 2 : Vectinis.
Score 3 : Portus Dubris; 4th Cohort,  2nd Augusta.
Score 4 : Portus Aderni ( N ).
Score 5 : Gabrantovicorum ( N ).
Score 6 : Arbeia ( N ).

MOVEMENT ON THE MAP.

● Players each throw a D6. The higher scoring player moves first. The second Player  moves next. After this, players take it in turns to move. Once both players have moved, fought battles etc, that concludes one Campaign Turn.

● A whole group will be in one square. When two opposed groups move into a square, a battle is fought.

● A group can be moved one square across country or two squares on a road.

● If ships are used they will move three squares on the map. They can move to any part of the shoreline but troops can only move away from the boats on the following turn.

● If a group moves into a town square with no opposition they can sack the town which is worth 5 points.


● A group needs 20 points for a successful raid. They also need to get back across the border or away in their boats. Each stand can " carry" 5 points with them, though if they fight, they must stash a marker on the table representing 5 points of loot.


Ships:


I know that not everybody has ships in their collection. A flat cardboard tray will suffice. It has to be big enough to hold one stand.

The Romans have access to a Navy of 12 ships. 4 are based at Rutupiae. 4 are based at Portus Aderni. 4 are based at Arbeia. The Roman player cannot replace these ships.

These ships were called Picati. They could hold 100 men. They were painted a blue-gray colour. The Roman crewmen also had blue-Gray tunics

 At the end of the 8th Campaign turn, the Warband player can sail 4 ships from either, Hibernia, Caledonia or Himlingoje ( Denmark ).

The ship's move three squares on the map.

Well, that's it for the moment. Hopefully the above will give you some ideas about a campaign. It's deliberately vague in places so that you can bring your own mechanisms in to play.

As the man said:  Ficta voluptatis causa sint proxima veris
( Fictions meant to please should approximate the truth ).