Showing posts with label gridwargaming. Show all posts

Sunday 22 May 2022

The Small Boat Section.

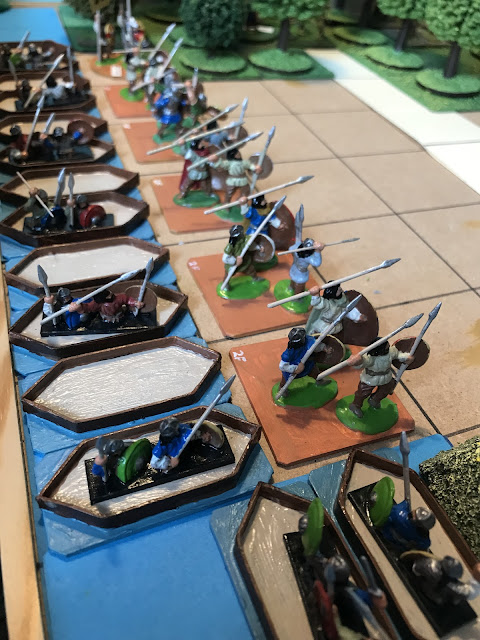
 In the previous blog I have shown some small boats for Aelle to attack Lechlade. 

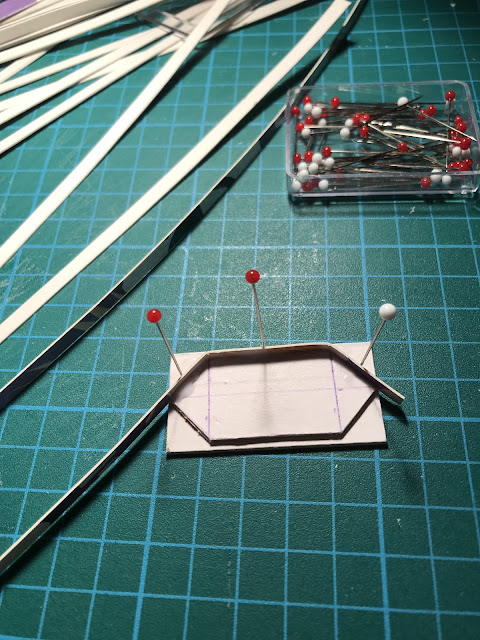
I thought that maybe I should show how I built them. For this you will need;

* Some cardboard. Picture framing cardboard for the base and the thin cereal packet cardboard for the sides.

* Some dressmaker pins.

* Some PVA glue.

* A pair of scissors.

* A craft knife. ( young people might need to enlist the aid of mum or dad.)

THE BUILD.

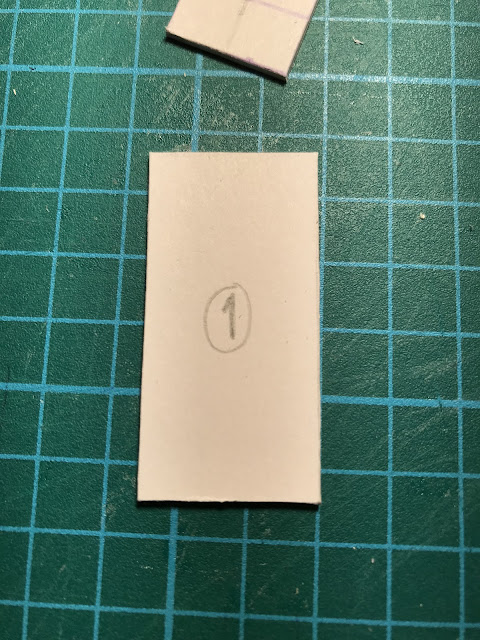
1)  Cut the base 50 mm long by 25mm wide.  ( 2 inches x 1 inch.).


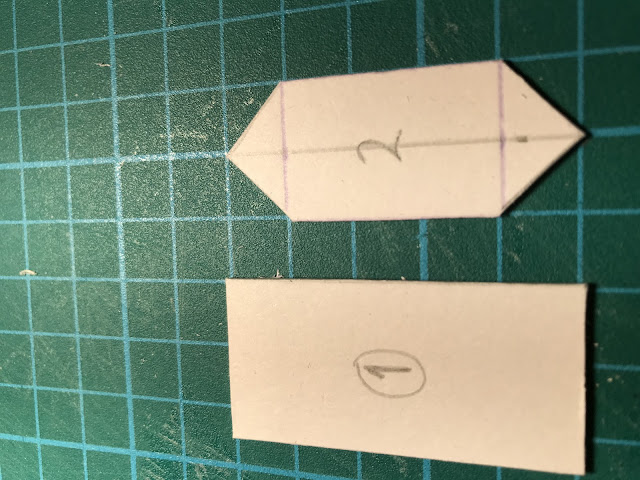
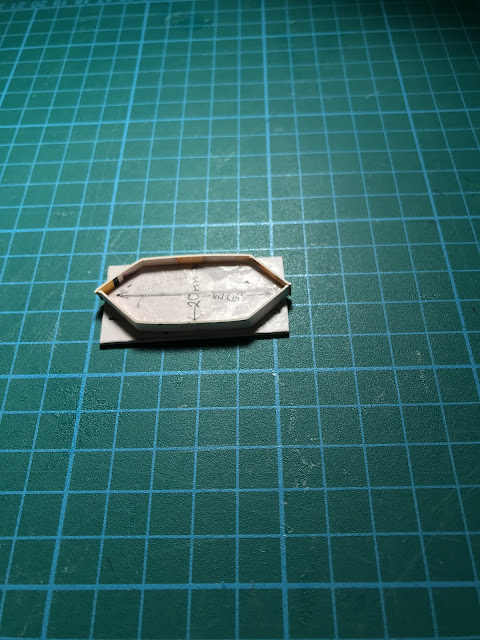
2) cut the boat shape.This is 50mm long x 20mm wide. ( 2 inches x 7/8ths). If you use thin card, you may have to glue two layers together.


3) Angle the ends of the boat shape about 10mm. ( 1/2 an inch ).


4) Glue the boat shape centrally, to the base.


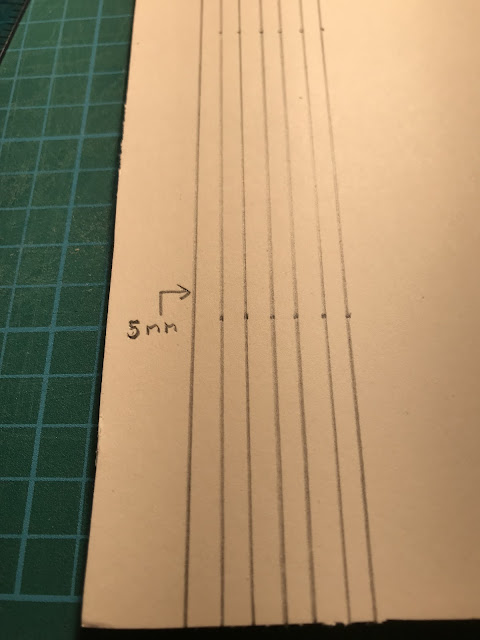
5) From the thin cardboard, cut some strips 5mm deep x 100 mm long. ( 2/8ths deep x 4 inches long).


6) Glue one strip to one side of the base, using three dressmaker pins to hold the piece in place. Leave this to dry.


7) Once dry, trim the glued side piece. Glue the second side piece to the boat shape, again using three dressmaker pins. Leave this to dry.


8) Once dry, trim this second piece to match.

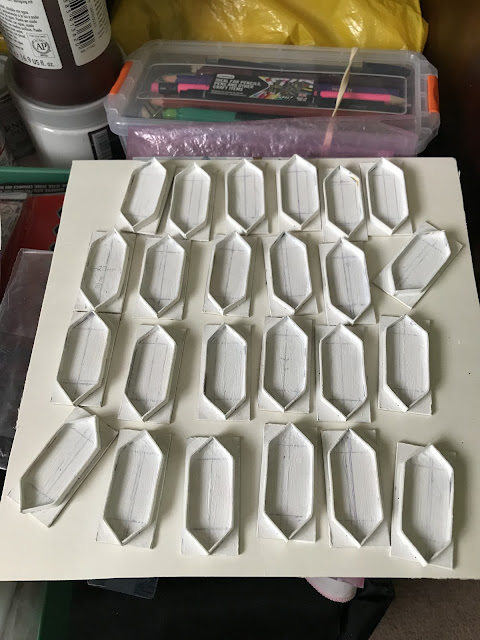
9) This now completes the boat. I coated mine in Texturing paste although you could coat the model in slightly watered down PVA glue. This is just to strengthen the model.


If required, you could pre-cut a load of pieces and “mass produce” a fleet.


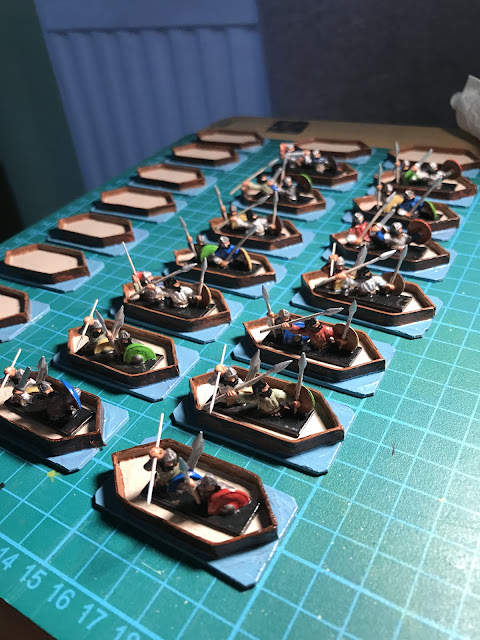
These boats could have a sail added if you want to use them as ships for 2mm, 6mm or 10mm figures. For 15 or 20mm, you could cut the figures in half (two or three ) to represent the boat crew.

In late Roman times these river craft were known as Dromons and were painted light blue. They could hold about 40 soldiers. The Saxons, Danes and Vikings had the same sort of vesssel holding a similar number of men.

The larger ships I built in a previous blog could be used as cargo ships..

The use of boats brings another dimension to the game.


The boats are meant to hold one stand for 15 or   20 mm figures. They could be deemed to hold more stands in the smaller scales.


The 5th Century in Britannia part 8 Arthur’s Battle of the River Bassus 487 AD.

 The following is my personal interpretation, as a wargamer, of events in this era. Everything I have written here is conjectural but I have attempted to use history as a guide. Any mistakes are my own.

486AD, June to December. Arthur’s victory against the Seaxons is a cause of great celebration amongst the Britons. The senior Nobles are glad to see a Seaxon host defeated. Inwardly, they are concerned that Arthur would become Dictator, then use the army against them after defeating the Seaxons.


Once again during the Winter Solstice, the Kings gather at Caerleon. They are;

Alclud;  Tutagual. ( his father Cinuit has died).

Gwynedd;  Einon.

Powys;  Cadell.

Dumnonia;  Geraint Llyngesic. ( the Fleet Owner ).

Gwent;  Iddon Ap Ynyr. 

Arthur, with Merlin in attendance joins the Council. Despite their personal misgivings, the Kings declare their support for the Pendragon. They all consign a number of troops for the Commitatus. The conversation amongst the assembled Kings then turns to the invaders. All of them have stories of more Seaxons  arriving on the East and South coast.

In the North, there has been a steady stream of civilians crossing the river Trent. In the South, there are still dwindling communities of Britons fighting off Seaxon raiders east of Dumnonia. At Winchester, the South Gate is blocked off. At Silchester, the North and East Gates are also sealed. At Wanborough along with the other towns is a cadre of Citizen Militia led by the Town Prefect. These are called upon to fight off any raiding parties. These towns are still being supplied from Corinium ( Cirencester).

Meanwhile, in Lundene, Osla meets with Aelle. They are both aware of the Saxon defeat. They decide on a plan to cut off the supply route to the South and East, making it easier to take over the territory.

Seaxon spies have found out that the Tamesis can be navigated by boat. The Tamesis flows past Durnovaria. At this point the river becomes the Isis, which can be navigated as far as Lechlade where the road South can be disrupted.

Because the area south of the Tamesis around Durocorinium and Silchester, still has strong Briton garrisons, Osla and Aelle are aware that if they wish to strike at Arthur’s home territory, they must move through the Tamesis valley or on the river itself.

Lechlade is an old Roman Colonia, which has fallen into disuse and is sparsely populated.


In a combined effort sixty boats can be collected or made. Each boat can carry forty warriors and a Pilot. Because he has a ten day march to Lundene via Stane Street. Aelle can only call on 2,600 warriors. The rest are required to guard Chichester. Aelle’s warriors will go into the boats


Osla can call on on 5,000 warriors. He will lead his men West along Akeman Street toward the river Glyme. The idea is that Osla will distract Arthur so that Aelle can destroy Corinium. Aelle  and Osla come to an agreement. Osla will recognise Jutish Rights to land South of the Tamesis. In return Aelle recognises the Tamesis as the Southern border of Angle territory.

487AD,  January to April. Arthur and his Generals bring the army together at Caerleon training the men in formations. Meanwhile, cavalry patrols are still watching the border country. Reports are surfacing that Seaxon raids have diminished. Merlin has heard whispers that a major attack is imminent and that boats are involved.

Arthur sends a request to Geraint of Dumnonia for ships to patrol the Severn Estuary and the South coast, sailing East as far as Vectis ( Isle of Wight ). Toward the end of April, Arthur moves the army to Glevum. Into May, the number of Seaxon raids diminish even further. Arthur moves the army once more to Corinium, both to watch Akeman Street and the Isis. As the army is set in motion, a patrol arrives reporting that a Seaxon Army is advancing West along the Akeman Street route.

In a brief meeting with his Generals, Arthur tells them to advance to Lechlade. Once there the army is to prepare for battle and to ensure his Standard can be seen. A messenger is sent to Durocorinium asking for the Militia to assemble at Lechlade.

By positioning his army at Lechlade, Arthur is using his army as bait, hoping that the Seaxons will attack him on ground of his own choosing.

ARTHURS ARMY OF THE BRTONS = 4,600 = 4.6 points x 10 = 46 points.

1,200 Briton Veteran Infantry = 1.2 points x 10 = 12 points = 4 stands @ 3 points.

1,200 Auxilliary Infantry ( Hwicce) = 1.2 points x 10 = 12 points = 5 stands @ 2points + Rogatainus @ 2pts.

400 Light Archers = 0.4 pts x 10 = 4 points = 4 stands @ 1 point.

600 Elite Cavalry = 0.6 pts x 10 = 6 points = 1 stand @ 3 points + Arthur @ 3 points.

400 Regular Light Cavalry = 0.4 pts x 10 = 4 points = 2 stands @ 1 point + Owain @ 2 points.

300 Hwicce Light Archers = 0.3 pts x 10 = 3 pts = 3 stands @ 1 point.

500 Gwent Militia = 0.5 pts x 10 = 5 points = 1 stand of Militia @ 2 points + Cadwallon @ 1 point + Cadwy @ 1 point + Medreut @ 1 point.

Arthur has the army drawn up in and around the remains of Lechlade. Palisades are erected to the north of the town. The remains of the town wall facing South to the river Isis are reinforced.


When Osla arrives at the road junction, his Scouts tell him that the Briton army is to the South. Corinium is to the West. Osla wants to take the town but realises that Arthur is positioned on his Southern flank with his back to the river. The opportunity is to good to pass by. Eventually, the Angles are drawn up in their shieldwall facing the Briton position. For a while both sides stare at each other in silence. Arthur realises Osla is playing for time. It is not long before he finds out why. Aelle,s fleet of sixty boats makes an appearance.


Suddenly Osla raises his sword and with a massive “ HOOM” shouted by the warriors the Angle shield wall rolls forward and battle is joined.


OSLA AND THE ANGLES = 5,000 men = 5 points x 10 = 50 points.

Osla  @ 1 point.

23 stands of Warriors @ 2 points = 46 points.

3 stands of Light Archers @ 1 point = 3 points.


AELLE AND THE JUTES = 2,600 men = 2.6 points x 10 = 26 points.

Aelle  @ 2 points.

11 stands of Warriors @ 2 pts = 22 points.

2 stands of Light Archers @ 1pt = 2 points.

As the Veterans meet the attack from the North, the Jutes run their boats up the bank of the river and attack piecemeal. This attack is met by Rogatainus and his Suebian Auxilliaries. As Aelle steps up onto the bank he immediately realises that the plan has changed and directs his warriors at the Britons.


The fighting is hard and everything hangs in the balance. Arthur and his Generals are in the thick of the fighting as are Aelle and Osla.


After some four hours of fighting, the situation is becoming desperate. Arthur’s troops are putting up a strong resistance but numbers are beginning to tell. As the fighting continues, Arthur and his Generals become aware that the Seaxon attack is starting to falter. Briton warcries are heard from the Western side of Lechlade.

The arriving Britons are attacking Aelle.s Jutes. A decision is made to concentrate on the Seaxons attacking the North side of Lechlade. As the Britons press forward, the Angles start to give way. Arthur signals his Cavalry and they move forward. The Angles break. Arthur tells Owain to take some of the Infantry to aid Rogatainus. As the Jutes also break formation the slaughter begins.


Many men are killed at the riverbank as the remaining Jutes take to  their boats. Aelle manages to get free. Meanwhile the Angles are being harried by the Briton Cavalry. Arthur has once again prevailed, but the army has taken a battering. Both the Angles and the Jutes have also lost heavily.

The three Prefects and their Militias are praised by Arthur.

Mauric led 700 Militia from Glevum;  0.7 pts x 10 = 7 points = 3 stands @ 2 points + 1 leader @ 1 point.

Manseutas led 600 Militia from Corinium;  0.6 pts x 10 = 6 points = 2 stands @ 2 points, 1 stand of archers @ 1 point, 1 leader @ 1 point.

Andragius led 600 Militia from Durocornium; 0.6pts x 10 = 6 points = 2 stands @ 2 points. 1 stand of Archers @ 1 point. 1 leader @ 1 point

The day after the battle, the dead are buried and the army reorganised.. The Seaxon boats are broken up and burnt. On the second day, Arthur leads his army to Glevum and onto Caerleon. Aelle has taken his remaining warriors back to Lundene. A few days later Osla leads his survivors into the City. In subsequent meetings there are heated exchanges and recriminations. Eventually wiser heads prevail and a loose agreement is made to combine against Arthur in the future.


For the moment Arthur has been victorious, however, in private conversations with Merlin the subject is always;  how long can the Britons prevail.?———-

HISTORICAL NOTE;

Nennius places Arthur’s Sixth battle at the river Bassus. As I understand it “ Bassus “ is the feminine of “Bass”. The only part of a river in Britain with a female name is the Isis. This is ( as shown on the map ) the upper part of the Thames between Dorchester ( Durnovaria ) and Thames Head. The name is used in conjunction with the annual Oxford and Cambridge boat race in modern times.


Lechlade was a busy river port at the height of the Roman Empire, but gradually fell into disuse in the later era. The town was ( and still is) roughly eight miles from the Akeman street junction.

If Arthur wanted to watch both Akeman Street, The Isis and keep the army together then, much like Syagrius at Soissons, he needed the enemy to come to him. This is why I think Lechlade was chosen. As far as I can make out, Lechlade sits on a promontory of land with the rest of the ground east and west being flatter.

There must have been a reason for Nennius to say that Arthur fought a battle “AT” the Bassus.If Arthur placed his army there, the main route to his base at Caerleon would be undefended.As stated above, he needed to provide a powerful incentive to the enemy.

Therefore, to be there, Arthur must have had some notion of an imminent waterborne assault . Aelle would have had to use Stane Street  to move his men to Lundene. This would be to avoid any Frontier Briton settlements around Silchester. This would have been quite an undertaking, as the warriors would need enough food etc for ten days. ( Roman  Military Posts were no more than three days march apart.). The ammount of food available would dictate how many men go on campaign.

The Angles knew that Arthur’s army was a powerful fighting unit therefore they would need help. The Saxons were in no state to fight another campaign so the Angles need the Jutes. These people were still trying to establish themselves on the South coast, in an area close to Briton territory, therefore only a few warriors wold be available to support a direct attack into the Briton heartlands.

Would it be possible for the Germanic tribes to organise a strategic attack?. Well, by this time many of the Germanic warriors and leaders would have had some contact with the Roman Military either as foes or as Foederati. The leaders would have served as Officers. Looking at the lives of Aetius and Ricimer, I certainly think it is reasonable.


The sealing off of the gates at Silchester and Winchester is a fact, but nobody knows when this actually happened. The town of Reading came into being as a Germanic settlement. The names of the three Prefects are real and did exist but I don’t know when. However I thought they could help Arthur.

The boats used by the Jutes were of a Scandinavian design which could hold forty men and a Pilot. The current train of thought is that the Angles, Jutes and Saxons rowed across the North Sea and the Channel.

When looking at a map of Roman Britain, Cirencester is a major hub controlling the roads to the South of Britannia. The countryside was heavily wooded so the Roman Roads were still important to movement. Gaining Cirencester would put the Seaxons closer to the centre of Briton resistance at Caerleon. If the River Severn could also be controlled, that would sever communications with Amorica.

With regard to the Militia intervening in the battle, well, according to Google it takes four hours to walk from either Wansborough or Glevum. Given enough planning these men could get to Lechlade in time to effect the battle.

There are still more battles for Arthur to fight,—————.

THE BATTLE:

Some special rules are required to fight this action.

* The Britons retain the initiative for the length of the battle.

* The battle will last for 8 Game-Turns.

* The Angles and Jutes move first on the first Game-Turn. From Game-Turn 2 until Game-Turn 8, each side will dice to see which side moves and fires first.

* The Britons win any ties.

* The Town Militias enter play on Game -Turn 5. The Militia are moved when the Britons move. Aelle,s Jutes will attack the town first. They will not engage the Militia until they appear from the trees.

* Stands in boats are worth one point.

* Stands cannot fire while in a boat.

* The palisade counts as a trench for the Britons.

* If the walls are attacked, the attacker looses 4 points. = 2 points for attacking uphill and a further 2 points points for attacking the wall.

*  The soft ground to the East of Lechlade cannot be entered.

* Boats move at two squares and cannot move if there is no crew.

* The buildings cannot be moved. The buildings inhibit movement and block line of sight for firing.

CREDITS;

The figures are mostly Hat Miniatures. Some are from Newline Design so a mixture of plastic and metal. The boat crew tokens were made from cutting plastic figures in half.

Most of the standards were scratch made from masking tape but Arthur’s standard is a decal from Little Big Man Studios as is the Elite Cavalry Standard. The standards are made from javelins supplied from North Star Miniatures.

The buildings were from Peter Pig. The walls and palisade are from Alternative Armies. The hills are a mixture of premade by Brian of Essex Miniatures, the others being scratch made from cork tiles. The trees are by various manufacturers, Guagemaster being one. The river and roads are made from thin card.

The tree outlines were made made by S and A scenics. The round mdf bases on some of the trees and command bases are 40mm and are from Minibits. The square stands are made from picture framing cardboard.

* The boats are scratch built from cardboard.


Thursday 7 April 2022

Battle of Cuneo ( Madonna Dell' Olmo ) Piedmont 26th - 30th September 1744.

 This article is of my own perspective on the events of this battle. Any mistakes are my own.  

In this ongoing war in Italy, the Spanish and French Governments realised that they needed to take out the Sardinian Kingdom in order to secure northern Italy for the Spanish Crown. The politics in France were convoluted, however the French Crown was at this point in the war, commited to helping Spain.


Acting on the advice of the mountain warfare expert, General *Pierre Bourcet, the French army under the Prince of Conti had split into nine columns and moved east through the valleys of the Alps bypassing Piedmontese strong points, then successfully regrouping to storm the Citadel of Demonte. The Spanish army under General  the  Maquis of La Mina had moved from Genoa to link up at Cuneo.

( * Napoleon also sought the advice of this General prior to his invasion of Italy. )

The Prince of Conti had a plan to take the fortress which was a key part of the defence of Piedmont. This combined Franco-Spanish  army was 50,000 strong. The Prince's plan involved in splitting the army into three parts. The first part was to dig the siege lines. The second part was east of Cuneo to stop any Piedmontese forces interfering with the siege. The third part was to be the field army


Meanwhile Charles Emmanual 3rd, King of Piedmont-Sardinia was not sitting idle. This Monarch and his First Minister, the Marquis D'Ormea were absolute masters of the Machiavellian politics of the 18th century. The King was also very much involved with his army on a par with Frederick of Prussia though not so draconian!!..

While the French and Spanish Generals, themselves no novices in the 18th century art of war, were starting their attack, the King had devised a plan of his own. He did have 3,000 Grenzer light infantry and a Regiment of Hussars sent by the Empress of Austria, however his plan was entirely dependant on his own army in which he had complete confidence. 

I thought at this point it might be worth giving some information on this army, as the Italian theatre is often overshadowed by the events further north and east. The Piedmontese army at this time was an Infantry army much like the Dutch, Danish and the other Italian States. There were only four regiments of Dragoons and two  of Horse. There were no Light Cavalry so , during this war the Piedmontese relied on the Austrian Hussars.


The bulk of the army were the Infantry. There were 32 Regiments, totalling 58 battalions. Of the Regiments, there were 8 National, 10 Provincial, 3 Italian, 3 German, and 7 Swiss.

There were also the Vaudois which were a regular Militia of up to 10 Battalions. Finally there was a peasant militia ( another 10,000 )that  the King could call on if required. The army had a well trained Artillery Corps of 1,500 men to service the Guns and to instruct other staff. In addition there was a very respected Corp of Engineers attached to the Artillery.

( I obtained this information from " The war of the Austrian Succession, A Wargamers Guide Part 8 uniforms of the Italian States" by  Stephen Manley ).

Within Cuneo was a garrison of 3,200 men commanded by General Leutrum who, although into his eighties led a spirited defence!!.

As the siege of Cuneo commenced, the King moved his army from Saluzzo, South toward their opponents. As the two armies moved into position to the West of Cuneo, the Piedmontese placed abattis on broken ground to defend their right flank from being overwhelmed.. Battle commenced when the Austrian Grenz charged toward the village of Madonna Dell'Olmo ----..


THE SPANISH ARMY;

23,000 Infantry ( including artillery )= 23 points x 2 = 46 points.

2,000 Cavalry = 2 points x 2 = 4 points.

1 General   ( La Mina ) @  1 point.

2 stands of Spanish Guard @ 4 points = 8 points.

2 stands of Irish Infantry @ 3 points = 6 points.

2 stands of Walloon Infantry @ 3 points = 6 points.

5 stands of Spanish Infantry @ 3 points = 15 points.

1 stand of Spanish Light Infantry  @  1 point.

2 stands of Cavalry  @  2 points = 4 points.

3 stands of Light Artillery @ 1 point = 3 points.

THE FRENCH ARMY;

21,000 Infantry ( including artillery ) = 21 points x 2 = 42 points.

4,000 Cavalry = 4 points x 2 = 8 points.

1 General ( Conti )  @ 1 point.

2 stands of Grenadier Infantry @ 4 points = 8 points.

9 stands of Line Infantry @ 3 points = 27 points.

2 stands of Heavy Artillery @ 2 points = 4 points.

2 stands of Light Infantry @ 1 point = 2 points.

4 stands of Cavalry @ 2 points = 8 points.

Note; I have no information on the composition of the French and Spanish forces in the battle, so the above list is my best guess.

THE PIEDMONTESE ARMY;

1 General ( King Charles)  @  3 points.

1 General ( Castagnole )     @ 1 point.

1 stand of Cavalry  @ 2 points.

2 stands  of Dragoon Cavalry @ 1point. = 2puts.

1 stand of Austrian Hussars @ 1 point.

1 stand of Guard Infantry @  4 points.

1 stand of Grenadier Infantry @ 4 points.

2 stands of Vaudois Militia @  2 points = 4 points.

4 stands of Light Artillery @ 1 point = 4 points.

( I've added the Engineers to the Artillery ).

1 stand of Austrian Grenz Light Infantry @ 1 point.

8 stands of Line Infantry  @ 3 points = 24 points.

GARRISON OF CUNEO;

3,200 = 3.2 points x 2 = 6points r/d.

1 General ( Leutrum )  @ 2 points.

2 stands of Garrison Artillery@ 1 point = 2 points.

2 Stands of Infantry @ 1 point  = 2 points


Notes,

* The rivers cannot be crossed by any troops except at the bridges.

*Any stands entering the rough ground cannot move further that turn and suffers a minus 2 on a Die roll if engaged in close combat.

* For the purposes of fire and close combat the abbatis counts as a trench for the Piedmontese to defend, as do the gabions for the Spanish.

* The Piedmontese move and fire first every Game-Turn. The Piedmontese retain the initiative Point for the entire game.

* The Piedmontese win any tied results.

* The garrison of Cuneo cannot sally out during the battle although the garrison can fire at any enemy targets.

The Winner:

This is tricky! because the Piedmontese lost so that their militia had time to play havoc with the enemy supply lines. Therefore. The Piedmontese must attempt to stay on the field for 8 Game-Turns. If they do, they win

If the Piedmontese retreat before 8 Game-Turns are complete, they have lost.

Historical Note.

As stated above, this was the the Kings plan. To keep the Spanish and French focused on his army while the Piedmontese Militia wrecked havoc on the enemy supply lines and magazines. This was exactly what happened.

Spanish and French jubilation gradually turned  to depression in the days following the battle. La Mina and Conti realised that without supplies their position was untenable. As the autumnal rains set in the army retreated back to France.

Credits;

The figures are mostly Miniature Figurines with some Peter Pig and Essex Miniatures.

The abattis is from Irregular Miniatures.

The gabions are made by Last Man Last Bullet Miniatures.

The tent models are from Peter Pig.

The citadel and house are scratch built.

The trees are from various manufacturers.

Most of the hill sections are made from cork tiles. There are some made by Brian at Essex Miniatures.

The river and road are made from thin card.


The battle was fought on  the  3 foot by 2 foot table. ( 90cm x 60 cm ).

FOOTNOTE:

I managed to fight this battle solo. After 8 Game-Turns the Piedmontese won the battle.

However, it was a near run thing!. This was the situation at the end of Game-Turn eight.


These Modenese were glad to sit out this battle.


Thursday 13 January 2022

Battle of Soissons, Northern Gaul 486AD.

 This article is my personal interpretation of historical events based on the limited information available. Any mistakes are my own.

As Arthur struggled against the invading Seaxons in the north of Britannia, the political landscape was changing in Gaul. Childeric, the King of the Franks had died leaving his son Clovis to rule the *Kingdom.

*Note; Childeric may have been a Roman appointed Dux or Comes but by this time these Officials were being regarded as a Rex or King.

When Aetius died there was no single person in the West with enough influence or the military strength, to keep the tribal groups from breaking out of their  settled areas. Therefore Clovis decided to expand the Frankish Kingdom by first using a combination of force and diplomacy to unite all the Frankish tribes under his rule.

Secondly, having suceeded his father, Clovis had no compunction in continuing the alliance with the Kingdom of Soissons which he saw as the last vestige of the failed Roman Empire in the west. Soissons itself was also an armoury.

In June 486 AD, Clovis led an army of 5,000 warriors south across  the river Aigne, to the east of Soissons. Syagrius, being told of the approach of the Franks realised that he would have to meet this army head on. There was no help coming from the Empire because the   " Roman Army" in the west was Visigothic and they held all the ground between the river Loire and Italy.

Therefore, Syagrius could not sit behind the walls of his Capital. He was not to know that this would be the " Last Hurrah" of the Old Empire,-------


ARMY OF SOISSONS;

6,000 Infantry = 6pts x 5 = 30 points.

1,000 Cavalry = 1 pt x 5 = 5 points. (No armour, shield, helmet, sword, javelins, )

1 General [ Syagrius ] @ 1 point.

1 Tribune [ Arbelius ]fictional @ 1 point.

2 stands of Regular Infantry @ 3 points = 6 points.

8 stands of Auxilliary Infantry @ 2 points = 16 points.

7 stands of Light Archers @ 1 point = 7 points.


THE FRANKISH ARMY;

5,000 Infantry = 5pts x 5 = 25 points.

Clovis @ 2 points.

Ragnachar @ 1 point.

Chararic @ 1 point.

3 stands of Archers @ 1 point = 3 points.

9 stands of Warriors @ 2 points = 18 points.


Battle Notes;

* The Franks retain the Initiative Point for the entire battle.

* The Frank's move first and fire first on the first Game-Turn.

* The river Aigne can only be crossed at the bridges.

* If the Franks retreat, they can only exit the board over the bridge at Venizels.

* If the Romans retreat ,it will be southward  at Berzy-le-Sec.

*Chararic  and his group of three stands cannot move for the first two Game-Turns. On the third Game-Turn his group can be moved as part of the Frankish army.

* The battle is played for 8 Game-Turns. The Winner is the side that inflicts the greater number of casualties and/or manages to push the enemy to their respective exit points.

* The game board is  3 feet x 2 feet ( 90cm x 60cm).

Here is the map;

Historical Notes;

Nearly everything written above is pure conjecture. The only information known, is that there was a battle, the combatants, the place and thats all. I went on to the British Battles website as , during World War 1, Soissons was part of the battle of Arras. I could also be wrong because in referring to Soissons the old writers could have been referring to any place within the entire Province rather than the City itself.

 However I reasoned that if this was going to be a decisive battle, it would be at the City. The map on the British Battles website gave me some detail about the terrain. Soissons is at the head of a valley which stretches south. I have represented the eastern side of the valley, known these days as the Noyant Plateau.


  In regard to the armies I referred to the Internet. On paper the army of Soissons should have been 25,000 strong but having seen a list of units, I worked on minimum numbers. With the Franks, I used the numbers given on Wikipedia.

The positioning of the opposing armies is my best guess. At the end of the battle, Syagrius, having lost, took off south in order to gain the safety of the Court of Alaric the 2nd, who had succeeded his father Euric as King of the Visigoths. Therefore, my conclusion was, that the  army of Soissons must have been positioned south of the town


Clovis had to cross the Aigne to attack. By all accounts the river itself is difficult to cross and without boats or any major engineering capability, the Franks must have used a bridge. The closest bridge to Soissons is at Venizels if the bridge existed at that time.


I wondered why if this was the case, that the bridge had not been guarded. I came to the conclusion that Syagrius would want the Franks to attack confident that he could wipe out the army and in the process eliminate Clovis. Syagrius didnt know that initially, Chararic, one of the Frankish chiefs hung back at the start of the battle hoping to join whichever side gained the upper hand. In the event, he stayed with Clovis.

I leave to you, the reader, to draw your own conclusions. In regard to Syagrius, well, he arrived at Alarics Court hoping he could claim sanctuary but it was not to be. Clovis threatened Alaric with military action if he did not give up Syagrius.

Syagrius was sent back and executed by Clovis.. The last of the " Roman Provinces" in the West had fallen.

CREDITS;

The figures are mostly Hat Miniatures, mainly the Gothic and Roman Medium Infantry sets. 

The Roman Cavalry are modified Hat Light Cavalry Archers.The Roman archers on the ground are Newline Designs as are the Roman Regulars. A few of the Frankish warriors are by Miliart. 

The hills are made by Brian of Essex Miniatures. The trees are from various manufacturers. The wood outline stands are from S and A Scenics. The dark age buildings are from either Hovels or Peter Pig ?. The town walls and buildings within are scratchbuilt.

The square stands are 40mm and made from picture framing cardboard. The round stands are 40mm circular mdf made by Minibits. The road and river are made from thin card. One of the bridges is from Kallistra and been modified. The standards are made from sticky labels and hand painted. The poles are from Northstars pack of Javelins.


Friday 24 December 2021

Battle of Mill Springs, Kentucky, January 19th 1862.

 This is my own interpretation of the battle as a wargamer. Any mistakes are my own. The numbers given below for each formation is my own best guess. This battle was also titled Logan's Crossroads.

As the war progressed the Union Administration did not want Kentucky going over to the Confederate Government. Having been repulsed at the Wilderness Road, the Confederate General  Felix  Zollicoffer moved further West in another attempt to disrupt Union activity.

In late 1861, a Confederate force of 6,000 men and 16 guns was camped at Mill Springs, on the South bank of the Cumberland River. Zollicoffer realised that if he could establish a camp on the north side of the river, he would be better placed to interdict Union activity between Somerset and Lebanon.

Zollicoffer,s force was also part of the Confederate Defense Line which was to prevent Union forces from interrupting rail shipments of supplies from southern and western Virginia.

Zollicoffer managed to gather up some rivercraft enough to transport 5000 men and 12 guns across the Cumberland to Beech Grove, leaving 1,000 men and 4 guns at Mill Springs. Both camps were entrenched.

Having been told of the Confederate movement, Union General George H. Thomas moved his 4,500 troops to Logan,s Crossroads [ modern day Nancy ]. about 10 miles north of the Confederate position. In the meantime Major General George B. Crittenden arrived to take control of Confederate forces.

Crittenden wanted to attack Thomas,s force before it could link up with Union General Albin F. Schoepes Division to attack the Confederate base.

The early hours of January 19th found the Confederate force from Beech Grove marching north in the rain and fog to suprise and attack Thomas,s Union force.

Unfortunately for the Confederates, the Union 10th Indiana Infantry and 1st Kentucky Cavalry, on piquet duty were wide awake!. as battle was joined, elements of Albin Schoepe,s Union formation were force marching to reinforce Thomas,-----


UNION ARMY; 4,500 = 4.5 X 8 =36 points.

( This total includes The reinforcements from Schoepe commanded by McCook ).

1 General, George H. Thomas.  @ 1 point.

1 General Robert L. McCook @   1 point.

12th New York Line Infantry ( 300 ) = 0.300 x 8 = 2 stands @ 1 point = 2 points. (R/d)

2nd Minnesota Line Infantry (500 ) = 0.500 x 8 = 2 stands @ 2 points = 4 points.

9th Ohio Line Infantry (800 ) = 0.800 x 8 = 2  stands @ 3 points = 6 points.

7th Ohio Line Infantry ( 500 ) = 0.500 x 8 = 2 stands @ 2 points = 4 points.

4th New York Line Infantry (500 ) = 0.500 x 8 = 2 stands @  2 points = 4 points.

2nd Tennessee Line Infantry ( 500) = 0.500 x 8 = 2 stands @ 2 points = 4 points.

7th Tennessee Line Infantry ( 500 ) = 0.500 x 8 = 2 stand @ 2 points = 4 points.

10th Indiana Line Infantry ( 500) = 0.500 x 8 = 4 stands @ 1 point = 4 points.

1st Kentucky Cavalry ( 300 ) = 0.300 x 8 =  2 stands @ 1 point = 2 points.

Whitmores Battery : 8 guns x 30 men = 240 men = 0.240 x 8 = 2pts r/u = 2 stands of Light Artillery @ 1 point = 2points.


CONFEDERATE ARMY; 5,000 = 5pts x 8 = 40 points.

1 General. George B. Crittenden  @ 1 point.

1 General. Felix Zollicoffer  @ 1 point.

15th Mississippi Line Infantry [ 800 ] = 0.800 pts x 8 = 6 pts [r/d]. 3 stands of Line Inf @ 2 pts.

16th Alabama Line Infantry [ 500] = 0.500 x 8 pts = 4 pts. 2 stands of Line Infantry @ 2 pts.

17th Tennessee Line Infantry [ 500] = 0.500 x 8 pts= 4 points. 2 stands of Line Inf @ 2 pts.

19th Tennessee Line Infantry [ 800 ] = 0.800 pts x 8 = 6 points. 3 stands of  Line Inf @ 2 pts.

20th Tennessee Line Infantry [ 500 ] = 0.500 pts x 8 = 4 points. 2 stands of Line Inf @ 2 pts.

25th Tennessee Line Infantry [ 500 ] = 0.500 pts x 8 = 4 points. 2 stands of Line Inf @ 2 pts.

28th Tennessee Line Infantry [ 500 ] = 0.500 pts x 8 = 4 points. 2 stands of Line Inf @ 2 pts.

29th Tennessee Line Infantry [ 500 ] = 0.500 pts x 8 = 4 points. 2 stands of Line Inf @ 2 pts.

Saunders Cavalry Battalion [ 300 ] = 0. 300 pts x 8 = 2 points. 2 stands of Cavalry @ 1 pt.

Bledsoe,s Battery, 12 guns x 30 men = 360 = 0.360 x 8 = 3 points [r/u ] = 1 stand of Heavy Artillery @ 2 points  and 1 stand of Light Artillery @ 1 point.

Here is the map;

The Battle;

* The Union Army has the  Initiative Point for the entire battle.

* The Confederates move first, and fire first on the 1st Game-Turn.

*From Game-Turn 2 until Game-Turn 8, both sides will roll a die to decide who moves and fires first. It also determines which side wins any tied results during the Game-Turn.

Ordered Movement:

This battle was something of a “ meeting” engagement.

For the Confederates, on the First Game-Turn only the 19th and 15th Infantry can move.

On the second Game-Turn, the 17th, 25th, 28, 16th and 20th can move.

On the third Game-Turn, Saunders Cavalry, the Field Guns and the 29th can move.

The Confederate army was strung out on the road which was muddy and it took time for the units to come into action.

Any stands entering the river section cannot fire.


The Generals:

CRITTENDEN,

It has been written that Crittenden wasn’t quite himself at this battle and didn’t have a clear idea of what was happening. Therefore. If a player wishes to move Crittenden, a 6 sided die is rolled. On a roll of a 5 or 6, Crittenden can be moved.

ZOLLICOFFER;

During the battle, Zollicoffer was in the front line. In the bad light he confused a Senior Union Officer as one of his own. As Zollicoffer rode off, another Union Officer saw what was happening and shot General Zollicoffer as he was riding away. Therefore, if Zollicoffer comes within range of a Union stand roll a 6 sided die. If a 5 or 6 is rolled, Zollicoffer is removed.

THE UNION ARMY;

The Union Army cannot move until the 10th Indiana and 1st Kentucky retreat to the snake fence.

The 7th and 9th Ohio with General McCook cannot move until Game-Turn 4. These Regiments were of German Immigrants who were veterans of the wars in Europe.


The Weather;

The weather on the morning of the battle was foggy with rain. This had an adverse effect on the weapons especially amongst the Confederate Infantry.  A number of them had old flintlock smoothbore rifles which some of the men were seen smashing against trees in their frustration.

Therefore, 2 points will be deducted from every firing die rolled in the game. this will result in more combats than usual.

FIRING RANGE; All rifle fire will be at two squares range. Field Gun range is four squares.

The hedgerow or"scrub" and the snakefencing do not provide any cover and only hinder movement to artillery and cavalry.

As before in previous scenarios, I don’t know if there was any true horse artillery so all artillery is moved at two squares.


CREDITS;

The figures are a mixture of Peter Pig and Miniature Figurines. The flags are from Peter Pig.

The hills are made from garden kneeling mats from Wilkinsons. The trees are from various manufacturers, one being Guagemaster.

The wood outline bases are from S and A Scenics , some from picture framing cardboard. The river and road sections are from thin cardboard.

The square figure stands are cut from picture framing cardboard. The round 40mm mdf bases are from Minibits.

The snake fencing and hedgerow [ 6mm woodland ? ] is from Northumberland Painting Service and MBM Scenery.

The tentline hidden in the top left of the board is from Peter Pig.

As before, the board is 3 feet x 2 feet, [ 90cm x 60cm ].


Friday 12 November 2021

The 5th Century in Britannia, part 7: Arthurs Battles of the Dark Waters.

 This article is my personal interpretation as a wargamer, of events in this era. Any mistakes are my own.

FIGHTING THE BATTLES;

* The Briton Army keeps the Initiative Point for the duration in every battle.

* The Briton Army moves first in every Game-Turn in every Battle.

* The Briton Army fires first where possible in every Game-Turn in every battle.

* Each battle will be played for eight Game-Turns, unless one side concedes before.

* In the first three battles, the rivers are shallow and do not impede movement and firing

* In the fourth battle the river Wharfe is more difficult therefore, stands must stop moving when they enter the river. Stands cannot fire whilst positioned in the river. They also suffer the combat penalty.

May 486 AD. After the second battle of the River Glyme, there was no time for the Britons to celebrate. Having received a message from King Einon of Gwynedd that Seaxons had crossed the Ouse at Eboricum. Arthurs army is marching north.

After eighteen days, the Briton army reaches Deva [ Chester ] which King Einon is using as his Capital. While the army prepares, 4,000 Saxons have been ravaging the area west of the River Ouse.

Arthur has 3,500 men with a further 800 men of the Gwynedd Militia. Einon has already lost a number of warriors trying to halt the Seaxon raids, but there has been no unified effort.

Arthur,s scouts locate the Seaxon host at Coccium [ Wigan ]. Therefore, his first destination was Condate [ Northwich ]. While in camp, Arthur is informed that the Seaxons are heading south-east laden with plunder and heading toward Manucium [ Manchester ].

As the morning progresses Arthur gives the orders. The army marches to the North of Manucium.  As the Saxon army spots the Briton army approaching, Bardulf and Colgrin order their warriors into a shieldwall. The Battle of the Dark Waters begin.

BATTLE OF THE RIVER DOUGLAS JUNE 486 AD. GWYNEDD. ( 1st battle ).


THE BRITON ARMY; 4,530 = 4.530 pts x 10 = 45 points r/d.

900 Veteran Infantry = 0.900 pts x 10 = 9 pts = 4 stands @ 2 pts + *1 General @ 1 point =9pts.

300 Light Infantry Archers = 0.300 pts x 10 = 3 pts = 3 stands@ 1 point = 3 points.

375 Elite Cavalry = 0.375 pts x 10 = 4 pts =  *Arthur @ 2 pts + 1 stand of Cav @ 2 pts = 4 pts.

280 Regular Light Cavalry = 0.280 pts x 10 = 2 stands @ 1 pt = = 2 points. 

1,500 Hwicce Infantry = 1.500 pts x 10 = 7 stands @ 2 pts each = 14 points.

150 Hwicce Light Infantry Archers = 0.150 pts x 10 = 1 stand @ 1 point.

225 Tribal Light Cavalry = 0.225 pts x 10 = 1 stand @ 1 point.

800 Gwynedd Militia =:0.800 pts x 10 = 3 stands of warriors @ 2pts each + 1 Lt Archers @ 1 point + *1 General @ 1 point = 8 points.

* Arthur.

* Medreut.

Cadwy  @ 1 point.

Owain @ 1 point.

* Cadwallon.

Rogatainus @ 1 point.

THE SAXON ARMY; 4,000 = 4.000 pts x 10 = 40 points.

Bardulf @ 1 point.

Colgrin @ 1 point.

4 stands of Light Archers @ 1 point = 4 points.

17 stands of Warrior Infantry @ 2 points = 34 points.


Bardulf tells Colgrin the army must retreat eastward slowly and stay closed up.

Arthur tells Cadwy that he is to signal the attack. Once the army is assembled, Arthur has the horns sounded and Cadwy moves forward followed by Cadwallon and Rogatainus.

As the battle progresses the Seaxons start to retreat to the east. Arthur forbades any pursuit. The Seaxons are on the move for many hours through the night. Having reached the Old Teme river, they  have no time to rest before Arthur's army arrives.

BATTLE OF THE OLD TEME RIVER; GWYNEDD, JUNE 486 AD, ( 2nd battle).


THE BRITON ARMY; 3,800 = 3.800 pts x 10 = 38 points.

700 Veteran Infantry = 0.700 pts x 10 = 3 stands @ 2 points = 6 points.

200 Light infantry Archers = 0.200 pts x 10 = 2 stands @ 1 pt = 2 points.

350 Elite Cavalry = 0.350 pts x 10 = 1 stand @ 1 point. ( * Arthur @ 2 points.)

270 Regular Light Cavalry = 0.270 pts x 10 = 2 stands @ 1 point = 2 points.

1,200 Hwicce Infantry = 1.200 pts x 10 = 6 stands @ 2 pts = 12 points.

150 Hwicce Light Infantry Archers = 0.150 pts x 10 = 1 stand @ 1 point.

200 Tribal Light Cavalry = 0.200 pts x 10 = 1 stand @ 1 point.

600 Gwynedd Militia = 0.600 x 10 = 3  stands @ 2 points = 6 points.

* Arthur.

Medreut  @ 1 point.

Owain @ 1 point.

Cadwy  @ 1 point.

Cadwallon @ 1 point.

Rogatainus @ 1 point.

THE SAXON ARMY; 3,000 = 3.000 pts x 10 = 30 points.

Bardulf @ 1 point

Colgrin @ 1 point.

4 stands of Light Archers @ 1 point = 4 points.

12 stands of Warrior Infantry @ 2 points = 24 points.


The Seaxons locked shields near the riverbank. The Teme is not very deep. As soon as Arthur has his army assembled, he signals the attack. The Briton infantry make a number of assaults while the cavalry harry the wings of the Saxon host.


Being tired, it is not long before the Saxons start to break. Once again Arthur stops any pursuit. His men are told to rest and eat. Medreut and Cadwallon have both been wounded.

The Seaxons have to move east, following the Roman road past the old fort of Camuludunum. Many of the warriors are exhausted, so Bardulf calls a halt on the east bank of the river Calder. At midday, Arthur's army appears again. Once more the Saxons lock shields on the bank of the river.

BATTLE OF THE RIVER CALDER, GWYNEDD 486 AD ( 3rd battle ).


BRITON ARMY; 3,100 = 3.100 pts x 10 = 31 points.

600 Veteran Infantry = 0.600 pts x 10 = 3 stands @ 2 points = 6 points.

100 Light Infantry Archers = 0.100 pts x 10 = 1 stand @ 1 point.

300 Elite Cavalry = 0.300 pts x 10 = 1 stand @ 3 points.

200 Regular Light Cavalry = 0.200 pts x 10 = 2 stands @  1 pt = 2 points.

700 Hwicce Infantry = 0.700 pts x 10 = 3 stands of  Infantry @ 2 pts + 1 stand  of skirmishes @ 1 pt = 7 pts.

120 Hwicce Light Infantry Archers = 0.120 x 10 = 1 stand @ 1 point.

150 Tribal Light Cavalry = 0.150 pts x 10 = 1 stand @ 1 point.

500 Gwynedd Militia = 0.500 pts  x 10 = 2 stands of Warriors @ 2 points + 1 stand of Light Archers @ 1 pt = 5 pts.

Arthur @ 2 points.

Owain @ 1 point.

Cadwy  @ 1 point.

Rogatainus @ 1 point.

THE SAXON ARMY; 2,400 =2.400 pts x 10 = 24 points.

Bardulf @ 1 point.

Colgrin @ 1 point.

10 stands of Warrior Infantry @ 2 points = 20 points.

2 stands of Light Archers @ 1 point = 2 points.

After  another hard fight, the Saxons are forced once again to retreat. Arthur issues the same instruction; No pursuit.


Continuing the retreat, Bardulf and Colgrin know that their warriors are close to collapse. The morale of the Briton Army is high and Arthur has their complete loyalty.

The last stand for the  Saxons takes place on the River Wharfe just north of Calcaria. Those that are left lock shields knowing that this could be their last battle. Away to the south is the ruined town that had been the first to be ravaged by the Seaxon army some weeks previous.

As before, Arthur's army appears from the west and advances toward the Saxon position. The cavalry ford the river Wharfe on either flank. As they engage the Seaxons, Arthur's infantry enter the fray.

BATTLE OF THE RIVER WHARFE, GWYNEDD JUNE 486 AD, ( 4th battle).


THE BRITON ARMY; 2,500 = 2.500 pts x 10 = 25 points.

400 Veteran Infantry = 0.400 pts x 10 = 2 stands @ 2 points = 4 points.

90 Light Infantry Archers = 0.090 pts x 10 =1 stand @ 1 point.

250 Elite Cavalry = 0.250 pts x 10 = 1 stand @ 2 points.

150 Regular Light Cavalry = 0.150 pts x10  = 1 stand @ 1 point.

600 Hwicce Infantry= 0.600 x 10 =3 stands @ 2 points = 6 points.

100 Hwicce Light Infantry Archers = 0.100 x 10 = 1 stand @ 1 point..

100 Tribal Light Cavalry = 0.100 x 10 = 1 stand @ 1 point.

300 Gwynedd Militia Infantry = 0.300 x 10 =3 stands @ 1 point = 3 points.

Arthur  @ 3 points.

Owain @1 point.

Cadwy @ 1 point.

Rogatainus @ 1 point.

THE SAXON ARMY; 1,800 = 1.800 pts x10 = 18 POINTS.

Bardulf @ 1 point.

Colgrin @ 1 point.

2 stands of Light Infantry Archers @ 1 point = 2 points.

7 stands of Warrior Infantry @ 2 points = 14 points.


This battle was the death knell of the Saxon army. Some gather to fight to the last, others collapse and cannot put up any resistance. Only a few make it back to Eboricum and into Linnius ( Lindsey). Arthur's victory is complete.


As he rides amongst his men,they clash their weapons and hail Arthur as " Imperator".


Historical Note:

Nennius tells us that Arthur fought a battle at the river Dubglas in the region of Linnius. many modern authors have interpreted this as the river Douglas and Linnius as the area of Lindsey north of the Humber estuary and east of the river Ouse.

While looking into this I read that 'DUBGLAS' means ' dark water '. Dark water is caused by minerals or extreme vegetation in a river. the Romans did a lot of mining in the Pennines and some of the area was heavily forested. which may well have turned some of the rivers dark.

It is roughly 84 miles between the river Douglas and Lindsey so why would Nennius mention the two places and one battle?. There are a number of rivers running roughly from north-west to south-east through the Pennines [ see main map above ].

 A Roman road [ number 712 on the Margary listing. ] runs along the route. My thinking is that the Saxons would have followed this in their retreat.

Is there a possibility Nennius made a slight mistake?Could he have meant ' The Dark Waters ' as many rivers rather than just one?.  If so, then , the description makes sense.

 Arthur fought a " running battle " against the Saxons across a number of river valleys  which eventually pushed them back across the Ouse into Linnius [ Lindsey ].

According to Google, it takes approximately 24 hours to walk from the river Douglas to York [ Eboricum ] so, splitting that 24 hours into 6 hour segments you could have a four day running battle.

I realise my methodology could be flawed, but, I hope my depiction of the situation sounds plausable.

Also, if the river TRENT and the OUSE marked the frontline or border of a reduced ROMANO-BRITISH Province as some historians have suggested, and Arthur,s battles were defensive in nature, then there is good reason for Arthur to be campaigning in the area.

This is battles 2,3,4 and 5 of Arthurs story.

CREDITS;

The figures are mostly from Hat Industries 1/72nd range [ ' The GOTHS' and ROMAN MEDIUM INFANTRY.  Also ROMAN LIGHT CAVALRY ]. Some of the figures are Newline Designs metal 20mm figures.

Nearly all the standards are painted by myself as are the shields. Arthur,s main flag and standard are from transfers from Little Big Man Studios. The flag poles are made from the Spear and Javelin sets sold by Northstar Miniatures as are some of the weapons.

The shields on Arthurs infantry are from Magister Militum [ 10mm round shields ]

The waggons are scratch built and the oxen are from Caesar Miniatures Roman Train. The waggon loads are by Bauda.

Refighting the Battles;

  The numbers I thought might be available to Arthur is my own estimation bearing in mind that Arthur was not a native Royal or related directly to any major family group.His position as almost that of a Foederati Roman General. 

I used current immigration records to try and work out how many Jutes, Angles and Saxons might have crossed the channel and from that, how many warriors might have been available for military service. Slightly unethical I know but I used these numbers in conjunction with the information from Illka Sylvannes book about Arthur.

For the wargamer, this series of battles could be turned into a mini campaign.

The first battle could be played with all the figures available to the players. The next battles are played with the surviving figures of the previous battles.

Terrain;

The hill are a mixture of pre-made by Brian of Essex Miniatures and sections of garden kneeling pads purchased from Wilkinson,s. some of the woodland marker bases were made by S and A scenics. The trees are made by various manufacturers. the river and road were cut from thin cardboard. The bridge is scratchbuilt.

Arthurs fight is far from over, as more Seaxons are arriving on the east coast of Brittania. There is also also renewed raiding from the Dal and the Picts.